Raiding the larder of ideas.

What one family eats, plans to eat, dreams of eating. Plus, other food and kitchen-related stuff from the home of steak-and-potatoes, pie and fresh green beans from the garden.

Monday, October 08, 2012

Moo's Potato & Eggplant Curry Thingy

Some years back, my seester (with whom the rest of us – being obnoxious siblings – saddled an unflattering and singularly inapt nick-name) was on a tight budget & was heading toward becoming a vegetarian as a result.  We swapped a few ideas for how to salvage ramen noodles, of course, and did a lot of other odds and ends in her kitchen, including giving me the opportunity to discover a few more of my allergies while broadening our culinary horizons.

She's become more fiscally sound, since then, and also become more protein-focused, but I've kept the one recipe from those hard times that actually made me feel that being broke and meatless wasn't quite a fate worse than death.

The first time my seester fixed this for us, it was in her apartment in Philadelphia, on one of those trips to visit I could barely afford to take, and she could barely afford to host me, but… well… she's my seester.  Just sitting around and talking with her is an awesome way to spend a week.  Food is a bonus.

So, there we were, in her tiny kitchen, with her wok and her cutting board on her tiny drop-leaf table from Ikea, going all teamwork-y on this sumptuous feast of curry on rice.  I can still see the steam on her glasses as she checked the taters' tenderness…

Now, it's your turn to steam up your own glasses, or smoke your tastebuds, or whatever.

CurryFavor Moo's Potato & Eggplant Curry Thingy

Ingredients:

5 large potatoes (about 2 1/2 lbs), peeled & cubed about 1/2" to 1"
2 medium eggplants (about 2 lbs total)
plenty of table salt
1/2 cup butter
1 tsp each: ground ginger, turmeric, cumin seeds,
1 tsp black mustard seeds
1 1/2 tsp salt
1/2 tsp each: cayenne pepper, cinnamon, and coriander
2 cloves fresh garlic, pressed or crushed
2 1/2 c. water
2/3 c. cooked or fresh peas (if frozen, thaw under hot water until just above room temp)
2 medium sweet bell peppers, cut into 1/2 inch squares
1 c. plain yogurt (I use Greek style)
4-6 cups cooked rice

Directions:

Peel eggplant, slice into 1/2 inch thicknesses.  Salt both sides of each slice, let stand on rack or paper towels about 1/2 hour.  Using fresh paper towels, press out liquids. Cut into cubes.

Peel & cut potatoes.

Melt butter in wok or large frying pan at medium-high heat. Add black mustard seed.  When they have mostly popped, add other spices and garlic. Brown slightly, then add potatoes, mixing thoroughly to cover the potatoes with spice mixture.  Let potatoes brown, then stir in eggplant.

Add water, allow to simmer uncovered 20-25 minutes stirring occasionally, until potatoes are tender.

While that is cooking, clean & cut peppers.

Remove wok from heat.

Add peppers and peas, allow to warm up. Add yogurt to taste (you may instead decide to have individuals add this as it is served).  Serve on rice.

Feeds 4-6.

Update, 13 January, 2013: in a fit of cabin fever, I decided to make this no matter what ingredients I had in the house. I lacked cumin seeds and cayenne pepper, so I adjusted to approximately 3/4 tsp, ground cumin, added saffron instead of turmeric, and minced five small serrano peppers (about 2 Tbs) instead of using the cayenne. The bell peppers I had were sweet red peppers, so, again, I made do. It came out very nicely, if I do say so, myself. The red peppers perked up the look tremendously, and the whole dish seemed just a little fresher than the last time I'd fixed it.

Tuesday, September 11, 2012

Extra-Special Chocolate Chip Cookies

The Bat says this recipe is a variation on one she found on a bag of chocolate chips, but it wasn't the Toll House recipe.  I don't rightly know… sometimes she likes pulling my poor, twisted and abused leg.  But any way you look at it, most recipes you find on bags of chocolate chips don't make a whopping 5 dozen heaping-tablespoons-of-dough cookies.  They seem to think the average American family will never have teen-aged boys, so they provide you with enough dough to make a couple dozen "modest" cookies.  You know, the kind that pass as a single serving when you ask official dietitians. When you ask mothers, though, a serving is whatever size will fill a young mouth so no sass can come out of it for the moment.

So, my mother made these cookies.  Or, rather, she made the dough and some cookies. We lived dangerously, back then, and nobody died from raw dough in the digestive tract. If, on the other hand, you worry about that sort of thing, feel free to make a substitution of pasteurized liquid egg white where the recipe calls for eggs.  Or, live life for the moment.

Either way, bake yourself a batch of the best chocolate chip cookies I ever had.  In theory, the recipe makes 5 dozen MONSTER cookies.  In our reckless house, I've never seen the dough left alone long enough to get the whole thing into the oven, but maybe you'll have some luck with that.

Extra-Special Chocolate Chip Cookies

Ingredients:

2 1/2 cups shortening* (do NOT use cooking oil)
2 cups brown sugar
2  cups granulated sugar
6 large or jumbo eggs
2 Tablespoons vanilla
2 teaspoons salt

7 cups sifted all-purpose flour
2 teaspoons baking powder
2 teaspoons baking soda

5 cups semi-sweet chocolate chips, chocolate chunks, or Heath Bits O'Brickle
3 cups coarsely chopped pecans (optional)

Directions:

Preheat oven to 375º F.

With mixer, cream shortening and sugar until very fluffy (about 5 minutes).  Add eggs, one at a time, beating thoroughly. Add vanilla and salt.

In another bowl, sift together flour, baking powder and soda. Add to creamed mixture and stir until completely mixed.

Add in chips and nuts.

Drop by heaping TABLESPOONS onto ungreased cookie sheet.

Bake 12-15 minutes, or until beginning to turn golden-brown on top.

[This dough may be formed into balls or tubes and frozen for up to five months.]


*Mom uses butter, & leaves them slightly undercooked by setting the oven at 350º F, to make soft, gooey, extra-tasty cookies. 

Saturday, September 01, 2012

Sailing into the next birthday cake

Photobucket


My young friend turned ten years old, this month.  This put me at that awkward stage, where I had to choose between making a cake that is strictly for show, or one that has exceptional flavors to reflect the exceptional nature of the young lady in question.  As it stands, I was tasked with preparing the cake for a party with her schoolmates, as well as a second one for just us extended family-types.  Therefore, I made both types.

This, however, is the tale of the building of a visual work (oh, I won't make it bland to the tongue, either. Let's get serious, shall we?), and how you, too can do the same, if you are foolish enough to go this crazy.

So, the first stage is actually to make a white or yellow cake into a lemonade cake.  If you have a favorite recipe, please use your own.  For me, I cheat and start with an affordable mix into which I add a half-cup of Greek-style yogurt, the juice of one medium lemon plus the finely-grated rind of that same lemon (using that much less water for the mix.  It usually adds up to about 1/4 cup difference).  I also have a 6-oz can of frozen lemonade mix (thawed), plus 2/3 cup of powdered sugar.  Bake the cake in  1 9-inch square cake pan left in oven at a slight angle (so the cake will come out slightly thicker at one end), plus a standard 8x4-inch loaf pan, using the baking instructions for your recipe or mix. Remove from oven, let it cool, remove from the pan & place on large platter or plastic-lined cookie sheet.  Take a long-tined fork & pierce the cake every half-inch or so (you will likely need to wipe the fork occasionally with wet cloth to de-stickify it).  When you've covered the cake with holes, mix the thawed lemonade with the powdered sugar & slowly pour the mixture over the entire cake, allowing the cake to absorb it all.  What spills over onto the plastic, feel free to scoop up with a spoon and drizzle once more over the top of the cake.

Now, pop that in the freezer until you're ready for the next stage.

(click on any image to embiggen)


Stage two involves cutting and crumb-coating the cake.

Birthday cake: Crumb layer, One loaf of lemonade cake, triangles sliced off right end, reversed & added to left. One 8" square, (baked slightly off-level), 2" cut from left (shallow) end, stacked on right, cut to a slight curve. All held together with frosting. Coated w/ layer of frosting to seal crumbs in. Returned to freezer.
(click to embiggen)

For this, you will need a nice, long, non-serrated knife (at least 10-inch blade is ideal).

Beginning with the loaf cake (and while still frozen), measure halfway up each side, mark it, and then, at one end, cut the diagonal from center mark to center mark to make an uneven pentagon (imagine you're cutting a kid's-style house).  Take the triangles you've cut off, reverse them, and let them snuggle up against the lower half-walls, turning it into a big triangle. Shave off a little from the sides to create a slight curve, for the prow of the ship.

On the square cake, put the thicker side near the big triangle. Slice off about 2 inches from the shallow end, lay the cut-off section on top of the thicker portion of the cake, and shave  to create a curve across the top of the cake.  This is the book-end.  All these parts must now be stuck together with frosting (I used a plain white store-bought tub to which I added plenty of lemon extract to my preference, because I know the girls who will be eating this cake like zippy lemony zing, too).

Send it back into the freezer to firm up a few hours, or until you are ready for stage three.

Stage three: finish frosting the cake. The ship end needs brown frosting colors, to make the wooden ship boards. The book end, of course, will need no color added to the white frosting, but you may want to pipe some color around the base, to represent the book cover.
 
PhotobucketBow and book, Boards sketched onto the frosting with Wilton's gel food coloring.  Edible sugar paper stripes applied to book page.Stage four is preliminary decorations. The ship's figurehead and rails can be shaped from fondant (don't forget to add a little lemon extract to that, too!) (I also added some ballusters to the rails by rolling little balls  attaching them with drops of water ever couple of inches along the rails).

If you lack the appropriate color of fondant, you can add gel food coloring to it.  Professionals usually have gloves for the kneading process, but I find as long as the quantities you need are about the size of a large candy bar, you can put it in a sturdy sandwich bag to work the color in.


Next, you'll want a sheet of edible paper, cut in half crosswise (available anywhere Wilton's cake supplies are sold) of a simple, small pattern such as stripes or stars.  One half will be used for the top page of the book,

Top of the page, Stripes: Edible (sugar) paper.  Text: "VOYAGE OF THE" in gel food color. Ship's boards sketched with gel food color.
and the other for the sail.

If you want more detail, use a toothpick or thin skewer for detailing ship's boards and sides of book, delicately drawing frosting color in lines to give wood grain and to imply many pages.

You will want to allow this to rest on a sturdy cardboard sheet cut to its precise dimensions, plus enough on the "book" end for gripping, coated with foil or plastic.


Stage Five will require these ingredients:

Eight (8) boxes of blue Jell-O (or lime flavored with many drops of blue food coloring)
Lots of gummi  candy fish (you can probably get by with a single 3-oz bag)
Candy stars

Line a large jelly-roll pan (a cookie sheet with upright sides) with foil which is then lightly greased. Make first batch of gelatin according to instructions for "knox blox" or Jell-O Jigglers, using four boxes Jell-O, and two cups boiling water.   Pour the gelatin mixture into the pan, arrange the fish & stars upside-down on top.  Try to avoid getting fish near the edges.

The deep blue sea, stag one

Make second batch of Jigglers, using remaining four boxes of Jell-O, pour over fish & stars, then allow to cool & firm up (at least 3 hours).  You should know, the fish get a little slippery when they are moistened or heated, so handling this as it cools may become a little tricky.

On a second large (flat, no raised sides) cookie sheet, apply a layer of foil. Tape in position. If you have  one, arrange a string of battery-powered LED star lights or fairy lights in a semi-random pattern. Tape to foil. Cover with cling plastic wrap.

Then flip jigglers over, onto the plastic sheet, completely covering the lights.  With a dull knife (or even your skewer) trim away excess, making room for cake to fit into a gap in it.  (If you want, you can pop the scraps into the microwave until they're melted more than a bit, then whip them up to make sea foam, but I decided I'd just set the scraps aside for kids to snack on later in the week.

The stars at night…, On top of a large cookie sheet: Battery-powered LED fairy star lights (I bought these at Christmas time at a Target store) between a layer of foil & a layer of plastic wrap (taped the stars down before applying plastic). The "sea" then got flipped over, foil peeled away, lights turned on for test run (we needed batteries).

The last stage is final assembly.  You will probably need to do this at the table or counter where it is to be carved and served.  In other words, you may wish to direct the guest of honor & other guests into another room, perhaps for the opening of gifts, or to play a game or two.  

Slide the cake into the gap in the Jell-O before adding final decorations.  


Cake assembled 1

For the mast, you will need: 1 long pretzel stick (8 inches, at least) or, if you can't find that, a hard candy stick will suffice, I chose the pretzel stick because I enjoy the juxtaposition of flavors among the sweet/tart/salty. Also, it looks a little like a well-seasoned mast to a ship... which is the point.  The remaining half of the edible paper can be attached to the mast at the last minute, as a sail, using dabs of leftover frosting.  If you want to assemble earlier, you may want to make a spar to support the sail upon its yardarms, by extremely carefully shaving a pretzel in half, or by just adding an inedible part, like a mid-sized bamboo skewer (I drilled a pair of skewers through the pretzel, then just taped the plastic sheet of edible paper to the skewers, so they could cut up the plastic later & lick the sugar off). 

Once you've attached the sail to the mast, allow to set up for a minute or two. 

Meanwhile, set the rails & the figurehead
  Photobucket  onto the ship's bow, securing them to each other with a scant  drop of water.  

Insert the base of the mast into the ship portion of the cake, about mid-point. 
Photobucket

Finally, insert the candles into the Jell-O,
  Cake assembled 2 
turn on the star lights,

Photobucket and light the candles.

Photobucket


Cut it into a zillion pieces
  Photobucket 
and serve with lemon sherbet* or ice cream and let the kids sprinkle lots of candy stars over it all.


* See simple homemade sherbet recipe here.

Lazy Vegan's Lemon Sherbet

Many of my friends and I are a bit on the lactose intolerant side, and with other allergies, to boot.  Several other friends are vegans or vegetarians.  This  does, on occasion, make cooking for the gang a bit challenging.  However, I did find a dessert everybody seems to be happy with – including the lazy chef!

Technically, it's neither sherbet nor sorbet nor ice cream nor gelato... well, it comes close to a gelato, if you go by the literal translation, which simply means "frozen".  But there's no egg, no milk, no cream, no fuss.  There is only a half a large can of frozen lemonade mix and two cans of coconut milk.  That's it.  No more.

I made a couple of batches of this yesterday, with the help of my ten-year-old friend, and she agreed it was not only easy, but tasty as heck.  Fair warning, though, coconut milk is not cheap. Two batches means two cans, currently at $3.98 apiece, so the double batch I made ended up being about $16 per half gallon.  Still, it's worth it, once in a while.

The sherbet goes like this:

Lazy Vegan's Lemon Sherbet

Ingredients:

2 cans (approx. 14 ounces each) fine quality coconut milk
1 cup frozen lemonade concentrate, thawed

Directions: 

Shake cans of coconut milk thoroughly before opening.  In a medium bowl, whisk together all ingredients.  Allow to chill in refrigerator about 15 minutes.  Pour into ice cream freezer, chill as your freezer directs, until the consistency of a very thick milkshake.  Put into its own container, place in deepfreeze.


See, now, wasn't that easy?

If you don't have an ice cream freezer, you can put it into the deepfreeze, then, every 15 minutes to half hour, take it out, stir it, until it becomes too thick to stir, then store until serving.

If it has been freezing longer than an hour or two, you will need to allow it to sit out for about 15 minutes before trying to serve, unless you cheat.*


* For the adult version, I like adding a couple tablespoons of light rum.  It doesn't make much of a difference in the flavor, but it does make it a little bit of soft-serve consistency. 

Tuesday, August 21, 2012

Frozen Custard "Ice Cream" To Warm Your Bones

I like making ice cream.  I admit it.  In fact, I like making it almost as much as I like eating it. Of course, I'm not big on sharing, either, which could very well explain much of what you see, if you meet me. Any way you look at it, though, ice cream is one of my favorite things in modern life, and homemade always beats others.

These days, I live far enough away from a source of pasteurized eggs, though, that I've had to resort to making frozen custard, instead. (In case you're wondering if that's a non-sequitur, it isn't. The best real ice cream recipe I ever came across has raw eggs in the finished product.)

So, not wanting to risk salmonella or worse, I found a few different frozen custard recipes, and tried them all out. Some are more complex and sophisticated than others, of course. After experimenting with about a dozen of the likeliest, I finally settled on one as being simple enough to prepare with the help of younger kids, and tasty enough that you don't notice the shortcuts too much.

When you make it with kids, though, you have to leave out one of my favorite parts – the bone-warmer.  I like adding a spot of liquor to the mixture, partly for the flavor, partly for the softening effect on the dessert (alcohol lowers the freezing point, so you end up with soft-serve, if you add enough). If you don't have any good liquor on hand, though, all you need to do is take the container of ice cream out of the freezer about 10-15 minutes before serving, to allow it softening time.

Frozen Custard

Ingredients:

1 1/2 cups whipping cream
6 egg yolks
1 14-ounce can sweetened condensed milk
1/2 cup unsweetened cherry juice
up to 1/2 cup bourbon (optional)

Directions:

1.  Pour cream into the top of a double boiler over medium heat, stirring occasionally.

2.  In a small bowl, whisk egg yolks until well- scrambled.

3.  When cream comes to a simmer (do NOT allow to boil), add into egg yolks VERY SLOWLY while constantly whisking. You don't want to dump too much hot cream into the egg too quickly, or it will cook & curdle the eggs.

4.  Once the eggs and cream have been thoroughly mixed, return them to the double boiler.  Stir constantly with whisk or wooden spoon, until the custard becomes noticeably thickened. Remove from heat, pour through sieve into a medium-sized bowl, and allow to cool a few minutes.

5.  Add the sweetened, condensed milk and cherry juice. Mix well.

6.  Refrigerate at least 4 hours (overnight is good).

7.  Follow your ice cream freezer's instructions on how to freeze this mixture properly.  If you wish to add alcohol to the custard, wait until the freezing process is nearly finished, and mix it in completely.  To simply keep the custard from becoming too hard to scoop, add only a tablespoon or two.  To make it strictly adult, add no more than a half-cup, as any more than that will keep it completely liquid.  A half-cup of any standard liquor will make your ice cream soft-serve, as it is.

8.  Put in separate, covered container in refrigerator freezer or deep freeze.

Variations:

Instead of cherry juice, try key lime juice, or strained orange juice, or another favorite unsweetened fruit juice.  In the final stages of freezing, you might also add some chopped fruit,  swirl in  a half-cup of your favorite fruit preserves, or, instead of using fruit juice, add some dark chocolate syrup and powdered malt,  then add swirls of fudge syrup in the final stage.

For liquored-up variations: 

My latest is to cover 1/3 cup dried tart (unsweetened) cherries in honey-infused whisky, and let chill overnight. Strain the cherries & mix the liquid with regular whisky to bring it to 1/3 cup for final stages, finally stirring the cherries into the mix right before going into the deepfreeze.

Daiquiri ice cream: switch out key lime juice for the cherry juice, and use rum instead of bourbon.

Mojito: key lime juice, then muddle some fresh mint into the rum before adding (or use a drop or two of mint essential oil).

Margarita: key lime juice, 3 tbs triple sec and fill the rest of 1/2 cup with tequila. Serve with a sprinkling of sea salt and a wedge of fresh lime or lemon. (fresh, strained orange juice may be substituted for triple sec).

Tequila Sunrise: Divide custard in halves after adding sweetened condensed milk. In one half, mix 1/4 cup pulp-free orange juice.  In other, mix 1/4 cup pomegranate juice or 1/4 cup grenadine. Chill.  Freeze separately, adding tequila (plus 1/4  cup halved - or coarsely chopped- maraschino cherries into the pomegranate/grenadine mixture, if you wish). Store either in one container, side-by-side or in separate containers, to mix upon serving.

Go ahead.  Play a little.

Saturday, May 12, 2012

Giant Ice Cream Sandwich

I'm assembling a birthday cake, again, today.   Instead of the light and fluffy cake, though, I'm going for decadent chocolate upon chocolate with ice cream swirled with chocolate.... for the start of it all, I dug out the recipe again for the Brownies that Justify Government-Paid Prices, doubled it, and baked it all up in a greased, dusted-with-cocoa-powder large roasting pan (14x20x2").

Meanwhile, I pulled out a half-gallon of good vanilla ice cream, let it soften up a little, and scooped out balls of it to fill a 9x13x2" baking pan which I had lined with plastic wrap.  Over the balls of ice cream I drizzled slightly warmed fudge sauce and white chocolate sauce, put another sheet of plastic over the surface, and pressed it all down to compact it back into a large sheet of swirled, chilled dessert.  I popped it back into the deepfreeze to firm back up.  After the brownies cooled and the ice cream hardened up, the brownie came out of the pan in one big piece, to be cut in half and set upon a large board.  From there, you can, I hope, imagine the process of making an ice cream sandwich.  A layer of brownie, a layer of ice cream, and another layer of brownie, and the sandwich is assembled. Serve immediately.

Note: the ice cream should be quite firm, and the brownies MUST be completely cooled (refrigerate, if necessary, before assembly).  Otherwise, what you will get is two layers of soggy brownies in a pool of milkshake.


Serve with more fudge sauce, real whipped cream, plus your favorite fresh berries (we are offering up a variety: raspberries, strawberries, blueberries, and also, for the heck of it, dried Montmorency cherries).

Tuesday, May 01, 2012

And, a chocolate pavlova


 This part of my birthday "cake" was offered with a pile of chocolate fudge syrup, whipped cream, and a variety of fruits, as well.  The recipe makes a slightly denser, chocolatey meringue than many are used to eating, but still kicks hindquarters.  

Chocolate meringue for pavlova

Ingredients:
4 large egg whites, at room temperature
1/4 c. dark-brown sugar
2/3 c. Splenda sugar substitute or 3/4 c. castor (extra fine) sugar
pinch salt
1/2 tsp. pure vanilla extract
2 1/2 Tbs. good Dutch-process cocoa powder

Toppings:
Your favorite fudge sauce, whipped cream, fresh fruits such as strawberries, peaches, kiwi, etc.

Directions:
Preheat oven to 300º F.  Line a cookie sheet with parchment.  On the back side of parchment, draw 8-inch circle, turn parchment over so ink (or pencil) side is down.  

In a double-boiler or mixer bowl set over pan of simmering water, mix egg whites, sugar, Splenda (or fine sugar), and salt.  Whisk constantly until sugars have dissolved and mixture is warm (about 3 minutes).  Remove from heat, and with mixer, whisk until stiff peaks form.  Mix in vanilla.

Sift cocoa powder over top of meringue, fold in gently until streaks are almost all gone. Spread meringue onto parchment into a round, with circle as guide (it will spread slightly past that as it cooks), building a slight well into the center. 

Bake until dry to the touch, about 65 minutes.  Allow to cool in oven or on wire rack.  Serve THAT DAY.  This meringue's crust will stay crisp for only 6 to 8 hours, depending on humidity of kitchen.

Un-birthday un-cake: Pavlovas

This year, my birthday came and went the way I like for it to do: quietly, peacefully, and without most people making note of it.  Family were far away, and I was not answering my phone, due to a combination of allergies and a nasty tooth problem having only recently been surgically resolved.  I liked just kicking back & playing with my online pals, while watching Mark Harmon on my little hdtv.

However, once my parents had returned from their trip, there was a sense that we needed to observe both my birthday and the Bat's, inviting our local extended non-blood family to dinner and dessert.  We went all picnic-y and grilled some chicken, served up potato salad, and somebody brought corn on the cob... for all that it wasn't local, & seemed out-of-season, that was really very good.

Anyway, when it came time for dessert, those who know our family were prepared for the fact that we generally don't have cakes, for ourselves.  I make lots of them for other people, but we here are pie folk.  And, while I didn't feel like rolling out crusts, I also wasn't in the mood for "store-boughten" pie dough, either.  In fact, I'd read about a thing called a Pavlova, and thought I'd give it a try.

Now, a Pavlova has a somewhat clouded history -- both Australia and New Zealand lay claim to having served the first, in honor of prima ballerina Anna Pavlova's tour of the lands down under.  It was supposed to be light as a feather, just as her dancing was.

Regardless of whose land gave birth to the treat, a meringue is an awesome way to elevate a bowl of fruit...  The Bat and I had readied sliced strawberries for everybody but me (allergies), and some Kiwi fruit, some lemon curd, fudge sauce, white chocolate sauce, whipped cream (the real stuff), and some good company, any one of which is fine, but assemble them all, and you have a mess of happy trouble.

And I had made three pavlovas, as experiment.

One thing I learned: I like Splenda (or a reasonable facsimile thereof) in my kitchen.

When you're making meringues of any sort, the trickiest part is really to get the sugars to dissolve smoothly in the egg white.  Many recipes call for the use of castor sugar, or, in plain parlance, superfine granulated sugar.  If you don't have easy access to that, because you live out in the boonies, a half-day drive from a decent baking goods supplier, you can take your regular granulated sugar and put it through a food processor/blender for anywhere up to five minutes per cup, depending upon the capabilities of your machine.  

Don't do that unless you have to prepare your pavlovas more than eight hours in advance.  Skip the sugar and go for the sucralose/maltodextrin stuff (if you can find some with probiotic additives, so much the better).  It dissolves nicely and performs well in the end, as well.  You just have to go by volume, and not weight, when you measure. And, remember, the artificial stuff is slightly sweeter per spoonful than is natural sugar.

Anyway, here's my (slightly lopsided, but nobody complained) pavlova:


Simple pavlova

Ingredients: 
4 large egg whites, allowed to come to room temperature
1 c. minus 1 Tablespoon  sugar substitute (or 1 c. extra fine granulated sugar)
1/2 tsp good vanilla extract
1 tsp rice vinegar
1/2 Tbs corn starch

Topping:
Fresh fruit of your choice -- berries, kiwi fruit, peaches, pineapple, or whatever you like (or a nice citrus curd, for an inverted, "crustless" meringue pie)
Whipped cream, lightly sweetened and with vanilla added

Directions: 
Place rack in center of oven.  Preheat oven to 250º F.  Line baking sheet with parchment paper, draw a 7-inch circle on the reverse side of the parchment, then turn parchment back over so ink side is down.

In your clean, dry mixer's bowl (make sure there is no water, oil, or egg yolk in it), using the whisk attachment, beat egg whites on medium until they hold soft peaks.  Set mixer on high, then slowly add in sweetener (take your time, about a tablespoon at a time),  until the meringue forms stiff and shiny peaks.  Add vanilla extract.

Lightly sprinkle vinegar and corn starch over the top of the meringue, then gently fold in with clean rubber spatula. Do not over-mix at this point, or you will reduce the volume and create a rubbery meringue.  Scoop onto parchment on cookie sheet, using spatula to spread it to cover the circle, and making a slight raised edge (create a shallow well structure so it can hold your choice of toppings).

Place on rack in oven, bake 60 to 70 minutes, or, until outside of meringue is dry and beginning to turn a pale golden.  Turn off oven, open the oven door, and allow meringue to cool in place.

When using sugar, the meringue may be stored in a cool, dry, airtight container for a few days, but with the substitute sweetener, its crust has a tendency to soften and become sticky after about 10 hours.

Serve by piling on a great dollop or three of whipped cream, then sprinkling your favorite fruits or other toppings over the whole thing, then serve immediately, so the meringue's crust does not have time to become soggy.

Saturday, March 31, 2012

Out of this world birthday cake

First, we have a seven-year-old boy.  Next, we have his nine-year-old sister who spends one afternoon per week as my art pupil.  Third, both children are practically my niece and nephew.  That's how important their family has been to me and my immediate family.

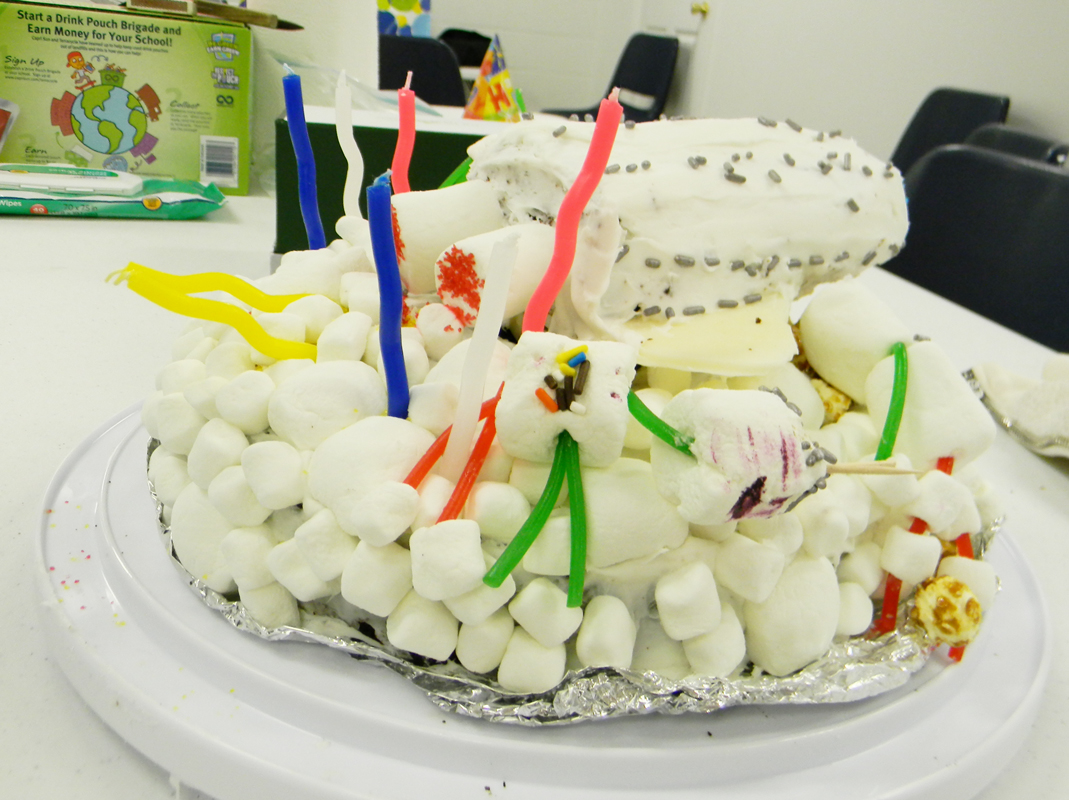
So, naturally, I beg for the opportunity to do the special cakes for their birthdays.  Last year, I built the circus tent cake, followed by the cheeseburger cake.  This year, the first cake was, again, chocolate cake, but with white fluffy whipped frosting and almond bark (aka white chocolate), plus a bazillion other ingredients.

You can see most of the bazillion, here.


The cake is a basic devil's food mix, with a little bit of buttermilk added for moisture and cohesion.  Since the whole thing was going to be fed to a mob of youngsters with undeveloped taste buds, I didn't worry about making a special frosting -- I bought a couple of tubs of whipped white, vanilla-flavored brand-name frosting.  I needed one and a half of them.

The cake was baked in two parts: a half-filled semi-cylinder loaf pan, and a basic tube pan (you could accomplish the same in a bundt pan, but ours needed a little love, so I went straight angel-food-tube pan.  Neither gets filled completely, unless you want to get wild and do a double-batch, in which case, you will have a leftover slab of your loaf cake.  As it was, I had a small section I didn't need for the sculpture, so I set it aside for a later, quiet family moment.
Anyway.  Once the cake was baked, cooled, and removed from the pans, I wrapped it and popped it in the freezer to make it easier to sculpt with.  In the meantime, my star pupil came over to help build the "alien robots" to decorate the cake.  This was done using both regular-sized and mini marshmallows, which were punctured by toothpicks (it helps to wet the toothpick, first), then stitched/pieced together to provide limbs, using Twizzlers® Pull-Aparts in both cherry and green apple (those would be the red and green strings).  Some of the faces were painted on, using a toothpick dipped in food coloring, while others were made sticking colored jimmies into the marshmallow. 

Note:  It's always helpful to have a child's imagination in building alien robots.  The birthday boy's sister has considerable talent, there.
The rocket ship was a little tricky.  Having a section of cake rise from the rest means building a support structure, or your cake will be nothing more than a straight layer.  I melted almond bark in a shallow dish, then dipped the butt end of a tall plastic container into it at an angle, to build a parabola (the container was approximately the same diameter as the loaf pan, so that the cake would rest easily inside it when the bark firmed up). When the belly of the rocket was firm enough to remove from its mold, I attached a pair of slim bamboo skewers to the base (using plenty more almond bark), sticking out from the flat back end.  These would be used to anchor the rocket to the rocky planet's surface.

Ah, yes, the rocky surface.  That would be (a) the coating of whipped frosting, followed by (b) a mass of Cracker Jack® popcorn (see pic below).  That's just the front end of the cake.  The back end is also frosted, but is piled with marshmallows (the larger ones were cut in half and stuck on, cut side into the frosting), to represent the cloud of smoke/steam of the rocket's exhaust from takeoff.


But, back to the rocket.  Once the almond bark was fully hardened for the base, and I was confident the skewers would hold the weight, I added wings: more almond bark, poured into a small square mold (actually, the indentation in the top of a plastic container's lid), then cut diagonally with a hot knife.  I attached them with more melted almond bark, placing the structure in the freezer to set up more quickly and firmly.

The round-bottomed loaf was long enough to make two rockets (just in case I was clumsy), so I cut it in half and trimmed away one to make a point, setting it in the almond bark undercarriage and coating it with frosting to make it appear one solid piece of food.  I finished it by adding silver jimmies along "seams", blue decorator sugar for the windshield, and large marshmallows for the jet engines on the back (each having been moistened at the end and lightly coated with red decorator sugar to indicate the engines were hot.  I inserted the skewers at an oblique angle, through the center of the base, then frosted the rest of the cake, then piled on the rocks, smoke, and aliens.

The candles I arranged as though the ones directly behind the jet engines had been blown over.  The advantage, here, is that they're all on the same side of the rocket, so a little boy doesn't have to dance around the cake in order to blow them all out.

Before anybody cut the cake, I helped pull the rocket off the top, and set it aside as the special piece exclusively for the birthday boy.  One of the aliens managed to stay clinging to it, so it will live to see another day.

I didn't need the second half of the loaf in order to make a rocket, so I used the remaining frosting and some jimmies to make a little side cake, just for the heck of it.
I had, actually, planned to tell him that the dog had eaten the big cake, and this was all I had left for him, but he saw the big cake box before I could hide it all away, so... gosh darn it, the joke was spoiled.  Still, he and his friends seemed to enjoy the out-of-this-world cake, piled high with soft ice cream.  I was glad to see he was not disappointed with his cake, this year.

And, since the party was a few days before his actual birthday, he gets his own birthday cake twice in one week.    We all should be so lucky!

I don't know what I'll do next year, though.


Tuesday, March 27, 2012

Fry Bread, for Indian Tacos or other nefarious purposes

Pop and the Bat have taken a couple of vacations to the Southwest, during which times, they have had occasion to sample some of the local chefs' versions of Navajo Fry Bread and Indian Tacos.  The Bat says that, if you ever get out to see the Grand Canyon, the place to stop is Cameron Trading Post... for more than just their awesome eats, but that's a great place to start.  Their fry bread is, to borrow a description from one of the kids in my neighborhood, "monster HUUUUUGE," and awesomely tasty.  

Having sampled this treat as a main dish and a dessert (I get to eat it when I hit the regional Powwows), I have developed a bit of a taste for it, myself, and decided to give it a go in our kitchen, too.    We had our usual Friday company for supper, last week, and served them a variation on that theme...

Now, when most of you fix tacos, you usually use ground meat, upon which you pour a mix of seasons and let it simmer for a few minutes before serving.  We aren't big fans of the flavor of most of those burger-laden varieties, especially when we have a perfectly good half a roast in the refrigerator, having been left over from the night before.   I shaved that up into very thin slices, cut again across the grain, so that I had strips approximately 3 millimeters thick by 1 centimeter wide by 15 centimeters long. I put together a chipotle spiced marinade mix,  the juice of one fresh lime, olive oil and water (proportions are based on the pre-fab marinade mix instructions, but slightly more water)all in a zipper storage bag, and added in the meat, tossing it into the refrigerator for about two hours.  While that steeped in its juices, I finely chopped tomatoes, onions, lettuce (we used romaine), and olives, putting each in its own covered dish in the refrigerator.   I made certain I had refried black beans topped with a sprinkling of shredded cheese (heat before serving), plus a guacamole "ketchup," homemade salsa, and some sour cream (greek-style yogurt with a little lime juice and honey makes a reasonable substitute), all waiting to go on the table. 

Then came time to prep the fry bread.  

Note:  Traditional Navajo fry bread uses powdered milk.  We didn't have any, because nobody much cares for it in our house.  On the other hand, we did have powdered buttermilk, making for an even more decadent version of the classic, while still keeping the calories lower (as if we were worried about this, in a fried food)... we recommend the buttermilk for its sweetness.  We also prefer to cook in lard, but, if you have issues with this, you may substitute Crisco or even cooking oil.  Just know, this will, necessarily, change the flavor.

Fry Bread

Ingredients:2 cups all-purpose flour
1/2 teaspoon table salt
1/4 cup powdered buttermilk
2 teaspoons baking powder
1 cup water
about 2 cups shortening (for frying)
extra flour (to keep the dough from sticking to your hands

Directions:Begin to preheat shortening in a deep fryer, large frying pan, or deep wok, aiming for about 350º F.  You need at least one inch depth to your shortening, so you will need to amend the measurement according to which pot or pan you use.

In a medium bowl, sift together dry ingredients.  Pour the water over the mixture all at once, mixing with whisk or fork until it begins to form one large mass.

Make sure your hands are clean, then flour them well.   Using your hands, gently work the dough in the bowl (do not knead, or the bread will become heavy), until it begins to form a slightly sticky ball.  

Divide the ball of dough into eight (8) equal pieces.  With floured hands, shape a piece of dough into a rough approximation of a six-inch diameter disk (don't worry if it's not exactly round.  This is a fun bread, not some uptight wheel of reason).  Poke a small hole in the center, gently place the flattened piece of dough into the hot oil (to avoid spattering).  

Fry until golden-brown (about 3 minutes or slightly more), then flip it to fry the other side.  The bread will be lumpy.  Do not worry about unevenness, as it's a feature, not a bug.  

Place the fry bread on a paper towel to absorb the excess shortening.  Serve hot.  If you have to set aside, place in 200º F oven for up to 1 hour before serving.

Further note: I am told you can save leftovers in the refrigerator overnight, and revitalize them in a 350º oven, 10 minutes or so.  I have never had enough left over to make this experiment possible.


When it comes time to serve the tacos, there is no folding the fry bread (unless you are overly ambitious).  Treat it as an open-faced sandwich, if you will. Pile on your favorite taco ingredients, slice it up with a knife and eat it with a fork.  Or, make a big mess and enjoy, anyway.

If, on the other hand, you don't want to do tacos, this makes a naughty dessert, as well.  You can dust it with powdered sugar or  cinnamon sugar, drizzle it with honey or fruit syrup/jelly/jam, or pile on your favorite berries/peaches/other tender fruits.  If you haven't tried it this way, but you've been to a county fair somewhere in the Midwest, think of this as a much tastier version of funnel cakes, and treat it as such.  Your tongue will love you, and your hips will resent every bite...