Raiding the larder of ideas.

What one family eats, plans to eat, dreams of eating. Plus, other food and kitchen-related stuff from the home of steak-and-potatoes, pie and fresh green beans from the garden.

Thursday, December 28, 2023

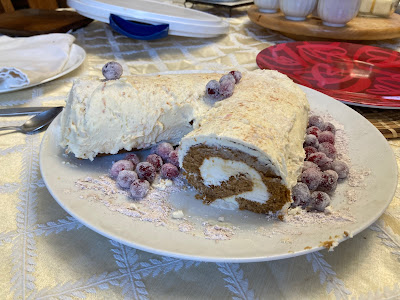
Molasses Sponge Cake Roll with Orange-y Buttercream Frosting

 This year, I anticipated having two separate Christmas dinners, so for each I made a different Bûche de Noël. Since my parents would be enjoying both meals, and I didn't want them to be bored with the Same Stuff, Different Day, two different flavors of cakes were in order.  And since my recipe for white chocolate/orange liqueur mousse is enough to fill two cakes with plenty to spare, I needed to make them both compatible with said filling. The first was a given: chocolate. Been doing it for a decade, now (even during the 2020 shutdown, when I sliced it & shipped it out to everybody in local extended family). 

Cake the second, though, needed to be Christmassy without peppermint or chocolate. My final choice: a variation on Grandma's Molasses Sponge Cake. Clearly, I couldn't use it as written, as their version is baked in a tube (Bundt) pan, & I needed a sheet I could roll. Also, I had to adapt to gluten-free formula, for certain persons who shall remain nameless (wink, wink)…

So here is what I came up with:

Dusted with a little cardamom/cinnamon/powdered sugar, and garnished with sugared cranberries, a Christmas delight


Molasses Sponge Cake

Ingredients:
3/4 cup gluten free 1:1 flour (I now use King Arthur's Measure-for Measure)
1/4 cup corn starch
1/2 teaspoon kosher salt
5 eggs, separated, at room temperature
1/2 cup granulated sugar, divided
1/2 cup molasses
1 Tablespoon finely grated zest of orange or tangerine (I used 3 Cuties)
1 1/2 teaspoons finely grated lemon zest
1 teaspoon lemon juice
1 Tablespoon orange liqueur (Cointreau, Grand Marnier, or other)


Directions:


Line bottom of 15"x 21"x 1" baking pan with greased parchment, also oiling the sides of the pan.

Preheat oven to 325º F, with rack in center.


In a medium bowl, sift or whisk together flour, starch, and salt. Set aside.  In bowl of stand mixer, with paddle, (or with regular beaters) beat egg yolks and 1/4 cup sugar until lemon-colored and fluffy. Gradually add in molasses (you may want to turn off mixer and drizzle in small amounts at a time toward the center, so the beater doesn't spray it all up the sides of the bowl). When all is mixed in, beat this mixture at low speed for another 3 minutes. Stir in zests, lemon juice, and liqueur.

Gradually add in flour mixture, 1/3 of it at a time, until fully incorporated. When all has been added, beat until light and fluffy.

Now for the meringue part of the sponge cake batter:

Scrape out the fluffy batter into the bowl which used to hold the flour mixture and then thoroughly  clean the mixing bowl and whisk attachment, wiping dry and then re-wiping with vinegar-soaked paper towel, or, if you're blessed as I am with 2 stand mixers, you can get this going on slow at the same time you mix the above...

Making sure you have NO oils in the bowl or on the whisk/beaters for the mixer, beat the egg whites on low until they become slightly foamy. 1or 2 teaspoons at a time, add in the granulated sugar, making sure it mixes in completely and has a chance to dissolve before adding the next portion. Continue to whip on medium until soft peaks can be formed.

Add 1/4 of meringue to bowl of batter, stir to "lighten" the latter. Then add the batter to the remaining meringue, folding just until no streaks of white can be seen in the batter. Pour into baking sheet, smooth the surface, and tap the pan on tabletop or countertop to force any large bubbles up and out.

Bake at 325º F for 20 minutes, or until toothpick inserted into center comes out clean, and/or surface of cake springs back at slight pressure of fingertip.

If you're making a roll cake, allow to cool about 5 minutes. In the meantime, lightly dust top of cake with corn starch, flour, or cocoa powder, lay a clean kitchen towel over it, and set a cooling rack over that. When the cake has just cooled just enough for you to handle it, flip the whole thing, remove the pan, peel away the parchment from the cake bottom, and letting the excess towel cushion the core, start rolling it along the lengthwise edge (unless you want a BIG FAT Yule log, in which case you roll it crosswise).

Seal the cake roll (towel and all) in plastic wrap and allow to rest several hours or overnight.

Make the filling just before you're ready to use it, and, once the cake is filled, allow to freeze for at least 3 hours (or overnight) before trying to frost it.

My choice of frosting, for just about any cake, is buttercream. For this cake, it cried out for oranges, of course.  And so, decadent orange-y buttercream is born

Orangey Buttercream Frosting

Ingredients:

1/2 cup (1 stick) unsalted butter
3 1/2 cups confectioner's sugar (or more, if needed)
1/2 teaspoon vanilla extract
2 Tablespoons orange liqueur (I recommend Cointreau or Grand Marnier)
2 teaspoons orange or tangerine zest, finely grated
2 Tablespoons frozen orange juice concentrate, thawed

Directions:

In stand mixer using paddle attachment, beat together butter, powdered sugar, vanilla, and liqueur until completely mixed. Add zest and orange juice concentrate. Beat until light and fluffy.

Apply to your cake as you see fit (hey, it's buttercream. You can slather it on with a trowel, or you can pipe it on like a dandy). It's just enough to generously cover a single yule log or modestly cover a 12" x18" sheet cake.

This can be kept, covered, in the refrigerator for up to a month, if you can resist dipping into it.


Also, sugared cranberries go really well with this cake combo…
Sunday, December 17, 2023

Zippy Fajita Soup… because why not?


Some of us like fajitas, but aren't supposed to have the tortillas that are usually a major part of the process. In the past, I've dumped my filling on top of a heap of rice (Spanish-style or just plain), but December weather being what it is, this week soup seemed to be in order.

Therefore:

Fajita Soup

Ingredients:

Marinade:
Juice of 1 lime
2 Tablespoons cooking oil
2 teaspoons Worcestershire sauce
1/2 teaspoon sugar

The rest of the stuff:
1 portion of your favorite dry fajita spice mix, divided (like this one, or even pre-packaged from the store)
1 small flank steak (I used a 1-lb portion)
1 red bell pepper, sliced into strips
1 yellow bell pepper, sliced into strips
1 medium onion, sliced into slivers
1 small green bell pepper, diced
1 small leek, diced (optional)
3 cups beef broth
2-3 tablespoons corn starch or other thickener
2 cups sliced (or diced) fresh tomatoes

Optional toppings:
diced avocado
sour cream
shredded or crumbled cheese of choice
salsa
fresh onions or scallions, chopped
fresh cilantro, chopped

Directions:


Score steak, top and bottom, in a diagonal grid pattern. Rub the steak with 1/2 of your spice mix. Place in sealable bag, then pour marinade over it and allow to rest, sealed, at room temperature for at least 30 minutes, but no longer than an hour.

Remove meat from bag, pat dry, and, in the bottom of an oiled heavy-bottomed stock pot or kettle, sear the meat well at high temperature. Remove from heat, allow to rest while you stir-fry your peppers, onions, and leek (if you want it) in the same pan. Reduce temperature to medium low, add remaining spice mix to cover veggies, then remove from pan & set aside.  Pour in 1 cup beef broth to deglaze the pan. In a small bowl, stir together starch and 1/4 cup room-temperature broth until all lumps are gone. Add starch mixture to hot broth in pan, stir until thickened. Add remaining broth, stir until smooth.

Slice the meat into thin strips, cross-grain, then cut into bite-sized pieces and stir into the broth. Add peppers and onions, stir and allow to return to simmer.

A few minutes before serving, stir tomatoes into simmering soup. Remove from heat source.

Top with your preferred additions, serve hot with tortilla chips, Spanish-style rice, and/or flat bread.


Of course, if you're the sort to make fajitas for a large crowd, and you have leftovers, you can use that as a shortcut… You just need be able to add broth and thicken it a little, and, perhaps, add a few more peppers and onions. Either way, adding the fajita seasoning and stir-fried (or grilled) peppers is a great way to pep up an otherwise basic beef soup.

Sunday, August 13, 2023

Picnic Tomorrow? Start a Baked Potato Salad Today!


Picnic food at its best

Inspired by those loaded potato dishes which were all the rage back in the 1980s, baked potato salad is an easy dish, even for beginners.

For the record, this is NOT a low-sodium, low-carb, or low-fat recipe, but when I'm looking for a break from the mayonnaise-y norm (or for a salad which will not spoil quite so quickly if taken to a picnic), this is a mighty fine option. 

Also, I very much recommend making it a day ahead, for two reasons: first is that the ingredients have a better chance of blending into one another for a better, fuller flavor experience, and second is that you can show up at that picnic looking fresh and relaxed, while everyone else is doing all sorts of last-minute stuff and adding sweat to their brows (or whatever else). You can smugly avoid that summer "glow", and still present a fine dish, to the envy of all.


Baked Potato Salad

Ingredients: 

Salad:
about 2 1/2 lbs small red potatoes
cooking oil
kosher salt

1/2 cup bacon bits or diced ham, fried until crisp, any grease drained and blotted away

1 cup diced celery
1/4 cup coarsely grated sharp cheddar cheese


Dressing:
1/2 cup sour cream 
1 Tablespoon dill weed (less, if fresh)
2-3 Tablespoons chopped chives
1/4 cup buttermilk or regular milk
1 teaspoon granulated tomato bouillon (chicken flavor is a reasonable alternative)

Directions:

Heat oven to 400º F.
Thoroughly wash and dry potatoes. Generously coat with cooking oil and plenty of salt, placing them on a baking sheet, at least 1/2 inch between them. Bake until tender (about 40 – 50 minutes, depending upon their size). Allow to cool completely.

While potatoes are cooking, mix up the dressing and store in refrigerator.

Cut cold potatoes into bite-sized chunks, placing them in a large mixing bowl.

Stir in remaining ingredients and dressing.

Allow to rest, covered, in refrigerator at least an hour – or overnight – before serving cold.

Notes:
If you're not a fan of tater skins, you can always peel the little guys after they've cooled, but that will take away some of the best of the flavor. Plus, it's a lot of work. This is supposed to be an easy salad.

Also, in the above photo, I used a mixture of crisp deli ham and non-fried bits, for a little visual variety. One can also add fresh diced peppers (sweet or hot), capers, or whatever else one recalls enjoying on baked spuds. Red bell pepper pieces might give it a perkier color, but some in my family don't much care for the after-effects of peppers…


Tuesday, August 08, 2023

Pulled Pork Salad

 I've noticed that, these days, prices for poultry are often similar to those of  centuries ago, when the height of political luxury was the promise of "a chicken in every pot". For those of us who look for the least expensive option when we can, pork is back as a chicken substitute… but that looks like (ewww) work. Also, right now it's August, so pretty darned hot, so frying stuff just makes a girl sweaty (sweatier). So go ahead, fetch out the slow cooker, get the cheapest pork roast you can find, set it in a little bit of broth, and let the thing slow-simmer until it's tender enough to pull apart with a fork.  Then remove it from the liquid, slice it into slabs, and get it to the table before everyone riots from hunger, letting people apply their own preferred BBQ sauces, if they wish.

Or, if you're like my household, eat half the roast for dinner and save the other half to make this salad later in the week. The salad is plain, simple, and adaptable to your tastes, just like chicken salad, tuna salad, etc.  The secret is usually in the dressing.


Pulled Pork Salad

Ingredients:

 
2 cups chilled roasted pork, sliced thickly and pulled into shreds with a fork
1/3 cup diced celery
1/3 cup fresh peas (or frozen peas, thawed)
1/4 cup minced sweet onion
1/3 cup good mayonnaise (I like Duke's)
1/4 cup (or more, if you like) stone ground mustard
1 Tablespoon apple cider or 3 Tbs finely-grated apple
Salt and pepper to taste

Directions:

In a small mixing bowl, combine mayonnaise, mustard, vinegar, salt & pepper. In medium mixing bowl, combine shredded pork, celery, peas, and onion. Stir in dressing.

Serve chilled on your favorite greens or as a sandwich filler.


Just call me Pork Salad Annie…


Monday, June 19, 2023

Simple Sour Cream Dill Dip (the kind Pop prefers)

 I know most recipes call for a blend of mayonnaise and sour cream along with whatever seasonings and additives one wants (it's the way even The Bat learned to make it, after all), but Pop never actually partook of that stuff. It wasn't until I simplified the process to eliminate one of those ingredients which tends to set off my migraines that he started actually snitching my supply of dip. The funny thing is, it sits well on the refrigerator shelf for longer than the stuff with mayo does. And it has only four simple ingredients: sour cream, dill weed, milk, and bouillon powder (it's my go-to cheat ingredient – depending on my mood & what I'm serving with it, I'll use chicken, shrimp, or simple tomato flavoring).

Simple Dill Dip

Ingredients:

1 pint sour cream (you can use lower-fat version if you prefer)
2-3 Tablespoons dill weed (to your preference, as well)
2 teaspoons bouillon powder
1/4 cup milk

Directions:

Mix all the ingredients in a medium-small bowl until smooth. Cover and refrigerate at least one hour to overnight before serving with chips or crudites*


*In our household, we deliberately mispronounce the word as CRUD-ites. Because some people don't like celery sticks.

Sunday, May 28, 2023

Quick and Easy Random Fruit Crisp

The best thing about putting together fruit crisps for dessert is that they're simple and supremely adaptable. All you need is fruit, nuts, sweetener, a little butter, a little binder, and your choice of spices (or none at all).


And, because a fruit crisp can be adapted to whatever ingredients you have on hand, it can easily become not only the go-to dish for emergencies, but the customizable signature dessert for your kitchen, and the guests need never know how simple and easy it is for you to throw together.

The formula is fairly simple: filling and topping, baked in a moderate oven (usually 350º F) until done.


Filling:
3 cups of your favorite pie fruit, such as blueberries, cherries, sliced apples, peaches… you can go with fresh, or drain a couple of cans/jars. If you feel really decadent, add some dried fruit to the mix, too (it'll help absorb any extra juices, as well, so factor that in, if you plan to use a starchy thickener).

2 to 4 tablespoons sugar (or your favorite substitute), to taste

approximately 1/2 teaspoon cinnamon (or somewhat less nutmeg, allspice, or cardamom to your taste)

If you're working with a particularly liquid filling, such as fresh berries or cherries, you may wish to add a tablespoon of corn starch, arrowroot, or instant tapioca as a thickener/binder (your mileage may vary)

3 tablespoons butter or margarine, cold, cut into roughly 1 centimeter cubes

Combine fruit, sweetener, spices, optional thickener in the bottom of a greased 8 or 9-inch square baking dish. Distribute pieces of butter over all.

Cover with topping:


Topping:

3 cups chopped pecans (or walnuts, pistachios, or unsweetened shredded coconut, or a mix – whatever; your choice), and a few extras, not chopped, to toss into the mix for esthetics, if you so desire

1/2 cup brown sugar (or your choice of substitute – I really like Swerve)

1/2 cup flour to bind the topping (I have, at various times, used whey powder, gluten-free all-purpose flour, almond flour, and rolled oats – even once turned to coarse powder in the food processor –, as well as traditional all-purpose flour)

1 teaspoon cinnamon (or your preferred spice, to your taste preference)

4-6 Tablespoons butter, melted

In a medium mixing bowl, stir together dry ingredients. Add melted butter & mix thoroughly. Spread over filling. (I have been known to sprinkle dried fruit – especially tart cherries or cranberries – over the topping at this point, as well).


Bake at 350º F for 30-35 minutes, until browned (for fresh-apple-filled, make that 45-50 minutes, and you'll want to cover the dish for the first 30 minutes so the topping doesn't burn).


Allow to cool at least 10 minutes before serving with your choice of chilled or frozen dairy or dairy-like topping (whipped cream, heavy cream, ice cream, fro-yo, whipped coconut cream… go crazy).


Monday, April 10, 2023

Carrots, Again??? A sugar-free, low carb carrot cake


We didn't think about taking a pic, this time. Everybody just dove in.
Therefore, this is from the day after Easter dinner.


 I keep coming back for variations on a theme: the carrot cake. Well, then, and why not? It's tasty, satisfying, and relatively difficult to ruin, especially when you slather on a mass of cream cheese frosting.

My most recent version is sugarless, gluten-free, and nearly keto-friendly (between the carrots and the chopped dried Montmorency cherries, the carbs get bumped up a bit more than most strict keto diets would allow, so keep this in mind. It's no-sugar-added, not totally carb neutral). And it's tender and tasty enough to share with just about everyone – excluding any friends or family who might have nut allergies. Nobody will guess what isn't in it.

I recommend toasting the pecans ahead of time for this cake. Put about 2 cups of pecan halves on a cookie sheet and pop them in the oven at 350º F for about 5 – 7 minutes, until they begin to look a little dry. After you chop up what you need for the cake, you might have some left over to nosh, or to put into an apple salad for tomorrow's dinner…

Also, for a bit more complex, nutty sweetness without adding extra sugar substitute, I suggest browning your butter for the cake (but not so much for the frosting).

For sugar substitute, I stock up on erythritol & baking blends – Swerve produces some truly fine replacements, especially for brown sugar and confectioner's (powdered) sugar. You may decide you prefer a different sweetener, though, so check proportions if you want to go your own way.


This makes two 9-inch round cake layers.


Sugarless, Flourless Carrot Cake

 
Ingredients:

1/2 cup butter, melted and browned (browning optional)
1 cup granulated sugar substitute (I prefer erythritol)
1/2 cup brown sugar substitute
8 eggs, at room temperature
1 teaspoon vanilla extract or powder
3 cups fine-ground almond meal or almond flour
3 teaspoons baking powder
1/2 teaspoon baking soda
1/2 teaspoon kosher salt
3 teaspoons ground cinnamon
1/2 teaspoon nutmeg
2 cups coarsely grated carrots
1 1/2 cups coarsely chopped pecans
1/2 – 1 cup coarsely chopped unsweetened dried tart cherries (like these)

Directions:

Grease two 9-inch cake pans and line the bottoms with greased or non-stick parchment.

Preheat oven to 350º F.

In the bowl of a stand mixer with paddle (not whisk or dough-hook), combine granulated and brown sugar substitutes, add melted butter, and mix at medium-high speed until creamed and fluffy (this may take 10 minutes or so).

In a separate medium mixing bowl, whisk (or sift) together almond meal, baking powder, baking soda, salt, cinnamon, and nutmeg. Set aside.

In another bowl, combine grated carrots, chopped pecans, and chopped cherries.

When the butter and sweeteners have begun to turn fluffy-ish (the artificial sweeteners don't cream as easily as regular sugars do, but they bake nicely, even so), begin adding in the eggs, one by one, making sure to mix thoroughly before adding the next egg. When the last egg is added and the batter is smooth, mix in the vanilla.

On low speed, stir in the bowlful of dry ingredients until completely mixed, then fold in the carrots, pecans, and cherries.

Divide batter between the two 9-inch cake pans, bake on center rack of 350º F oven for 30 – 35 minutes, or until toothpick inserted in the center of cake comes out clean.

Cool on racks on counter 20 to 30 minutes – until only slightly warm to the touch – before removing from pans.

Allow to completely cool before applying frosting (recipe below).


Sugar-Free Cream Cheese Frosting

Ingredients:

1 lb. (2 8-ounce bricks) regular full-fat cream cheese
1/2 cup butter
finely grated zest of 1 small lemon
3 – 5 Tablespoons fresh, strained lemon juice
1/2 cup confectioner's sweetener
1 Tablespoon heavy (whipping) cream (optional)

Directions:

Bring ingredients to room temperature.

In medium mixing bowl, combine butter, cream cheese, and lemon zest and whip until light and fluffy. 

Add in lemon juice and confectioner's sweetener in alternating portions, 1 tablespoon of the lemon juice and then a couple of tablespoons of the sweetener, until you have the thickness and tang you desire. If the frosting is too thin, add a little more sweetener. If it's too thick, add either a small amount of lemon juice or a bit of cream.

This will easily cover a 2-layer 9-inch cake or very generously cover a single 9" x 13" rectangular cake.


The thing I like about this kind of frosting is that you can easily adapt it to your own preferences, whether you want a hint of lemon or a great big bite of it.

Sunday, March 26, 2023

Low-Carb Fried “Rice”, for when Regular Rice Isn't Nice


In this house, I cook for three (The Bat, Pop, and myself), and too often the cuts of meat I can buy are too big for a single meal. Leftovers, therefore, are a regular thing.

Sometimes, The Bat and I throw together soup or stew, sometimes sandwiches, and sometimes… sometimes… we go crazy and I make fried rice. Except that, recently, I've been put on a lower-carb plan, and I have a friend or two with even tighter restrictions on starches and sugars, so rice (being one of the starchiest of starchy foods) is a pretty much no-no. Naturally, this means playing with substitutions.

If you like working from scratch, you can prepare your own cauliflower rice in advance, but I felt flush enough to buy some already prepared (from the freezer section of my local supermarket). With that, it needs to be completely thawed and allowed to drain and dry out a bit. You can also use rinsed and drained hearts of palm "rice" (such as Palmini) in the same recipe – I like it a lot, but it's often hard to find, out here in the sticks. So cauliflower it is, for us, today.

The trick to cooking any fried rice, is, of course, to have everything lined up in advance (mise en place, people!), so you have it ready to stir in quickly, without any pause in your operation. Further, it's best to have most of the ingredients at room temperature before cooking. Cook your meat and mushrooms as far in advance as a day or two, and store them, covered, in the refrigerator (marinating the strips of meat overnight in a combination of deglazed pan drippings and a teaspoon or so of soy sauce gives it a little something extra, as well), but bring everything out to stand at least 20 minutes before you start cooking. 

As soon as you start the heat on your stove, you'll just keep adding and adding, letting each layer get fully heated up before adding the next, until the last, tenderest leafy item is heated to just shy of your liking (let it come to completion off the burner, on its way to the table).    


Fried "Rice", Low-Carb Style

Ingredients:
2 eggs, beaten
1 teaspoon soy sauce
1/2 teaspoon granulated sugar substitute (I like erythritol)
2 – 3 Tablespoons sesame oil
1/2 teaspoon lemon zest, finely grated 
1 small carrot, diced small or very coarsely grated (up to 1/4 cup)
1 small onion (about 1/4 cup or less – to taste), minced
1 cup riced cauliflower
1/4 cup leftover cooked beef, sliced into small, thin strips, & marinated in soy sauce
8 – 10 ounces fresh mushrooms, sliced and stir-fried in butter until slightly crisp
1 cup broccoli florets
2 – 3 heads baby bok choi, chopped coarsely
3 – 4 medium scallions, chopped finely

Directions: 

In a small bowl, beat eggs, soy sauce, and sugar substitute thoroughly (you don't want blobs of egg white showing up). Set aside.

On stove top at high setting, bring oil and lemon zest to shimmering heat in wok or frying pan; add in carrot and cook just until tender. Add onion, cook until it becomes somewhat transparent. Stir in cauliflower, coating it well with oil, and cook until the onion and carrots begin to brown. Add in egg mixture, stir well (and scrape the bottom of the pan to keep it from sticking), cooking until eggs show signs of setting up. Scoop the meat out of the marinade*, allow a second for it to drain, and add meat to pan, bring to full heat, then add mushrooms and heat, then broccoli, and finally the baby bok choi and scallions.

Cook only until the bok choi leaves start to wilt,  remove from heat, and serve.


*you can freeze the meat marinade for use in a later dish, such as noodles or even scrambled eggs, for a bit of a kick. Since there's nothing raw in it, it's even safe to just drizzle over your roasted skinny asparagus.


The only real rule about this kind of dish is that you should use ingredients you like to eat. Almost anything can be substituted for something else on the list, in whatever flavor combinations and proportions will float your boat. But for it to meet your own dietary restrictions, check with health professionals for more specific guidelines. As it stands, this one falls into the relatively keto-friendly range.

Addendum: lots of chefs, these days, tell you to scramble & cook up the eggs first, and stir them in as a separate item. However, The Bat taught me what she learned from Buwei Yang Chao's  How to Cook and Eat in Chinese, and that is to add the eggs to the oily, heated rice. I find that it gives the dish an almost creamy finish, as opposed to having eggy lumps distracting me from the other flavors and textures. It does mean you have to be more aware of the potential for sticking to the pan, but firm, swift stirring with a good spatula can reduce or even prevent that.

Friday, March 24, 2023

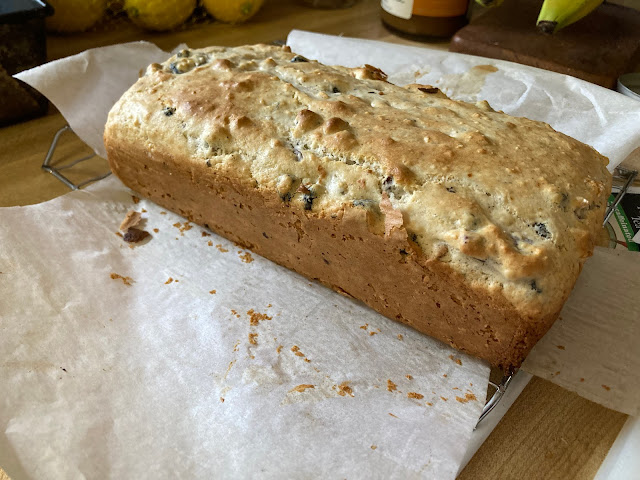
Quick Bread from Freezer Emergencies (Ice Cream Quick Bread)


A while back, I took a stab at this sort of quick bread using some old, not particularly good leftover ice cream.  Today, I had a better excuse for giving it a test: our freezer door was left slightly ajar for several hours, causing a meltdown of our excellent Tillamook ice cream. Rather than let it all go to waste – or worse, to my waist – I looked up a few recipes for ice cream bread. Almost all of them are labeled "2-ingredient bread" and call for self-rising flour.


Well, kiddies, this house doesn't keep a lot of self-rising flour around. Instead, we adjust those recipes to serve at need. Therefore, my adaptation in today's post means that, if you are like us and don't have a bin of self-rising flour, you don't have to go rushing out to the store for some. You'll only need your regular stuff and some good ice cream you're willing to sacrifice to the heat.


Ice Cream Quick Bread

Ingredients:

2 cups melted regular vanilla ice cream
1 1/4 cups all-purpose flour, sifted
2 teaspoons baking powder
1/4 teaspoon salt
1/2 cup coarsely chopped pecans*
2 cups dried blueberries*

Directions:

Preheat oven to 350º F.

Line a 4-inch by 8-inch loaf pan with parchment, allowing an inch or so of  overhang on the long sides.

In a small bowl, cover dried blueberries with warm water, allow to "plump" for about 15 – 20 minutes, drain and pat dry.

Meanwhile, allow ice cream to completely liquefy and come to room temperature.

In a medium mixing bowl, whisk together flour, baking powder, salt, pecans, and blueberries. Add ice cream and stir only until completely mixed – DO NOT OVERMIX!

Pour into loaf pan, bake at 350º F for 35 – 40 minutes.

Remove from oven, allow to cool about 5 minutes, then remove from pan. Cool completely before serving.


*optional. May substitute your own favorite nuts & fruits, or omit them entirely.

Serve with softened butter or cream cheese.


While this isn't quite as decadent as turning our ice cream into a milk shake, it turns out a quick bread can be a very nice alternative, during a freezer crisis.

Also, for the record, the flavor and texture of this bread is somewhere in the range of a traditional muffin. It isn't particularly sweet and dessert-like. I recommend it as a breakfast food, so you can tell everyone you have ice cream for breakfast.

Monday, March 13, 2023

Low(ish)-carb Buttermilk Drop Biscuits


One should always have buttermilk powder in one's kitchen arsenal. It's a habit I, personally, picked up from The Bat… no idea who started her down that dusty buttermilk lane, though. All she says about that is that it can elevate simple dishes by imparting its subtle tang, especially to pancakes, waffles, cornbread, and biscuits. And I have to agree with her. It even helps make a keto-friendly recipe even friendlier.

Granted, because it has dairy content, it's not entirely carb-free, so if one is on a strict keto diet it might not be the best option. Still, a trace of indulgence is better for the soul than a heap of resentment – especially if one also has fresh butter for slathering a bit more indulgence.

If, however, you're trying to behave yourself, you can swap out the buttermilk powder and the water in this recipe for 3 Tablespoons of almond milk, coconut milk, or whatever other "milk" you prefer. (A swap can also be made of your favorite shortening for the butter, but don't blame me when it doesn't taste like a real, fresh biscuit.)

Anyway, sometime soon, please, go ahead & get crazy! It's not nearly as naughty as you'd think.


Low(ish)-carb Buttermilk Drop Biscuits

Ingredients: 

2 1/2 cups almond flour
1/4 cup buttermilk powder
2 teaspoons baking powder
1/2 teaspoon baking soda
1/4 teaspoon salt
3 Tablespoons unsalted butter, hard-chilled
2 large eggs
3 Tablespoons cold water

Directions:

Prepare cookie sheet with nonstick parchment.

Preheat oven to 350º F.

In food processor or medium bowl with a whisk, completely mix together flour, buttermilk powder, baking powder, soda, and salt.

Cut in chilled butter (if not working with food processor, use pastry cutter or fork) until fully mixed into flour and forms into pea-sized lumps. Add eggs and water, mix until just blended. Allow to stand in bowl about 1 minute (give the the water a chance to "wake up" the buttermilk powder), then drop by approximately 2-Tablespoon portions onto the parchment, allowing a space of about 2 inches between.

Bake 12–15 minutes, or until the little peaks of the biscuits begin to turn a rich golden brown.

Serve immediately with softened salted butter.

Makes one dozen.


I made these for my family for Sunday dinner. Usually Pop will politely eat a single sample of whatever gluten- or sugar-free bread I put on the table, but the rest will remain for me, the next day. Monday morning, I saw that he'd polished off his second biscuit, at breakfast, so he didn't equate them with "diet food". This is high praise, around here.

Further, they don't lose their tenderness overnight. Just a little heating up, and they're ready for more butter and/or a spot of sugar-free jelly.

Saturday, March 11, 2023

Chocolate Pound Cake (sugarless version)

Served with a generous portion of Rebel™ Keto-friendly triple-chocolate ice cream, because… birthday and chocolate


Now is the beginning of the busy birthday season in our house – starting in the middle of the second week of March, we basically have a birthday to celebrate, on average, every nine days, until the end of May (when we take a break until August).

Which means a different birthday cake every weekend, more or less.

The first has always been the easiest, until this past year, when I had to start planning around a low- to no-sugar option. How does one make a tasty, sugarless chocolate pound cake?

Well, now… after doing my homework for a couple of weeks, I've proved it's possible.

Bear in mind, any good loaf of pound cake usually looks a bit like a brick, and has a similar heft. But, oddly, this one is difficult to mess up, as long as you have a little patience in the process, and it ends up moist, rich, and flavorful as heck. Also, it can be served plain, frosted, or decorated with a cheerful dusting of powdered "sugar" just before serving.

For this version, I made a simple shortcut (sugarless) whipped ganache (recipe below).

Sugar-free (keto-friendly) Chocolate Pound Cake

Ingredients:

1 ounce unsweetened baking chocolate
1 cup granulated sugar substitute (I like an erythritol blend, like Swerve)*
1/4 cup butter, cut into 1-Tablespoon pats†
4 ounces cream cheese†
4 large eggs†
1 1/4 cups almond flour
1/4 cups dark cocoa powder
1 1/2 teaspoons baking powder
1 teaspoon instant coffee (optional)
1/4 teaspoon kosher salt

Directions:

Preheat oven to 350º F.

Grease a 4" x 4" x 8" loaf pan, and line it with parchment, leaving at least an inch of overlap on each long side (to grip, in order to remove cake from pan
).

In a small microwave-safe bowl, melt unsweetened chocolate using 20-second increments (you don't want to burn it).

Using the paddle attachment of stand mixer, combine butter and sugar substitute, mix at high speed until it's light and fluffy, and turns from brighter yellow to a pale lemony hue, stopping occasionally to scrape down the sides of the bowl (this process may take as much as 10 or 15 minutes – don't try to cut it short, or you could end up with a bottom-heavy cake).

Meanwhile, in a separate bowl, whisk together almond flour, cocoa powder, and baking powder. Set aside.

When the butter and "sugar" are nice and fluffy, add in cream cheese, mix in thoroughly.

Gradually add in the eggs, mixing completely before adding the next one.

A few of tablespoons at a time, add in the dry mixture.

Finally, add in the melted baking chocolate, stirring until evenly distributed.

Pour batter into loaf pan, bake at 350º F for 60 minutes (or until a toothpick inserted into center comes out clean).

Allow to cool at least 15 minutes before removing from pan. Allow to cool completely before decorating or frosting.


*If you're looking to take a couple minutes off the time it takes to cream the "sugar" and butter, run a couple of cups of your sugar substitute through a food processor for a minute or so, giving it a finer grain. Don't swap out powdered sugar substitute, though, since it may also have a starch substitute.

†Allow these ingredients to come to room temperature before starting to mix.


and then there's the easy sugar-free whipped ganache frosting:


Ingredients:


8 ounces sugar-free semi-sweet chocolate chips
3/4 cup plus 1 tablespoon heavy cream

Directions:

Combine chocolate chips and cream in medium-small microwave safe bowl, and in 30-second increments, heat until chocolate just begins to melt. Stir until completely smooth, and allow to cool down until the bottom of the bowl is barely warm to the touch (just above room temp). 

Using hand mixer, whip until it lightens in color and more than doubles in volume (this may take as much as 10 minutes, depending upon how warm the ganache is when you begin).

Slather on cake and have some fun.


This is best if eaten within a day or two (as if anybody had to encourage you to rush to chow down on chocolate).