Raiding the larder of ideas.

What one family eats, plans to eat, dreams of eating. Plus, other food and kitchen-related stuff from the home of steak-and-potatoes, pie and fresh green beans from the garden.

Saturday, March 31, 2012

Out of this world birthday cake

First, we have a seven-year-old boy.  Next, we have his nine-year-old sister who spends one afternoon per week as my art pupil.  Third, both children are practically my niece and nephew.  That's how important their family has been to me and my immediate family.

So, naturally, I beg for the opportunity to do the special cakes for their birthdays.  Last year, I built the circus tent cake, followed by the cheeseburger cake.  This year, the first cake was, again, chocolate cake, but with white fluffy whipped frosting and almond bark (aka white chocolate), plus a bazillion other ingredients.

You can see most of the bazillion, here.


The cake is a basic devil's food mix, with a little bit of buttermilk added for moisture and cohesion.  Since the whole thing was going to be fed to a mob of youngsters with undeveloped taste buds, I didn't worry about making a special frosting -- I bought a couple of tubs of whipped white, vanilla-flavored brand-name frosting.  I needed one and a half of them.

The cake was baked in two parts: a half-filled semi-cylinder loaf pan, and a basic tube pan (you could accomplish the same in a bundt pan, but ours needed a little love, so I went straight angel-food-tube pan.  Neither gets filled completely, unless you want to get wild and do a double-batch, in which case, you will have a leftover slab of your loaf cake.  As it was, I had a small section I didn't need for the sculpture, so I set it aside for a later, quiet family moment.
Anyway.  Once the cake was baked, cooled, and removed from the pans, I wrapped it and popped it in the freezer to make it easier to sculpt with.  In the meantime, my star pupil came over to help build the "alien robots" to decorate the cake.  This was done using both regular-sized and mini marshmallows, which were punctured by toothpicks (it helps to wet the toothpick, first), then stitched/pieced together to provide limbs, using Twizzlers® Pull-Aparts in both cherry and green apple (those would be the red and green strings).  Some of the faces were painted on, using a toothpick dipped in food coloring, while others were made sticking colored jimmies into the marshmallow. 

Note:  It's always helpful to have a child's imagination in building alien robots.  The birthday boy's sister has considerable talent, there.
The rocket ship was a little tricky.  Having a section of cake rise from the rest means building a support structure, or your cake will be nothing more than a straight layer.  I melted almond bark in a shallow dish, then dipped the butt end of a tall plastic container into it at an angle, to build a parabola (the container was approximately the same diameter as the loaf pan, so that the cake would rest easily inside it when the bark firmed up). When the belly of the rocket was firm enough to remove from its mold, I attached a pair of slim bamboo skewers to the base (using plenty more almond bark), sticking out from the flat back end.  These would be used to anchor the rocket to the rocky planet's surface.

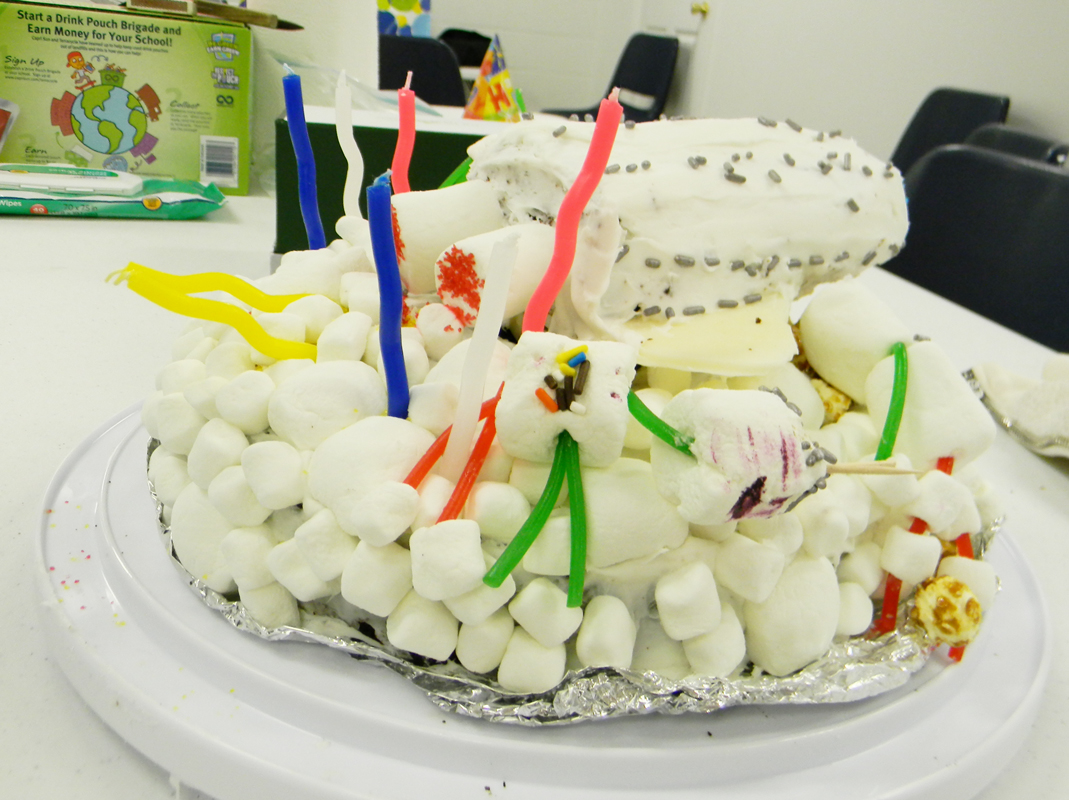
Ah, yes, the rocky surface.  That would be (a) the coating of whipped frosting, followed by (b) a mass of Cracker Jack® popcorn (see pic below).  That's just the front end of the cake.  The back end is also frosted, but is piled with marshmallows (the larger ones were cut in half and stuck on, cut side into the frosting), to represent the cloud of smoke/steam of the rocket's exhaust from takeoff.


But, back to the rocket.  Once the almond bark was fully hardened for the base, and I was confident the skewers would hold the weight, I added wings: more almond bark, poured into a small square mold (actually, the indentation in the top of a plastic container's lid), then cut diagonally with a hot knife.  I attached them with more melted almond bark, placing the structure in the freezer to set up more quickly and firmly.

The round-bottomed loaf was long enough to make two rockets (just in case I was clumsy), so I cut it in half and trimmed away one to make a point, setting it in the almond bark undercarriage and coating it with frosting to make it appear one solid piece of food.  I finished it by adding silver jimmies along "seams", blue decorator sugar for the windshield, and large marshmallows for the jet engines on the back (each having been moistened at the end and lightly coated with red decorator sugar to indicate the engines were hot.  I inserted the skewers at an oblique angle, through the center of the base, then frosted the rest of the cake, then piled on the rocks, smoke, and aliens.

The candles I arranged as though the ones directly behind the jet engines had been blown over.  The advantage, here, is that they're all on the same side of the rocket, so a little boy doesn't have to dance around the cake in order to blow them all out.

Before anybody cut the cake, I helped pull the rocket off the top, and set it aside as the special piece exclusively for the birthday boy.  One of the aliens managed to stay clinging to it, so it will live to see another day.

I didn't need the second half of the loaf in order to make a rocket, so I used the remaining frosting and some jimmies to make a little side cake, just for the heck of it.
I had, actually, planned to tell him that the dog had eaten the big cake, and this was all I had left for him, but he saw the big cake box before I could hide it all away, so... gosh darn it, the joke was spoiled.  Still, he and his friends seemed to enjoy the out-of-this-world cake, piled high with soft ice cream.  I was glad to see he was not disappointed with his cake, this year.

And, since the party was a few days before his actual birthday, he gets his own birthday cake twice in one week.    We all should be so lucky!

I don't know what I'll do next year, though.


Tuesday, March 27, 2012

Fry Bread, for Indian Tacos or other nefarious purposes

Pop and the Bat have taken a couple of vacations to the Southwest, during which times, they have had occasion to sample some of the local chefs' versions of Navajo Fry Bread and Indian Tacos.  The Bat says that, if you ever get out to see the Grand Canyon, the place to stop is Cameron Trading Post... for more than just their awesome eats, but that's a great place to start.  Their fry bread is, to borrow a description from one of the kids in my neighborhood, "monster HUUUUUGE," and awesomely tasty.  

Having sampled this treat as a main dish and a dessert (I get to eat it when I hit the regional Powwows), I have developed a bit of a taste for it, myself, and decided to give it a go in our kitchen, too.    We had our usual Friday company for supper, last week, and served them a variation on that theme...

Now, when most of you fix tacos, you usually use ground meat, upon which you pour a mix of seasons and let it simmer for a few minutes before serving.  We aren't big fans of the flavor of most of those burger-laden varieties, especially when we have a perfectly good half a roast in the refrigerator, having been left over from the night before.   I shaved that up into very thin slices, cut again across the grain, so that I had strips approximately 3 millimeters thick by 1 centimeter wide by 15 centimeters long. I put together a chipotle spiced marinade mix,  the juice of one fresh lime, olive oil and water (proportions are based on the pre-fab marinade mix instructions, but slightly more water)all in a zipper storage bag, and added in the meat, tossing it into the refrigerator for about two hours.  While that steeped in its juices, I finely chopped tomatoes, onions, lettuce (we used romaine), and olives, putting each in its own covered dish in the refrigerator.   I made certain I had refried black beans topped with a sprinkling of shredded cheese (heat before serving), plus a guacamole "ketchup," homemade salsa, and some sour cream (greek-style yogurt with a little lime juice and honey makes a reasonable substitute), all waiting to go on the table. 

Then came time to prep the fry bread.  

Note:  Traditional Navajo fry bread uses powdered milk.  We didn't have any, because nobody much cares for it in our house.  On the other hand, we did have powdered buttermilk, making for an even more decadent version of the classic, while still keeping the calories lower (as if we were worried about this, in a fried food)... we recommend the buttermilk for its sweetness.  We also prefer to cook in lard, but, if you have issues with this, you may substitute Crisco or even cooking oil.  Just know, this will, necessarily, change the flavor.

Fry Bread

Ingredients:2 cups all-purpose flour
1/2 teaspoon table salt
1/4 cup powdered buttermilk
2 teaspoons baking powder
1 cup water
about 2 cups shortening (for frying)
extra flour (to keep the dough from sticking to your hands

Directions:Begin to preheat shortening in a deep fryer, large frying pan, or deep wok, aiming for about 350º F.  You need at least one inch depth to your shortening, so you will need to amend the measurement according to which pot or pan you use.

In a medium bowl, sift together dry ingredients.  Pour the water over the mixture all at once, mixing with whisk or fork until it begins to form one large mass.

Make sure your hands are clean, then flour them well.   Using your hands, gently work the dough in the bowl (do not knead, or the bread will become heavy), until it begins to form a slightly sticky ball.  

Divide the ball of dough into eight (8) equal pieces.  With floured hands, shape a piece of dough into a rough approximation of a six-inch diameter disk (don't worry if it's not exactly round.  This is a fun bread, not some uptight wheel of reason).  Poke a small hole in the center, gently place the flattened piece of dough into the hot oil (to avoid spattering).  

Fry until golden-brown (about 3 minutes or slightly more), then flip it to fry the other side.  The bread will be lumpy.  Do not worry about unevenness, as it's a feature, not a bug.  

Place the fry bread on a paper towel to absorb the excess shortening.  Serve hot.  If you have to set aside, place in 200º F oven for up to 1 hour before serving.

Further note: I am told you can save leftovers in the refrigerator overnight, and revitalize them in a 350º oven, 10 minutes or so.  I have never had enough left over to make this experiment possible.


When it comes time to serve the tacos, there is no folding the fry bread (unless you are overly ambitious).  Treat it as an open-faced sandwich, if you will. Pile on your favorite taco ingredients, slice it up with a knife and eat it with a fork.  Or, make a big mess and enjoy, anyway.

If, on the other hand, you don't want to do tacos, this makes a naughty dessert, as well.  You can dust it with powdered sugar or  cinnamon sugar, drizzle it with honey or fruit syrup/jelly/jam, or pile on your favorite berries/peaches/other tender fruits.  If you haven't tried it this way, but you've been to a county fair somewhere in the Midwest, think of this as a much tastier version of funnel cakes, and treat it as such.  Your tongue will love you, and your hips will resent every bite...

Monday, March 12, 2012

Sweet Bird of Pizza!

I've been playing around with my pizzas, lately, since I developed a little problem processing tomatoes & now rather dislike red pizza sauces.  The past few 'zas have been pesto-based, topped with crumbled ricotta & mozzarella, with mixtures of chicken and a few vegetables (onions, mushrooms, sweet peppers, whatever is in the crisper drawer).  Tonight, I went wild and left the pesto in the fridge.  Instead, I made a sweet-and-zesty version, using mascarpone cheese blended with honey and fresh ground ginger spread on a plain whole wheat thin crust, topped with sautéed chicken in honey-whisky-and smoky tabasco, with onions, peppers, and pineapple.  This time, I used quite a few preserved or previously-prepared ingredients, but I think next time I try this, I will use all fresh.  Except, I really like using Mama Mary's thin & crispy crusts (available at, of all places, the local Mart of Wals, for half the price of the other brands' crusts).

Anyway, if you want to try my pizza topping, here's the stuff:


Sweet Bird of Pizza!  
(or, if it weren't for the chicken, this could pass for dessert....)


Ingredients:


1 pre-cooked 12-inch pizza crust of your preferred variety
olive oil
4 oz.  mascarpone cheese
1 1/2 Tbs. fresh ground ginger
2 tsp. honey
8 oz. shredded mozzarella cheese
1 Tbs. butter
8 oz. sliced mushrooms
1 lb. white chicken meat, cut into 1/2-inch or smaller cubes*
1/4 cup (or slightly more) honey-infused whisky
a few shakes (to your taste) smoked tabasco sauce (I used about a dozen)
salt & pepper to taste
sliced or chopped: onions, fresh sweet peppers,  hot peppers (remove & discard the seeds)
finely-cut or shredded pineapple (fresh is better, but, if you use canned, be sure to drain it well)

Directions:

Preheat oven according to instructions for crust (usually, for a crispy crust, you'll need a fairly hot oven, around 425º F.).    Place crust on a cookie sheet or pizza pan, brush lightly with olive oil.

In a small bowl, mix mascarpone, ginger, and honey until completely blended.  Set aside.

Using a medium frying pan or wok at high temperature, stir-fry mushrooms in butter until some of the mushrooms develop a golden-brown, crisp edge.  Remove from heat, put in separate bowl.  Return the pan to heat,  add in chicken, salt & pepper, stir until most of the pink is gone from the meat.  Add in honey-whisky and tabasco, simmer, stirring, until liquid is cooked away and meat is lightly golden-brown.

Spread mascarpone mix on pizza crust, sprinkle lightly with mozzarella, then top with all other ingredients, distributed evenly and arranged to please your eye.

Bake on cookie sheet or pizza pan for 7-10 minutes (I do not recommend the extra-crispy method of baking right on the oven rack, because the mascarpone cheese will melt quickly and may run off the pizza onto the bottom of the oven).  When the mozzarella and onions have begun to lightly brown, remove from oven, allow to cool about 3-5 minutes before serving.


*I find the easiest way to prepare chicken for the purpose is to take a completely frozen chicken breast and allow it to thaw an hour or so at room temp -- or in the nuke for about a minute at full power -- just enough to make it less of a brick, but still frozen fairly solid.  Take out a good, heavy-duty knife and cut while still frozen.  Allow those wee chunks to thaw the rest of the way in the refrigerator, or stir-fry while still a little frozen.  If you're using a brined chicken breast, you'll want to drain the ensuing liquid from the pan before you add the whisky/tabasco.