The Bat says this recipe is a variation on one she found on a bag of chocolate chips, but it wasn't the Toll House recipe. I don't rightly know… sometimes she likes pulling my poor, twisted and abused leg. But any way you look at it, most recipes you find on bags of chocolate chips don't make a whopping 5 dozen heaping-tablespoons-of-dough cookies. They seem to think the average American family will never have teen-aged boys, so they provide you with enough dough to make a couple dozen "modest" cookies. You know, the kind that pass as a single serving when you ask official dietitians. When you ask mothers, though, a serving is whatever size will fill a young mouth so no sass can come out of it for the moment.
So, my mother made these cookies. Or, rather, she made the dough and some cookies. We lived dangerously, back then, and nobody died from raw dough in the digestive tract. If, on the other hand, you worry about that sort of thing, feel free to make a substitution of pasteurized liquid egg white where the recipe calls for eggs. Or, live life for the moment.
Either way, bake yourself a batch of the best chocolate chip cookies I ever had. In theory, the recipe makes 5 dozen MONSTER cookies. In our reckless house, I've never seen the dough left alone long enough to get the whole thing into the oven, but maybe you'll have some luck with that.
Extra-Special Chocolate Chip Cookies
Ingredients:
2 1/2 cups shortening* (do NOT use cooking oil)
2 cups brown sugar
2 cups granulated sugar
6 large or jumbo eggs
2 Tablespoons vanilla
2 teaspoons salt
7 cups sifted all-purpose flour
2 teaspoons baking powder
2 teaspoons baking soda
5 cups semi-sweet chocolate chips, chocolate chunks, or Heath Bits O'Brickle
3 cups coarsely chopped pecans (optional)
Directions:
Preheat oven to 375º F.
With mixer, cream shortening and sugar until very fluffy (about 5 minutes). Add eggs, one at a time, beating thoroughly. Add vanilla and salt.
In another bowl, sift together flour, baking powder and soda. Add to creamed mixture and stir until completely mixed.
Add in chips and nuts.
Drop by heaping TABLESPOONS onto ungreased cookie sheet.
Bake 12-15 minutes, or until beginning to turn golden-brown on top.
[This dough may be formed into balls or tubes and frozen for up to five months.]
*Mom uses butter, & leaves them slightly undercooked by setting the oven at 350º F, to make soft, gooey, extra-tasty cookies.
Tuesday, September 11, 2012
Saturday, September 01, 2012
Sailing into the next birthday cake

My young friend turned ten years old, this month. This put me at that awkward stage, where I had to choose between making a cake that is strictly for show, or one that has exceptional flavors to reflect the exceptional nature of the young lady in question. As it stands, I was tasked with preparing the cake for a party with her schoolmates, as well as a second one for just us extended family-types. Therefore, I made both types.
This, however, is the tale of the building of a visual work (oh, I won't make it bland to the tongue, either. Let's get serious, shall we?), and how you, too can do the same, if you are foolish enough to go this crazy.
So, the first stage is actually to make a white or yellow cake into a lemonade cake. If you have a favorite recipe, please use your own. For me, I cheat and start with an affordable mix into which I add a half-cup of Greek-style yogurt, the juice of one medium lemon plus the finely-grated rind of that same lemon (using that much less water for the mix. It usually adds up to about 1/4 cup difference). I also have a 6-oz can of frozen lemonade mix (thawed), plus 2/3 cup of powdered sugar. Bake the cake in 1 9-inch square cake pan left in oven at a slight angle (so the cake will come out slightly thicker at one end), plus a standard 8x4-inch loaf pan, using the baking instructions for your recipe or mix. Remove from oven, let it cool, remove from the pan & place on large platter or plastic-lined cookie sheet. Take a long-tined fork & pierce the cake every half-inch or so (you will likely need to wipe the fork occasionally with wet cloth to de-stickify it). When you've covered the cake with holes, mix the thawed lemonade with the powdered sugar & slowly pour the mixture over the entire cake, allowing the cake to absorb it all. What spills over onto the plastic, feel free to scoop up with a spoon and drizzle once more over the top of the cake.
Now, pop that in the freezer until you're ready for the next stage.
(click on any image to embiggen)
Stage two involves cutting and crumb-coating the cake.

(click to embiggen)
For this, you will need a nice, long, non-serrated knife (at least 10-inch blade is ideal).
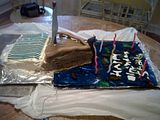
Beginning with the loaf cake (and while still frozen), measure halfway up each side, mark it, and then, at one end, cut the diagonal from center mark to center mark to make an uneven pentagon (imagine you're cutting a kid's-style house). Take the triangles you've cut off, reverse them, and let them snuggle up against the lower half-walls, turning it into a big triangle. Shave off a little from the sides to create a slight curve, for the prow of the ship.
On the square cake, put the thicker side near the big triangle. Slice off about 2 inches from the shallow end, lay the cut-off section on top of the thicker portion of the cake, and shave to create a curve across the top of the cake. This is the book-end. All these parts must now be stuck together with frosting (I used a plain white store-bought tub to which I added plenty of lemon extract to my preference, because I know the girls who will be eating this cake like zippy lemony zing, too).
Send it back into the freezer to firm up a few hours, or until you are ready for stage three.
Stage three: finish frosting the cake. The ship end needs brown frosting colors, to make the wooden ship boards. The book end, of course, will need no color added to the white frosting, but you may want to pipe some color around the base, to represent the book cover.

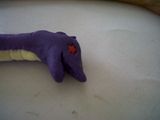
 Stage four is preliminary decorations. The ship's figurehead and rails can be shaped from fondant (don't forget to add a little lemon extract to that, too!) (I also added some ballusters to the rails by rolling little balls attaching them with drops of water ever couple of inches along the rails).
If you lack the appropriate color of fondant, you can add gel food coloring to it. Professionals usually have gloves for the kneading process, but I find as long as the quantities you need are about the size of a large candy bar, you can put it in a sturdy sandwich bag to work the color in.
Next, you'll want a sheet of edible paper, cut in half crosswise (available anywhere Wilton's cake supplies are sold) of a simple, small pattern such as stripes or stars. One half will be used for the top page of the book,

If you want more detail, use a toothpick or thin skewer for detailing ship's boards and sides of book, delicately drawing frosting color in lines to give wood grain and to imply many pages.
You will want to allow this to rest on a sturdy cardboard sheet cut to its precise dimensions, plus enough on the "book" end for gripping, coated with foil or plastic.
Stage Five will require these ingredients:
Line a large jelly-roll pan (a cookie sheet with upright sides) with foil which is then lightly greased. Make first batch of gelatin according to instructions for "knox blox" or Jell-O Jigglers, using four boxes Jell-O, and two cups boiling water. Pour the gelatin mixture into the pan, arrange the fish & stars upside-down on top. Try to avoid getting fish near the edges.
Eight (8) boxes of blue Jell-O (or lime flavored with many drops of blue food coloring)
Lots of gummi candy fish (you can probably get by with a single 3-oz bag)
Candy stars

Make second batch of Jigglers, using remaining four boxes of Jell-O, pour over fish & stars, then allow to cool & firm up (at least 3 hours). You should know, the fish get a little slippery when they are moistened or heated, so handling this as it cools may become a little tricky.
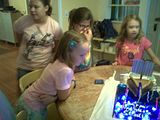
On a second large (flat, no raised sides) cookie sheet, apply a layer of foil. Tape in position. If you have one, arrange a string of battery-powered LED star lights or fairy lights in a semi-random pattern. Tape to foil. Cover with cling plastic wrap.
Then flip jigglers over, onto the plastic sheet, completely covering the lights. With a dull knife (or even your skewer) trim away excess, making room for cake to fit into a gap in it. (If you want, you can pop the scraps into the microwave until they're melted more than a bit, then whip them up to make sea foam, but I decided I'd just set the scraps aside for kids to snack on later in the week.

The last stage is final assembly. You will probably need to do this at the table or counter where it is to be carved and served. In other words, you may wish to direct the guest of honor & other guests into another room, perhaps for the opening of gifts, or to play a game or two.
Slide the cake into the gap in the Jell-O before adding final decorations.

For the mast, you will need: 1 long pretzel stick (8 inches, at least) or, if you can't find that, a hard candy stick will suffice, I chose the pretzel stick because I enjoy the juxtaposition of flavors among the sweet/tart/salty. Also, it looks a little like a well-seasoned mast to a ship... which is the point. The remaining half of the edible paper can be attached to the mast at the last minute, as a sail, using dabs of leftover frosting. If you want to assemble earlier, you may want to make a spar to support the sail upon its yardarms, by extremely carefully shaving a pretzel in half, or by just adding an inedible part, like a mid-sized bamboo skewer (I drilled a pair of skewers through the pretzel, then just taped the plastic sheet of edible paper to the skewers, so they could cut up the plastic later & lick the sugar off).
Once you've attached the sail to the mast, allow to set up for a minute or two.
Meanwhile, set the rails & the figurehead
 onto the ship's bow, securing them to each other with a scant drop of water.
 onto the ship's bow, securing them to each other with a scant drop of water.
Insert the base of the mast into the ship portion of the cake, about mid-point.

Finally, insert the candles into the Jell-O,
 and light the candles.

turn on the star lights,
and light the candles.
Cut it into a zillion pieces

* See simple homemade sherbet recipe here.
Lazy Vegan's Lemon Sherbet
Many of my friends and I are a bit on the lactose intolerant side, and with other allergies, to boot. Several other friends are vegans or vegetarians. This does, on occasion, make cooking for the gang a bit challenging. However, I did find a dessert everybody seems to be happy with – including the lazy chef!
Technically, it's neither sherbet nor sorbet nor ice cream nor gelato... well, it comes close to a gelato, if you go by the literal translation, which simply means "frozen". But there's no egg, no milk, no cream, no fuss. There is only a half a large can of frozen lemonade mix and two cans of coconut milk. That's it. No more.
I made a couple of batches of this yesterday, with the help of my ten-year-old friend, and she agreed it was not only easy, but tasty as heck. Fair warning, though, coconut milk is not cheap. Two batches means two cans, currently at $3.98 apiece, so the double batch I made ended up being about $16 per half gallon. Still, it's worth it, once in a while.
The sherbet goes like this:
Lazy Vegan's Lemon Sherbet
Ingredients:
2 cans (approx. 14 ounces each) fine quality coconut milk
1 cup frozen lemonade concentrate, thawed
Directions:
Shake cans of coconut milk thoroughly before opening. In a medium bowl, whisk together all ingredients. Allow to chill in refrigerator about 15 minutes. Pour into ice cream freezer, chill as your freezer directs, until the consistency of a very thick milkshake. Put into its own container, place in deepfreeze.
See, now, wasn't that easy?
If you don't have an ice cream freezer, you can put it into the deepfreeze, then, every 15 minutes to half hour, take it out, stir it, until it becomes too thick to stir, then store until serving.
If it has been freezing longer than an hour or two, you will need to allow it to sit out for about 15 minutes before trying to serve, unless you cheat.*
* For the adult version, I like adding a couple tablespoons of light rum. It doesn't make much of a difference in the flavor, but it does make it a little bit of soft-serve consistency.
Subscribe to:
Posts (Atom)