Raiding the larder of ideas.

What one family eats, plans to eat, dreams of eating. Plus, other food and kitchen-related stuff from the home of steak-and-potatoes, pie and fresh green beans from the garden.

Sunday, March 26, 2023

Low-Carb Fried “Rice”, for when Regular Rice Isn't Nice


In this house, I cook for three (The Bat, Pop, and myself), and too often the cuts of meat I can buy are too big for a single meal. Leftovers, therefore, are a regular thing.

Sometimes, The Bat and I throw together soup or stew, sometimes sandwiches, and sometimes… sometimes… we go crazy and I make fried rice. Except that, recently, I've been put on a lower-carb plan, and I have a friend or two with even tighter restrictions on starches and sugars, so rice (being one of the starchiest of starchy foods) is a pretty much no-no. Naturally, this means playing with substitutions.

If you like working from scratch, you can prepare your own cauliflower rice in advance, but I felt flush enough to buy some already prepared (from the freezer section of my local supermarket). With that, it needs to be completely thawed and allowed to drain and dry out a bit. You can also use rinsed and drained hearts of palm "rice" (such as Palmini) in the same recipe – I like it a lot, but it's often hard to find, out here in the sticks. So cauliflower it is, for us, today.

The trick to cooking any fried rice, is, of course, to have everything lined up in advance (mise en place, people!), so you have it ready to stir in quickly, without any pause in your operation. Further, it's best to have most of the ingredients at room temperature before cooking. Cook your meat and mushrooms as far in advance as a day or two, and store them, covered, in the refrigerator (marinating the strips of meat overnight in a combination of deglazed pan drippings and a teaspoon or so of soy sauce gives it a little something extra, as well), but bring everything out to stand at least 20 minutes before you start cooking. 

As soon as you start the heat on your stove, you'll just keep adding and adding, letting each layer get fully heated up before adding the next, until the last, tenderest leafy item is heated to just shy of your liking (let it come to completion off the burner, on its way to the table).    


Fried "Rice", Low-Carb Style

Ingredients:
2 eggs, beaten
1 teaspoon soy sauce
1/2 teaspoon granulated sugar substitute (I like erythritol)
2 – 3 Tablespoons sesame oil
1/2 teaspoon lemon zest, finely grated 
1 small carrot, diced small or very coarsely grated (up to 1/4 cup)
1 small onion (about 1/4 cup or less – to taste), minced
1 cup riced cauliflower
1/4 cup leftover cooked beef, sliced into small, thin strips, & marinated in soy sauce
8 – 10 ounces fresh mushrooms, sliced and stir-fried in butter until slightly crisp
1 cup broccoli florets
2 – 3 heads baby bok choi, chopped coarsely
3 – 4 medium scallions, chopped finely

Directions: 

In a small bowl, beat eggs, soy sauce, and sugar substitute thoroughly (you don't want blobs of egg white showing up). Set aside.

On stove top at high setting, bring oil and lemon zest to shimmering heat in wok or frying pan; add in carrot and cook just until tender. Add onion, cook until it becomes somewhat transparent. Stir in cauliflower, coating it well with oil, and cook until the onion and carrots begin to brown. Add in egg mixture, stir well (and scrape the bottom of the pan to keep it from sticking), cooking until eggs show signs of setting up. Scoop the meat out of the marinade*, allow a second for it to drain, and add meat to pan, bring to full heat, then add mushrooms and heat, then broccoli, and finally the baby bok choi and scallions.

Cook only until the bok choi leaves start to wilt,  remove from heat, and serve.


*you can freeze the meat marinade for use in a later dish, such as noodles or even scrambled eggs, for a bit of a kick. Since there's nothing raw in it, it's even safe to just drizzle over your roasted skinny asparagus.


The only real rule about this kind of dish is that you should use ingredients you like to eat. Almost anything can be substituted for something else on the list, in whatever flavor combinations and proportions will float your boat. But for it to meet your own dietary restrictions, check with health professionals for more specific guidelines. As it stands, this one falls into the relatively keto-friendly range.

Addendum: lots of chefs, these days, tell you to scramble & cook up the eggs first, and stir them in as a separate item. However, The Bat taught me what she learned from Buwei Yang Chao's  How to Cook and Eat in Chinese, and that is to add the eggs to the oily, heated rice. I find that it gives the dish an almost creamy finish, as opposed to having eggy lumps distracting me from the other flavors and textures. It does mean you have to be more aware of the potential for sticking to the pan, but firm, swift stirring with a good spatula can reduce or even prevent that.

Friday, March 24, 2023

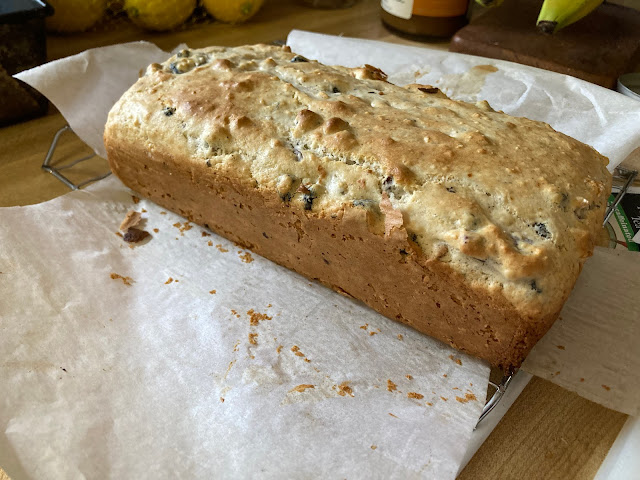
Quick Bread from Freezer Emergencies (Ice Cream Quick Bread)


A while back, I took a stab at this sort of quick bread using some old, not particularly good leftover ice cream.  Today, I had a better excuse for giving it a test: our freezer door was left slightly ajar for several hours, causing a meltdown of our excellent Tillamook ice cream. Rather than let it all go to waste – or worse, to my waist – I looked up a few recipes for ice cream bread. Almost all of them are labeled "2-ingredient bread" and call for self-rising flour.


Well, kiddies, this house doesn't keep a lot of self-rising flour around. Instead, we adjust those recipes to serve at need. Therefore, my adaptation in today's post means that, if you are like us and don't have a bin of self-rising flour, you don't have to go rushing out to the store for some. You'll only need your regular stuff and some good ice cream you're willing to sacrifice to the heat.


Ice Cream Quick Bread

Ingredients:

2 cups melted regular vanilla ice cream
1 1/4 cups all-purpose flour, sifted
2 teaspoons baking powder
1/4 teaspoon salt
1/2 cup coarsely chopped pecans*
2 cups dried blueberries*

Directions:

Preheat oven to 350º F.

Line a 4-inch by 8-inch loaf pan with parchment, allowing an inch or so of  overhang on the long sides.

In a small bowl, cover dried blueberries with warm water, allow to "plump" for about 15 – 20 minutes, drain and pat dry.

Meanwhile, allow ice cream to completely liquefy and come to room temperature.

In a medium mixing bowl, whisk together flour, baking powder, salt, pecans, and blueberries. Add ice cream and stir only until completely mixed – DO NOT OVERMIX!

Pour into loaf pan, bake at 350º F for 35 – 40 minutes.

Remove from oven, allow to cool about 5 minutes, then remove from pan. Cool completely before serving.


*optional. May substitute your own favorite nuts & fruits, or omit them entirely.

Serve with softened butter or cream cheese.


While this isn't quite as decadent as turning our ice cream into a milk shake, it turns out a quick bread can be a very nice alternative, during a freezer crisis.

Also, for the record, the flavor and texture of this bread is somewhere in the range of a traditional muffin. It isn't particularly sweet and dessert-like. I recommend it as a breakfast food, so you can tell everyone you have ice cream for breakfast.

Monday, March 13, 2023

Low(ish)-carb Buttermilk Drop Biscuits


One should always have buttermilk powder in one's kitchen arsenal. It's a habit I, personally, picked up from The Bat… no idea who started her down that dusty buttermilk lane, though. All she says about that is that it can elevate simple dishes by imparting its subtle tang, especially to pancakes, waffles, cornbread, and biscuits. And I have to agree with her. It even helps make a keto-friendly recipe even friendlier.

Granted, because it has dairy content, it's not entirely carb-free, so if one is on a strict keto diet it might not be the best option. Still, a trace of indulgence is better for the soul than a heap of resentment – especially if one also has fresh butter for slathering a bit more indulgence.

If, however, you're trying to behave yourself, you can swap out the buttermilk powder and the water in this recipe for 3 Tablespoons of almond milk, coconut milk, or whatever other "milk" you prefer. (A swap can also be made of your favorite shortening for the butter, but don't blame me when it doesn't taste like a real, fresh biscuit.)

Anyway, sometime soon, please, go ahead & get crazy! It's not nearly as naughty as you'd think.


Low(ish)-carb Buttermilk Drop Biscuits

Ingredients: 

2 1/2 cups almond flour
1/4 cup buttermilk powder
2 teaspoons baking powder
1/2 teaspoon baking soda
1/4 teaspoon salt
3 Tablespoons unsalted butter, hard-chilled
2 large eggs
3 Tablespoons cold water

Directions:

Prepare cookie sheet with nonstick parchment.

Preheat oven to 350º F.

In food processor or medium bowl with a whisk, completely mix together flour, buttermilk powder, baking powder, soda, and salt.

Cut in chilled butter (if not working with food processor, use pastry cutter or fork) until fully mixed into flour and forms into pea-sized lumps. Add eggs and water, mix until just blended. Allow to stand in bowl about 1 minute (give the the water a chance to "wake up" the buttermilk powder), then drop by approximately 2-Tablespoon portions onto the parchment, allowing a space of about 2 inches between.

Bake 12–15 minutes, or until the little peaks of the biscuits begin to turn a rich golden brown.

Serve immediately with softened salted butter.

Makes one dozen.


I made these for my family for Sunday dinner. Usually Pop will politely eat a single sample of whatever gluten- or sugar-free bread I put on the table, but the rest will remain for me, the next day. Monday morning, I saw that he'd polished off his second biscuit, at breakfast, so he didn't equate them with "diet food". This is high praise, around here.

Further, they don't lose their tenderness overnight. Just a little heating up, and they're ready for more butter and/or a spot of sugar-free jelly.

Saturday, March 11, 2023

Chocolate Pound Cake (sugarless version)

Served with a generous portion of Rebel™ Keto-friendly triple-chocolate ice cream, because… birthday and chocolate


Now is the beginning of the busy birthday season in our house – starting in the middle of the second week of March, we basically have a birthday to celebrate, on average, every nine days, until the end of May (when we take a break until August).

Which means a different birthday cake every weekend, more or less.

The first has always been the easiest, until this past year, when I had to start planning around a low- to no-sugar option. How does one make a tasty, sugarless chocolate pound cake?

Well, now… after doing my homework for a couple of weeks, I've proved it's possible.

Bear in mind, any good loaf of pound cake usually looks a bit like a brick, and has a similar heft. But, oddly, this one is difficult to mess up, as long as you have a little patience in the process, and it ends up moist, rich, and flavorful as heck. Also, it can be served plain, frosted, or decorated with a cheerful dusting of powdered "sugar" just before serving.

For this version, I made a simple shortcut (sugarless) whipped ganache (recipe below).

Sugar-free (keto-friendly) Chocolate Pound Cake

Ingredients:

1 ounce unsweetened baking chocolate
1 cup granulated sugar substitute (I like an erythritol blend, like Swerve)*
1/4 cup butter, cut into 1-Tablespoon pats†
4 ounces cream cheese†
4 large eggs†
1 1/4 cups almond flour
1/4 cups dark cocoa powder
1 1/2 teaspoons baking powder
1 teaspoon instant coffee (optional)
1/4 teaspoon kosher salt

Directions:

Preheat oven to 350º F.

Grease a 4" x 4" x 8" loaf pan, and line it with parchment, leaving at least an inch of overlap on each long side (to grip, in order to remove cake from pan
).

In a small microwave-safe bowl, melt unsweetened chocolate using 20-second increments (you don't want to burn it).

Using the paddle attachment of stand mixer, combine butter and sugar substitute, mix at high speed until it's light and fluffy, and turns from brighter yellow to a pale lemony hue, stopping occasionally to scrape down the sides of the bowl (this process may take as much as 10 or 15 minutes – don't try to cut it short, or you could end up with a bottom-heavy cake).

Meanwhile, in a separate bowl, whisk together almond flour, cocoa powder, and baking powder. Set aside.

When the butter and "sugar" are nice and fluffy, add in cream cheese, mix in thoroughly.

Gradually add in the eggs, mixing completely before adding the next one.

A few of tablespoons at a time, add in the dry mixture.

Finally, add in the melted baking chocolate, stirring until evenly distributed.

Pour batter into loaf pan, bake at 350º F for 60 minutes (or until a toothpick inserted into center comes out clean).

Allow to cool at least 15 minutes before removing from pan. Allow to cool completely before decorating or frosting.


*If you're looking to take a couple minutes off the time it takes to cream the "sugar" and butter, run a couple of cups of your sugar substitute through a food processor for a minute or so, giving it a finer grain. Don't swap out powdered sugar substitute, though, since it may also have a starch substitute.

†Allow these ingredients to come to room temperature before starting to mix.


and then there's the easy sugar-free whipped ganache frosting:


Ingredients:


8 ounces sugar-free semi-sweet chocolate chips
3/4 cup plus 1 tablespoon heavy cream

Directions:

Combine chocolate chips and cream in medium-small microwave safe bowl, and in 30-second increments, heat until chocolate just begins to melt. Stir until completely smooth, and allow to cool down until the bottom of the bowl is barely warm to the touch (just above room temp). 

Using hand mixer, whip until it lightens in color and more than doubles in volume (this may take as much as 10 minutes, depending upon how warm the ganache is when you begin).

Slather on cake and have some fun.


This is best if eaten within a day or two (as if anybody had to encourage you to rush to chow down on chocolate).