Raiding the larder of ideas.

What one family eats, plans to eat, dreams of eating. Plus, other food and kitchen-related stuff from the home of steak-and-potatoes, pie and fresh green beans from the garden.

Saturday, November 25, 2017

A Gem of a Cornbread Mix

Thanksgiving in our house means turkey and stuffing. And, by "stuffing", I mean cornbread stuffing. In this household, we don't cotton to deliberately making good wheat bread go stale, just so we can make it soggy again inside a dead animal. Cornbread, toasted lightly so it's crispy, makes a much richer base for the rest of the ingredients, and remains firmer as it absorbs the juices from a roasting bird. Add to that, the nature of available grain for the first Thanksgiving dinner all those centuries ago, and imported wheat was not to be wasted, so cornbread is a more traditional flavor. Also, there's this wheat intolerance thing. Therefore, cornbread it must always be.

Now, as far as the feast is concerned, we don't mind taking the occasional shortcut – when I was much younger, we made our cornbread from the Jiffy™ mix. It was easy, tasty, and extremely inexpensive. But it has things in it (wheat flour)… well, you get the picture. So I looked around for wheat-free mixes, which usually get labeled as "gluten free". It's no skin off my nose if there's gluten from other grain sources, but, heck, if it's GF, it's also devoid of wheat, so, yay!

So, I tried a honey-cornbread mix from Aldi, and a similar Krusteaz GF mix, and both were very good. Very, very good.  They were just too sweet to use in the bird. We want savory. So I hunted and experimented, and finally found the recipe for me, for this. And I set it up so that Pop, if he gets bored, can make his own, by adding a few basic ingredients, just as though he'd gone & gotten himself a mix from the store.

It's a basic formula for skillet buttermilk cornbread, so you can bake it in one great honkin' disk, or you can turn it into adorable little bite-sized nuggets (my preference, so that I can crumble as many as I want into halves, and save a few to eat with a bowl of chili.).


Basic Cornbread Mix (and assembly instructions)

The Mix:
Ingredients:
1/4 cup (4 Tablespoons) powdered buttermilk (or powdered milk, if you prefer)
1 cup gluten-free all-purpose flour (I like Pamelas, but Bob's Red Mill 1:1 is good, too)
3/4 cup corn meal
2 Tablespoons granulated sugar
2 1/2 teaspoons baking powder
3/4 teaspoon salt

Directions for mix:On the outside of a 1-quart zipper storage bag, write instructions in indelible ink* (I like black or blue Sharpies for the purpose) the necessary instructions for baking, which are as follows:

Preheat oven to 400º F. In a medium bowl, combine 2 large eggs, beaten, 1 cup water, and 1/4 cup (1/2 stick) unsalted butter, melted. Mix well. Add dry mix, stir until just mixed (do not overmix!)
Spoon mix into small muffin tins, filling each reservoir to 3/4 full, and bake 15-17 minutes (until golden browned.  Makes up to 3 dozen.

Or, pour into an 8-inch square pan and bake 25-30 minutes (or until a toothpick inserted in center comes out clean).
Allow to cool briefly in pan.


In a medium mixing bowl, whisk all the dry ingredients together. Pour into zipper bag, store until needed – if you plan to use it within a few weeks, it can rest on a shelf. If you're uncertain when you'll get to it, freeze it for up to 9 months, and bring to room temperature before mixing.


*You can print out a card with the instructions, and attach it to the bag, if you're feeling lazy.

Simple cornbread dressing, for use as turkey stuffing

Our Thanksgiving turkey doesn't get all decked out the way some others' do. For several generations, now, we've kept it neat and simple, because...why mess with perfection? You pick up a bird, make sure the brine isn't one with too much salt, sugar, or peculiar flavor additives (if I had my druthers, we'd drive an extra 40 minutes -- round trip -- to get one unbrined, so I could fix it just right, but I don't own the car or the budget, so...) 

Not Norman Rockwell, but darned close to it ;)
Anyway.

Plan to begin the process at least three days ahead of serving, because you need *stale* cornbread. And -- here's the tricky part -- you generally don't want that cakey, overly-sweet mix with the honey in it. You want a basic, savory cornbread. If you buy a mix, keep it simple, and buy a couple of boxes of Jiffy brand, or for those who have family with celiac issues, Krusteaz makes a fairly nice gluten-free version. They're as reliable as you can get. For me, since I'm cheap, have problems with wheat, and Pop sometimes gets in a baking mood, I make my own cornbread mix, using Pamela's gluten-free all-purpose flour and Saco brand powdered buttermilk..

Make a double batch of your savory cornbread, using melted butter where it calls for oil. Don't cut corners. This is a holiday food. 

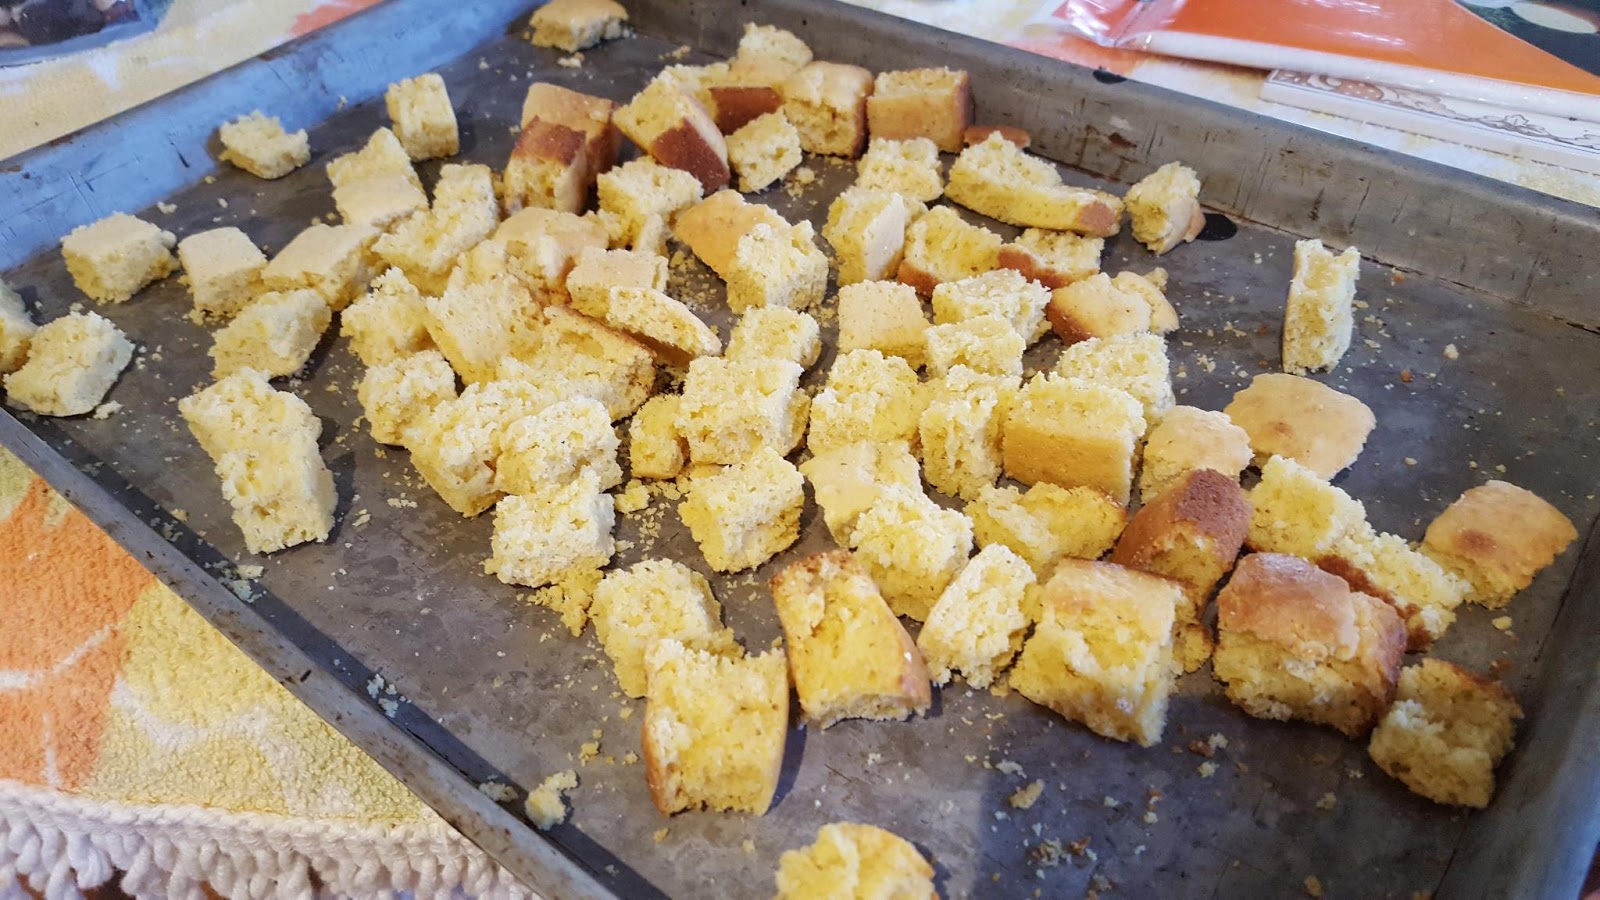
Once you've baked that cornbread and it's just cooled enough to handle, cut it into cubes. Itty bitty cubes. You know those croutons you get at restaurants, from the salad bar? Aim for a tad bigger than that size. Ballpark it, if you have to, but you don't want them any bigger than an inch long. Or, if you have a kid who wants to help, have him break up the cornbread into pieces comparable to the end of a thumb, from joint to tip. 

Cornbread r squared
When it's all in bits, the cornbread needs to thoroughly dry out. Spread it out on a pair of cookie sheets, or a tray of foil, or whatever will allow you to have a loosely-distributed single layer of cubes or crumbs. If you're in a hurry, pop it right back in the not-yet-completely-cooled oven, set the temp around 200°F, and let it toast for 20 minutes, then turn off the oven and leave the cornbread chunks alone in there until you're either ready to assemble the rest of the dressing, or you need the oven for soething else (but – and I cannot emphasize this  enough, based upon my own experiences – do not forget it and let it burn. That makes it taste nasty and will set off your fire alarm), whichever comes first.

Then comes the second stage.

You need a roasting pan and a bird.

A minimum of 12 pounds is ideal, for the bird. The weight of the pan is mostly irrelevant, unless you're dealing with a monster bird and a teeny, flimsy, disposable foil pan which... please don't. Go find a real pan. 

Once you have the  pan, and the plan...Panama! Oh, wait. No, let's not butcher a palindrome. Let's just prepare a bird. You'll also need cheesecloth and butter. And a baster or a good spoon for ladling, to baste a roasting bird.

But the bird is another page…

This is about the dressing.

Cornbread. Butter. Mushrooms. Onions. Celery. Rubbed sage. Salt. Pepper. If you have it, chicken or turkey stock. 

Around here, every time we buy a chicken or turkey, we take the bones and other scraps (especially the roasted skin) out before anybody can gnaw on them, and we turn them into our own long-simmered bone broth, which we bag up in a corner of the deep freezer. You can probably get away with using store-boughten broth, though, if you need. I don't recommend the powdered or cubed bouillon, though. Get some good stuff. This is a holiday, gosh dern it!

Once you have all the ingredients prepared, you can make the dressing as much as 24 hours before you plan to use it, but if you're going to stuff the bird with it, don't do that part until right before it goes into the oven (don't want to risk salmonella coming to dinner).

From this point forward, it's all in the assembly, and it becomes a matter of personal taste.  You may decide you want to add a cup of cooked sausage, chopped apples, fresh cranberries, chopped dried apricots, or any of a a gazillion potential combinations, you may decide you like more moisture, or gravy folded in at the beginning… this is just the simple, clean base we like best.

Cornbread Dressing (for use as stuffing, too)
Ingredients: 
8 cups crisply stale or toasted savory cornbread cubes (make at least 2 days ahead, for proper firmness)
2 cups lightly seasoned, low sodium turkey or chicken broth
3/4 cup butter (1 1/2 sticks), divided into thirds, cut into tablespoon-sized pats
1 pound cleaned, sliced button or cremini (baby bella) mushroms 
1 small red onion, cut coarsely (about 3/4 to 1 full cup)
1 large or 2 small sweet onions, cut coarsely (I use Vidalia onions, when I can)
3 cups celery, sliced on a bias, about 1/4 inch thick – leaves included
1-3 teaspoons rubbed sage (I'm from the less-is-more school, where this is concerned)
1 teaspoon salt
ground pepper to taste 

Directions: 
Prepare the cornbread well in advance – baking, breaking into cubes, and allowing it to become crunchy-stale. Put it in a very large bowl.

A bowl full of crunchy bits

In a small saucepan or microwaveable bowl, heat broth until simmering (no need to boil).

Heat a large frying pan, wok, or sauté pan at high temperature. Melt 1/3 of the butter, and, as soon as the solids begin to turn golden-brown, add in half the sliced mushrooms, tossing them to lightly cover with the butter. Allow to cook on high, relatively undisturbed, until they start to brown and slightly crisp, stir, allow other sides to brown around the edges.  Stir into the bowl of cornbread crumbs. Repeat with second half of mushrooms.


'Shroomies. I like to make 'em squeak with anxiety from the high heat.

Two – count them, TWO – varieties of mushrooms, for nuance. Also, these were on sale.
With the last portion of butter, in the same frying pan, stir fry the celery, onions, rubbed sage, salt, and pepper until onions turn translucent. Add 1/2 cup broth*, stir (mostly this is to deglaze the pan & pick up all those caramelized flavors sticking to the bottom).  Add to cornbread and mushrooms. Stir well. Here is where you need to use a little restraint: you may need to add some more broth, at this point, if the bread is still too crisp in the center. But if you add too much, you'll make it soggy and gross. So, if you're adding more broth, do so a couple of tablespoons at a time, tossing well with the wooden spoon after each addition – until the bread is moistened, but still noticeably firmer than you like it when it's served at the table. Then quit adding.  There's already a substantial amount of moisture coming from the vegetables. 

Less is still more.

Onions, celery, rubbed sage, salt, pepper…these are actually pretty tasty even without the rest of the dressing. But let's not stop short of perfection.
Set aside until cool enough to handle. 

May be refrigerated overnight, in bowl (or 1.5 gallon zipper bag).

When you fill your turkey with this, be sure to avoid overstuffing it. It should be very loosely packed into both the body and neck cavities, with plenty left over. What won't fit, put back into the fridge until just before the bird is due to come out of the oven. 

When the turkey is due to come out of the oven, bring out the remaining dressing, put it in a large, buttered, oven-safe bowl, and set it close to where you'll be letting the turkey rest (yes, you'll want a foil tent for the bird, and you'll want the thing to sit under that tent for at least 20 minutes after coming out of the oven, before you try to carve it).  Before you do anything else with the turkey, scoop the stuffing out of the cavities and add it to the reserved dressing. Stir it together, then place it in the oven until completely warmed (about 20 minutes). 


Close. Gonna add another spritz of broth.


*Odds are, you won't need much – if any – of the remaining 1 1/2 cups of broth, but if you like your dressing to be more like a bread pudding, you may want to add it into the mixture until the cornbread is saturated.  We prefer to leave a little bit of resistance – firm cornbread, crunchy bits of celery, etc. I have been known, though, to stir in a half cup or so of gravy right before I put it on the table.


Feast! Family! Fun!

Thursday, March 09, 2017

Praline and Butter Pecan Pound Cake (an experiment) (gluten free)

Ring of No Regrets
In case you hadn't figured this out, I love having the opportunity to bake birthday cakes. Twice a year, I get to design and build something more for show, because the feasting will be done, in the majority, by youthful philistines... that is, the party guests of my favorite house monkeys. ;) And so, I have created rough sculptures from flour, sugar, and butter.

This weekend is another birthday, though, for an adult in the family. No sculpture necessary. It just has to be tasty as heck and not look as though a train ran it over and it caused a derailment.

Therefore, I have the freedom to explore a variety of flavors, textures, and extra ingredients, all of which I hope will please the palates of the family. And I may have hit on one. Well, at least if the rest of the crowd isn't impressed, The Bat and I will have some extremely decadent treats.

Because…pecans and butter. What's not to love?


You know you want some of that butter and pecan bliss…

My inspiration was a recipe I found in my mailbox, but I had to adapt it to remove the wheat, and…well, once you mess with flour in a cake, there's a huge risk you're going to end up with something completely different from the original plan. I realize there are some very good gluten-free 1:1 all-purpose flours on the market (I generally use Pamela's™because it's reliable & reasonably priced), but when your recipe is in volume rather than weight, textures can vary. Also, I was interested in finding out whether a cake with nut meal in its base was everything the GF sites said it was.

It is.

Seriously, even if this had come out nothing but crumbs, I'd have spent an hour licking the last crumbs off the countertop.

Try it for yourself.


I made this one using a mix of pecans, brown sugar, and butter in the bottom of the pan. The sugar hardened, & needed help coming out of the pan (hence, the crumbly lines at what would have been the ridges), but it tasted like the Elyssian Fields...And WAY too sweet for most of the family.

Praline and Butter Pecan Pound Cake (gluten free)

Ingredients:

2 cups pecan pieces
3/4 pound unsalted butter (3 sticks) plus 2 tablespoons, divided
2 1/4 cups granulated sugar (plus more for pan)
3/4 cup light brown sugar, firmly packed
6 large eggs
1 1/2 cups almond flour (almond meal)
1 1/2 cups gluten-free 1:1 all-purpose flour
1 teaspoon kosher salt
1 1/2 teaspoon gluten-free baking powder
1/2 teaspoon baking powder
1 Tablsepoon pure vanilla extract
1 cup buttermilk
1/2 cup pralines (or simple pecan halves) (optional)

 Directions:

Set out all refrigerated ingredients at least 1/2 hour ahead of time, so that everything you work with is at room temperature.

Finely chop 2 cups of pecans (I use a tool designed expressly for the purpose). In a large frying pan, melt 2 Tablespoons butter, add in chopped pecans. Stir until butter covers the pieces completely, continue to stir until they're lightly browned (about 5-8 minutes). Remove from heat, set aside to cool.

Preheat oven to 325º F (approx 165º C).

Completely coat the inside of your non-stick baking pan with non-stick spray, then "dust" it with a coating of granulated sugar (I used a bundt pan, but you might want to pull out your large tube pan). Arrange 1/2 cup pecan halves facing downward on the bottom of pan.

In a small mixing bowl, whisk together granulated & brown sugars until evenly combined. Set aside.

Into a medium mixing bowl, sift together almond flour, all-purpose flour, salt, baking powder, and baking soda.

Using your stand mixer bowl with paddle (or a heavy-duty hand mixer, if you don't have a solid stand mixer) at low speed, mix together sugar and butter until just combined, add eggs and mix only until the yolks are broken.

With mixer continuing at low speed, begin adding in the dry ingredients a few tablespoons at a time until all combined.

Add in vanilla, mix in completely.

Add chopped pecans, stir by hand, if necessary.

Scoop batter into cake pan carefully, so as to avoid disturbing your layer of pecans.

Bake 75 minutes, or until toothpick inserted in center of cake comes out clean.

Remove from oven, allow to cool completely.
(If the cake sticks to the pan at this point, warm it a few minutes in the oven, to soften the sugar in the crust enough for it to release from the pan.)

Serve in small slices, perhaps with unsweetened whipped cream or with ice cream.

The Slaw Lane

Just about everybody has a version of slaw handed down from Grandma or stolen from a favorite eatery. It's an unwritten (s)law. 

Personally, I like working variations on a theme. There are the standards (simple shredded cabbage and dressing) and the fancified (mixed cabbages, finely grated fruits, nuts, wine dressings, and airs to put on), and everything in between.

Today, I opted for the "trendy" member of the cabbage family. Cauliflower. It's not because the fashion this year is all things cauliflower. We've been eating the stuff for years. 

It's because...well, just because. I like it. It's tasty, the salad is simple, and that's all.

You can buy cauliflower "rice" -- the pre-grated stuff --  if you're lazy. You can grate it by hand, if you must. Personally, I like putting a fine slicer blade into the Kitchen-Aid attachment (any food processor's fine slicer will do), so as to make pretty bites. 

And, once you have the shredded vegetable matter, the rest is simple.


Zesty Cauliflower Slaw

Ingredients:

1 small head cauliflower, sliced or grated (about 4-5 cups sliced, 3 cups "rice" style)
2/3 cup mayonnaise (I like Hellmann's/Best with Olive Oil, or – even better – homemade)
1 tablespoon rice vinegar
2-8 drops Tabasco sauce, to taste

Directions:

In a small bowl, combine mayonnaise, vinegar, and hot sauce to make dressing (you will want to use slightly less hot sauce than you think you'll need, because the cauliflower does amplify the heat of the sauce). Stir until completely mixed. 

In a medium bowl, stir the dresing into the cauliflower until evenly distributed. If you need to extend the dressing, sprinkle vinegar lightly and stir until every bit of the cauliflower is coated. 

Cover. Refrigerate at least 1 hour before serving.


It's that simple.