Raiding the larder of ideas.

What one family eats, plans to eat, dreams of eating. Plus, other food and kitchen-related stuff from the home of steak-and-potatoes, pie and fresh green beans from the garden.
Showing posts with label almond meal. Show all posts

Thursday, March 09, 2017

Praline and Butter Pecan Pound Cake (an experiment) (gluten free)

Ring of No Regrets
In case you hadn't figured this out, I love having the opportunity to bake birthday cakes. Twice a year, I get to design and build something more for show, because the feasting will be done, in the majority, by youthful philistines... that is, the party guests of my favorite house monkeys. ;) And so, I have created rough sculptures from flour, sugar, and butter.

This weekend is another birthday, though, for an adult in the family. No sculpture necessary. It just has to be tasty as heck and not look as though a train ran it over and it caused a derailment.

Therefore, I have the freedom to explore a variety of flavors, textures, and extra ingredients, all of which I hope will please the palates of the family. And I may have hit on one. Well, at least if the rest of the crowd isn't impressed, The Bat and I will have some extremely decadent treats.

Because…pecans and butter. What's not to love?


You know you want some of that butter and pecan bliss…

My inspiration was a recipe I found in my mailbox, but I had to adapt it to remove the wheat, and…well, once you mess with flour in a cake, there's a huge risk you're going to end up with something completely different from the original plan. I realize there are some very good gluten-free 1:1 all-purpose flours on the market (I generally use Pamela's™because it's reliable & reasonably priced), but when your recipe is in volume rather than weight, textures can vary. Also, I was interested in finding out whether a cake with nut meal in its base was everything the GF sites said it was.

It is.

Seriously, even if this had come out nothing but crumbs, I'd have spent an hour licking the last crumbs off the countertop.

Try it for yourself.


I made this one using a mix of pecans, brown sugar, and butter in the bottom of the pan. The sugar hardened, & needed help coming out of the pan (hence, the crumbly lines at what would have been the ridges), but it tasted like the Elyssian Fields...And WAY too sweet for most of the family.

Praline and Butter Pecan Pound Cake (gluten free)

Ingredients:

2 cups pecan pieces
3/4 pound unsalted butter (3 sticks) plus 2 tablespoons, divided
2 1/4 cups granulated sugar (plus more for pan)
3/4 cup light brown sugar, firmly packed
6 large eggs
1 1/2 cups almond flour (almond meal)
1 1/2 cups gluten-free 1:1 all-purpose flour
1 teaspoon kosher salt
1 1/2 teaspoon gluten-free baking powder
1/2 teaspoon baking powder
1 Tablsepoon pure vanilla extract
1 cup buttermilk
1/2 cup pralines (or simple pecan halves) (optional)

 Directions:

Set out all refrigerated ingredients at least 1/2 hour ahead of time, so that everything you work with is at room temperature.

Finely chop 2 cups of pecans (I use a tool designed expressly for the purpose). In a large frying pan, melt 2 Tablespoons butter, add in chopped pecans. Stir until butter covers the pieces completely, continue to stir until they're lightly browned (about 5-8 minutes). Remove from heat, set aside to cool.

Preheat oven to 325º F (approx 165º C).

Completely coat the inside of your non-stick baking pan with non-stick spray, then "dust" it with a coating of granulated sugar (I used a bundt pan, but you might want to pull out your large tube pan). Arrange 1/2 cup pecan halves facing downward on the bottom of pan.

In a small mixing bowl, whisk together granulated & brown sugars until evenly combined. Set aside.

Into a medium mixing bowl, sift together almond flour, all-purpose flour, salt, baking powder, and baking soda.

Using your stand mixer bowl with paddle (or a heavy-duty hand mixer, if you don't have a solid stand mixer) at low speed, mix together sugar and butter until just combined, add eggs and mix only until the yolks are broken.

With mixer continuing at low speed, begin adding in the dry ingredients a few tablespoons at a time until all combined.

Add in vanilla, mix in completely.

Add chopped pecans, stir by hand, if necessary.

Scoop batter into cake pan carefully, so as to avoid disturbing your layer of pecans.

Bake 75 minutes, or until toothpick inserted in center of cake comes out clean.

Remove from oven, allow to cool completely.
(If the cake sticks to the pan at this point, warm it a few minutes in the oven, to soften the sugar in the crust enough for it to release from the pan.)

Serve in small slices, perhaps with unsweetened whipped cream or with ice cream.

Wednesday, April 06, 2016

Lemon Meringue Bites (gluten-free)

I split this one with Pop before dinner. It didn't spoil our appetites at all.

This time of year is the big birthday season, in our family (we have a LOT of Aries' babies, if you're into astrology). As such, the first thing on the agenda is always the birthday cake (for which I have already produced a couple, and will have another constructed, this coming Saturday) …or, in Pop's case, as you may recall, the birthday pie.

I used to enjoy the Bat's divine lemon meringue pie, myself. And then I found out I had that little problem with wheat. So Pop's favorite dessert – and mine – was no longer on my menu. Seriously. Even with the many varieties of GF flours on the market, it just didn't work, because one of us would be left unhappy.

Or so I thought.

This week, I stumbled across a recipe for gluten-free lemon squares in a King Arthur Flour's email, and realized that I could very easily adapt the nut flour shortbread crust to our "ancient family secret" pie recipe. And, since this was an experiment, and I really can't eat a whole pie by myself, I had to spend some time re-figuring the structure and time on this project.

As luck would have it, our kitchen is stocked with several different types of baking pans, among them a mini-cheesecake tin I bought for myself a couple of years ago and had thus far only used for brownie bites. It really makes removing treats from those little wells so easy!

A few things for me to consider, the next time I make these (and I will be doing so fairly frequently, now) :

1. The wells in the mini-cheesecake tin are a little over 4 centimeters deep, and this dough, while tender, is fairly sturdy. I could make the reservoir in the cookie even deeper than I did (they ended up being halfway up, or roughly 2 cm). I like the flavor of the cookie, though, and, with a strong citrus curd, it's not a bad idea to keep it almost effectively a "thumbprint tart". If I do decide to press them to accommodate more curd, I'll break out the wooden tart/tassies press instead of letting my thumbnails interfere in the process. That way, I'll easily produce 12 tartlets, instead of the nine I got this time.

2. In making the meringue, I'll add about 1/4 teaspoon lemon juice, and a little zest, too. I accidentally spilled at least a full teaspoon of juice into my egg whites (Captain Coordination strikes again!), and, rather than waste them, I gave it a whirl. The meringue tasted amazing, but, unsurprisingly, fell almost immediately after it came out of the oven, becoming gooier and a spot tougher. However, I've used a small amount of citrus juice before, in making meringue cookies, and, for three egg whites, a hint (1/4 tsp, added in near the end of beating the egg whites & before adding the sugar) is all I need as a substitute for the cream of tartar (to which I am very allergic).

3. Use a wire cheese cutter to slice butter into half-centimeter cubes before tossing them into the freezer for a really good chill.

4. It is possible to make these little bite-sized treats using only the mini-cheesecake pan, but I found that the cookie cups held up very nicely outside the pan, and took on a more attractive hue when browning the meringue. Plus, it's easier to hand-clean the pan elements if there's no meringue baked on.

5. Always make more lemon curd than you think you're going to need. Not that you'll actually need it, but who doesn't want a little custard cup of lemony heaven once in a while?

That pretty curd is Meyer lemon, this time.

Here is the recipe, as I attempted to work it today:


Lemon Meringue Bites (gluten-free)

Ingredients: 

cookie shell:
6 Tablespoons butter, diced and hard-chilled
2 cups blanched almond flour (or fine-ground almond meal)
6 Tablespoons sugar
3 Tablespoons corn starch
1/4 teaspoon salt
finely grated zest of 1 small lemon

filling: 
3 egg yolks
3/4 cup sugar
grated zest of 1 small lemon
1/3 cup lemon juice
2 Tablespoons butter
2 Tablespoons corn starch
pinch salt
1 1/4 cups boiling water


meringue:

3 egg whites
6 Tablespoons sugar
zest of 1 small lemon
pinch salt


Directions:

Preheat oven to 350º F.

Lightly butter the wells of your baking tin.

Make the shortbread cookie shells: In a small mixing bowl, whisk together all the ingredients for the cookie shell except the butter. When your dry ingredients are thoroughly mixed, add in the mostly-frozen butter cubes and work into dough using a pastry blender or your fingers. Don't overwork it, but be sure that there are no large clumps of butter in the mixture. It will resemble coarse, moist sand when it is ready.

Fill each cup in the baking tin with the loose mixture, then proceed to press it against the sides and bottom of the cup (yay! building sand castles in the kitchen!).

Place in oven, bake for 15-20 minutes, or until golden brown.

Remove from oven, allow to cool completely in the pan on a cooling rack.

When the cups are cooled, remove them carefully from the pan, place on a cookie sheet or another baking dish.

While the cookies are cooling, make the filling and the meringue.


Make the lemon curd: Prepare a double boiler (or, if you don't have one, improvise one by resting a heat-proof bowl over a saucepan with about an inch of room for the water beneath it). In a medium mixing bowl, beat egg yolks thoroughly by hand. Add in all other ingredients except the water. Mix completely.

Add in the boiling water, pour the mixture into the top of the double boiler, and stir over simmering water until it begins to thicken. Allow to cook another 10 minutes, until completely thick.

Fill each cookie cup with curd. If there is any left over, pour (or scoop, as the case may be) into a custard cup, and save that for later misconduct.


Prepare the meringue: If you were energy-conscious and turned your oven off while the cookies were cooling, re-heat the oven to 350º F.

In a small mixing bowl which has been cleaned thoroughly to make sure there is no residual oil in it, beat egg whites on medium speed until soft peaks begin to form. Add in lemon juice while the mixer is still running, then gradually add in the sugar. When the eggs become glossy and medium-soft peaks can be formed, fold in the lemon zest. At this point, you can scoop the meringue into a pastry bag and form pretty designs on top of your cups, or you can go random with a spoon, the way I prefer.
Meringue in dollops. Lots of dollops.


Waste not, want not. Leftover lemon curd is fine alone, or with a pretty leftover meringue topping.

Bake at 350º F for 15 minutes, or until golden-browned.

Remove from oven, allow to cool completely (cover & chill overnight if you think you can leave them alone that long).


Ain't misbehavin'. Savin' my curd for lunch.


Sorry about the color. Kitchen table lighting doesn't do the warm golden meringue tips justice, especially on a green dish. But it was what was at hand as the crowd started arriving.

Wednesday, December 30, 2015

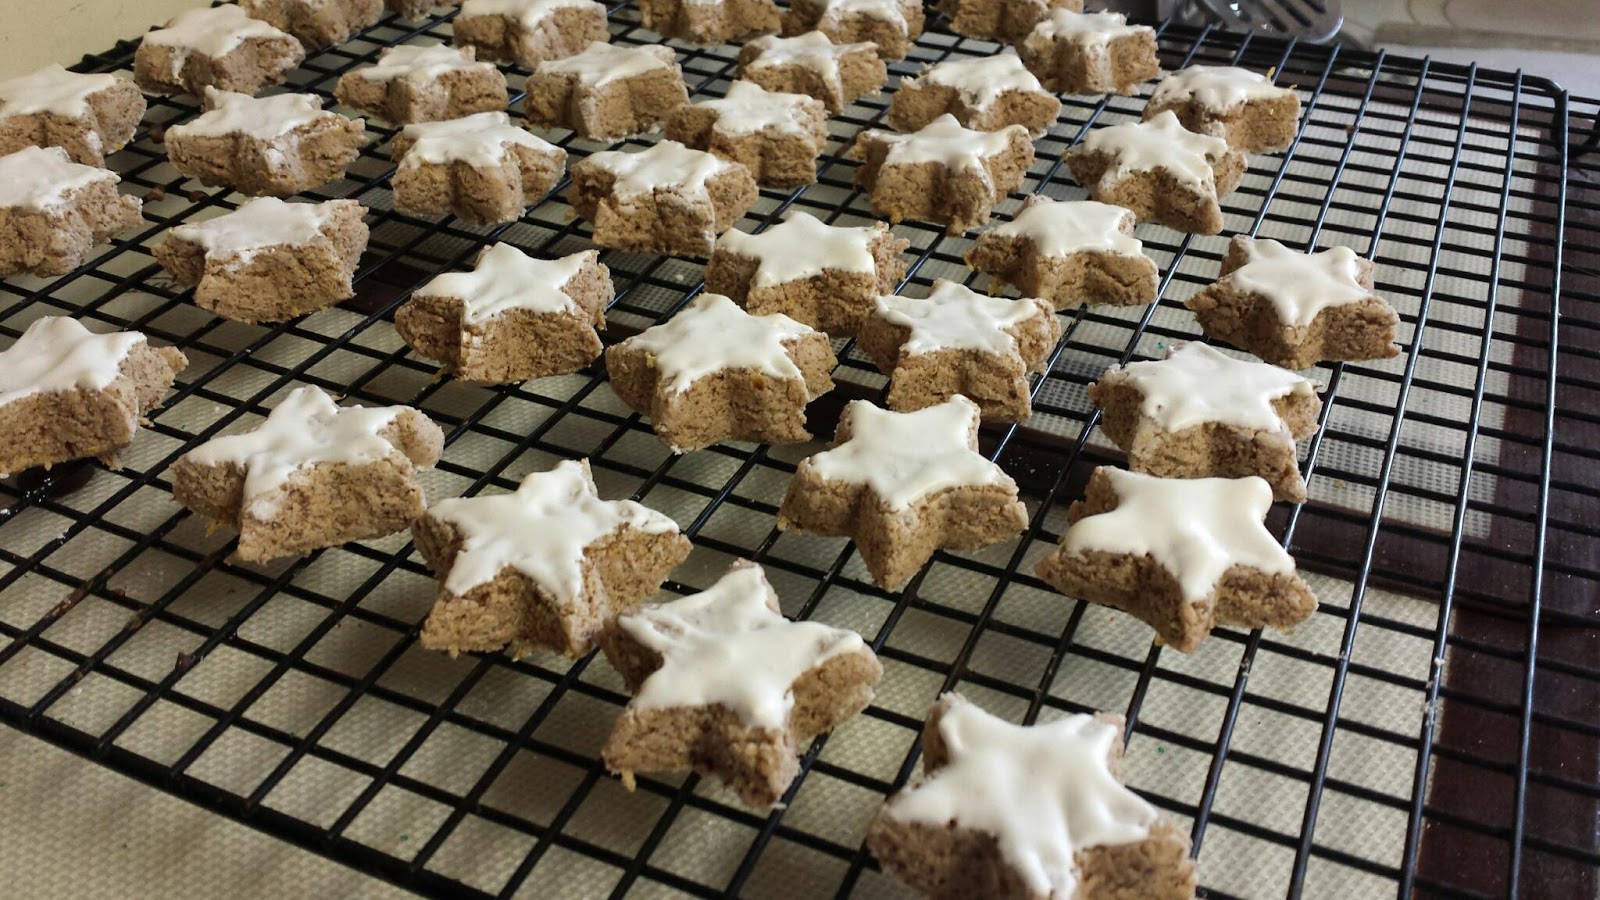
Cinnamon Christmas Stars, aka Zimtsterne

This is one of those recipes which is not outrageously expensive, and yet is outrageously tasty and outrageously easy to make – the latter especially so, if you have a young'un or two around the house who happen to be willing to help out with the cutting and slathering with icing. But even without my having assistance of Ilex, 


this Christmas treat is one I'll be making regularly…possibly even outside the holiday season. It's that good. Plus, it's gluten-free by its original design, so there is that, as well. I don't have to worry about remembering to adapt my freezer-full of flours to meet the current needs.

I do recommend bringing out your most accurate kitchen scales before you get started, too. Not only is it what the original recipe called for, but I find that – as professional bakers have assured me – dry ingredients may vary wildly in their density from one milling to the next, so one cup of something one day may be 10% heavier than the next day, so you'll have less predictable results.

However, I will need to study further, to see if they can be made with alternative sweeteners, for my other friends who are on low- or no-sugar-added diets. But, as a certain non-German woman once said, "I'll think about that tomorrow." I'll finish eating giving away these, first.

Heh.

Meanwhile, here's what we have: starting with this recipe, and adapting slightly to our kitchen. 

Zimtsterne (Cinnamon Stars)

Ingredients:
3 egg whites
250 grams powdered sugar
360 grams finely ground almonds or almond flour (I used non-blanched for this batch)
2 1/2 tsp cinnamon
Fresh, finely-grated zest of 2 small lemons (about 2 Tablespoons)
Pinch of salt

Directions:
Make sure your mixer bowl and whisk attachment are completely clean and free from any oils before you start. (I recommend washing, drying, and then taking a paper towel or cloth moistened with cider vinegar to wipe it clean again, to be doubly sure.)

In that bowl of your stand mixer, using the whisk attachment, beat egg whites until they become foamy.

Begin adding the powdered sugar in small batches (a few tablespoons at a time) while the mixer is running. Beat on high until the meringue is very shiny, but before very stiff peaks form. This may take ten minutes or more, so be patient.

Remove 50 g of the meringue (about 1/3 – 1/2 cup) to a small bowl, cover and refrigerate.

Next, in a medium bowl, whisk together the ground almonds (or almond flour), cinnamon, lemon zest and salt. 

Fold dry ingredients into the remaining meringue mixture until just evenly distributed, and no more. (If it feels really thick and dense, don't worry. This recipe bakes up light, almost airy cookies, despite its feeling like you're stirring nearly-hardened concrete.)

Tip the contents out onto a large sheet of parchment paper sprinkled with powdered sugar. Sprinkle the top of the mixture with some more powdered sugar and top with another sheet of parchment paper. Roll out the dough to just under 1 centimeter thick. Refrigerate 1/2 hour to an 1 hour, to help firm up dough and reduce its stickiness.

Once sufficiently chilled, remove from refrigerator, peel off the top sheet of parchment and sprinkle again with a bit of powdered sugar.  Coat your star cookie cutter with nonstick spray and wipe excess away. Then, dipping your cutter into powdered sugar each time, cut out the stars and place fairly close together on a parchment-covered cookie sheet (they don't expand very much). Continue to collect the dough into a bowl and roll out until all is used up.

Preheat the oven to 300° F., or 150º C.

Using an offset spatula or a knife (I use a tapered icing spatula, for more precise application on the star points)  spread the remaining meringue mixture evenly across all stars, making sure it doesn’t drip down the sides. Place in oven and bake for 8-10 minutes. Keep an eye on them --  you don't want the meringue to brown, just cook and crisp up a little.

Let cool on the cookie sheet for 5 minutes and then transfer to a cooling rack. Allow to completely cool. Store in an airtight container for up to a few weeks.

Makes about 50-75 6cm (roughly 2 inch) 2-bite stars. Larger cookie cutters will, obviously, make fewer cookies, and be slightly less challenging to get unstuck from the pointy parts of the cutter. 


Update: I've given a try to substituting an artificial sweetener for another batch (1 cup Splenda instead of the sugar). The flavor is as good, and the cookies are as tender as the regular ones (if a wee tad drier on the tongue), but it seems that the Splenda-based meringue topping, when left to sit in the refrigerator for a while, tends to curdle. This may mean I over-beat the eggs (easy enough to do when you're whipping eggs without sugar), but I think I'd like to give a try to separating out one egg white in advance – or measure out prepackaged egg white – and whipping that up with sweetener, only after I've allowed the dough to chill, and I'm ready to cut the stars.
They're not as pretty as the real sugar version, but I'll have no qualms about noshing on them, or sharing with others…if I have to.

Monday, January 03, 2011

Graham Cracker Fudge (aka nutty fudge nougat)

It's a cross between a candy and a no-bake bar cookie. And it's a sin not to nibble.


Some years back (possibly even before I was born), the Bat caved to impulse and picked up one of those little booklets of recipes they put in the racks by the cash registers at the supermarket. We don't usually cave to the allure of candies, or to the wild and woolly displays of the tabloids, but recipes -- well, that's quite another thing. And when the Pillsbury prize-winning ones come out, heck, that's like catnip to us. We don't always have to try every one of them, but we has to has, my precious... That's where this one comes from, originally, with slight variations.

Best made near Christmas, so you can justify making lots of it, and taste-testing every last batch.

When we make a batch, it usually disappears in short order. You can probably imagine why.

They're very rich, and in no wise carb-neutral, but they're butter-and-chocolate heaven. And they can be made wheat-free!

So I went a little nuts…

 
Graham Cracker Fudge

Ingredients:
4 c. sugar
1 c. butter
1 can Milnot (or plain evaporated milk)
1 c. semi-sweet chocolate chips
1 1/2 c. all-purpose flour*
2 c. graham cracker crumbs*
1 1/2 c. chopped nuts (optional)†
2 tsp vanilla
 pecan halves (optional)

Directions:
Combine sugar, butter, milk product in 3-quart (or larger) saucepan, bring to a boil stirring constantly.

Once in full rolling boil, allow to continue for 10 minutes, stirring occasionally.

Remove from heat, stir in remaining ingredients until well-mixed.

Spread into a greased jelly roll pan. Allow to cool (may be refrigerated to speed the setting-up process). Cut into 1-inch squares. Top with nut halves, if desired.


* if you need to prepare this for someone on a gluten-free diet, of course you should substitute 1:1 gluten free all-purpose flour for the regular flour (I have, most recently, been using Pamela's, easily available for subscription via Amazon), and, instead of graham cracker crumbs, use almond meal (almond flour). In the depicted batch, I used the unblanched meal, but there's no set rule on this one. I have discovered that, in fact, using the almond flour instead of graham crumbs makes these more tender. There's a fine line (the difference of less than a teaspoon), in using graham cracker crumbs, when these things go from delightful to dry. That doesn't seem to happen with the nut flour.


†Recently, I experimented with adding coarsely-chopped dried tart cherries, along with the chopped pecans. It was pretty darned spiffy. But these goodies need no embellishment. They're just decadent and sinful all by themselves...