Raiding the larder of ideas.

What one family eats, plans to eat, dreams of eating. Plus, other food and kitchen-related stuff from the home of steak-and-potatoes, pie and fresh green beans from the garden.
Showing posts with label birthday. Show all posts

Saturday, September 13, 2014

Sculpting a White Rabbit Carrot Cake with All Sorts of Extras…

I made my last solo effort for a friend's daughter...next year, she will be turning thirteen, and will help design and construct her own cake, pooling our resources. This year, though, she got a rare bit.

I based the form (very loosely) upon the Tenniel drawing from Alice in Wonderland,
and, knowing my own abilities were VERY limited, I simplified more than a little, and still had a major project.

So, she had a magic-themed birthday party, with a white rabbit, playing cards, some Butterbeer...but that's another story. The Cake is what we're all about.


So, to introduce the cake:

It's a hare off-kilter, but that's life.


I'm betting you didn't know the White Rabbit's real name was Julius Caesar. This guy got et, too.

I know, I know – the poor hare looks like he's in the middle of an acupuncture session. I did try, initially, to build a ruffled collar which would also hold the candles, but the royal icing and the meringue options failed, so I was forced, at the last minute, to make a swirly, somewhat lace-topped disc of white chocolate, and didn't have the time or skill to place the candles in it without trashing them in transit, or to put dots of royal icing on it to receive the little sticks of wax upon their arrival at destination. So, we had a poor pitiful pincushion. 

But I imagine he looks quite spiffed up with flames surrounding his adorable meringue bunny ears (they didn't crumble the way so much else of meringue does when I'm under pressure).

For the record, there is quite a variety of foodstuffs involved in the making of this project. I made two cakes: one, in a giant cupcake mold, is a carrot/pecan/cranberry cake. His torso, legs, and head were those parts, carved up a bit to meet the needs of the design. He's leaning against a wall of more carrot cake – this time, gluten-free (substituting Bob's Red Mill All-Purpose GF Flour for the regular AP flour in the Bat's basic recipe) and fruit-free. He is assembled using two frostings: lemon royal icing (the glue), and lemon/cream-cheese/buttercream frosting (the decoration), both whipped to a fare-thee-well.

His collar is white chocolate, plain and simple, straight from the supermarket, melted in the microwave oven, and shaped on a turntable before chilling. His ears, arms, and trumpet are lemon-flavored meringue. The cards fanning the wall he's leaning upon are chocolate sugar cookies with a basic vanilla royal icing. The large placard is a tender gluten-free chocolate shortbread with a chocolate-cinnamon-Cointreau royal icing. Decorations on card and placard are done using meringue powder wash (a teaspoon of meringue powder mixed thoroughly with 3 tablespoons water), painted on, and then sprinkled with colored sugar.

I did also "spray paint" a few features: the trumpet and the hearts on his jerkin (torso parts). Wilton has some very nice edible paints in cans, and I have enjoyed taking advantage of them for occasional use. I suppose I could have gone over the top and bought some pearl dust, but…maybe next year. They carry a nice, wide variety of decorating products at my favorite boutique, but if you don't live in my region, you can find them all at Hobby Lobby, Michael's, or, of course, Amazon.

In the interim, I hope to eventually get the proper posts up, including the Bat's recipe for carrot cake & the cream cheese frosting, the chocolate shortbread cookie, and the chocolate royal icing. Let me gather my notes and energy, and I'll get right on that.  

Meanwhile, I ended up running out of steam by the end of the day.  My chauffeur (hi, Bat!) arrived a little before the celebrants were ready to approach the cake (they had hot dogs, chips, beans, and a few other picnic foods), and I, having had a very long week, opted to come home right away, rather than to stay and watch the candles lit and blown out. Besides, the party really was for the roomful of tweens. I'd have been the one basking in the glory of the evening, instead of making it about her.   If her grandparents share pictures of the cake or her face all lit up, I hope I can post them, too. 

For now, though, I rest my weary self and enjoy the evening, and hope you'll do the same with your time.

Monday, August 26, 2013

Birthday SOS! We're eating sand!

Seriously. We had a message in a bottle, and it read in large, splotchy letters, "S.O.S.*", and below, the parchment read, "*She's Older Still!"

It was the party for Asteroidea's eleventh birthday. 

For her and her brother, I've been building entertaining little cakes each year on their birthdays. If you go back through this blog, you'll find a TARDIS (with Dalek cupcakes), A sailbook with Swedish Fish-filled Jell-O seas, a marshmallow-robot-infested spaceship, a giant cheeseburger and fries, with cherry ketchup, and a circus tent filled with candies. Before I started this blog, I'd built a chocolate locomotive and coal car… and a couple more. 

I try to leave them guessing what I have planned, and then to give them something a little absurd and yet tasty. Sometimes I cheat. I use mixes and store-bought tubs of frosting when I know nobody with serious taste buds will be eating the thing (i.e, if it's for the kids' party, and I'm fixing another for the grownups of the family).

With this one, I really didn't cheat. The cake was a from-scratch banana cake, with cream cheese frosting, the "sand" was a special blend of crumbs, the shells were homemade candies, and the pebbles in the sand… okay, I cheated on those. I ordered them from Amazon


But I did make the punch from scratch, too. See that watermelon half? Scooped out, and all that stuff put through a blender, then mixed 2:1 with seltzer. No sugar added, and the kids gulped it down. So did most of the adults (my parents are not fans of watermelon, & I'm allergic, but everybody else had multiple cups of the stuff.)

But the cake.


The cake.

I stumbled across one of my mother's old chocolate molds, and started plotting to make seashells and a starfish cake, but somehow every way I looked at my plan, it wasn't coming together.

I had been teasing Asteroidae that planning this party was driving me bananas. Then there was this make-ahead recipe for banana cake. And then, there was this lovely post on Cake Wrecks…OY! the gears started moving.

Granted, I'm no professional. I do this stuff strictly for the romp in the kitchen, and to make a couple of kids' faces light up.  But I do try. I don't expect my cakes to look anything like the Sunday Sweets, and am happy if they look slightly better than the other things featured on Cake Wrecks' regular pages.  And eventually I accomplish what I was hoping to do.

Five little girls and one little boy consumed just about every last grain of sand. Three women and two men nibbled rocks all evening. And they all had a load of fun.

I made the candy shells and the sand well ahead. The pink sugar shells were made using the "extra strong sugar molds" recipe at the bottom of this page, but substituting strained lemon juice for the water, and, once they were hardened, they were stored in the fridge until serving. The sand, however, took finesse. I learned long ago that sand isn't really "sandy" when you look at it closely. So you can't just use plain old Nilla Wafer crumbs and think you're making realistic beach scenes. You have to add texture, color, and, mmmm flavor. So I'm including my sand recipe, below.

The structure of the cake, by the way, was built by baking two 4x9" loaves and eight cupcakes – the cupcakes being four large (Texas Muffin sized) and four small (well, standard) cups filled to just above the halfway mark, and then, after baking, stacked small upon large to form the truncated cone "towers". The loaves were sliced lengthwise and crosswise, then their corners trimmed at an angle so they could nest around the cupcake "towers". When you do your own version, you'll find this initially requires improvisation.

Once you have all the components gathered and ready to assemble, frost them, build the castle, and cover with pebbles, shells, and, finally, the sand. Lots and lots of sand.

Edible sand

Ingredients:

1 Tablespoon almond bark (or, if you prefer, white chocolate)
2 1/2 cups graham cracker crumbs
2 or 3 dark chocolate wafer cookies (like Oreos w/o the cream filling), ground to fine crumbs (but NOT to dust)
3 Tablespoons brown sugar
3-5 Tablespoons yellow-colored decorating sugar
1-2 Tablespoon red-colored decorating sugar
1 Tablespoon green-colored decorating sugar
1 teaspoon blue-colored decorating sugar
5 Tablespoons regular granulated sugar

Directions:

In a microwave oven, melt the almond bark on a notebook-sized sheet of waxed paper or parchment. Using a butter knife or spreading spatula, spread the almond bark as thinly as possible. Put into freezer.

Combine other ingredients, either in a blender or using a medium bowl and a whisk.

Remove almond bark from freezer and, while still very cold, break or chop into fine chunks and crumbs. Mix into bowl with other ingredients. Put in storage container, seal, and refrigerate until you need to use it.

Saturday, April 06, 2013

DECORATE! DECORATE! Cupcake Cone Daleks

So, Monday afternoon I'm supplying the cake, the extra treats, and the decorations for a party celebrating a monkey-boy's seventh birthday. The event will take place at his grandparents' house, a few blocks from where I live and bake. The activities include watching an episode of Doctor Who and then building cupcake Daleks.

 photo 950c401f-a93a-419c-907e-018d953702c9_zps879f6cd5.jpg

In order for a riot of boys to do something like building an army of alien killer robots

there has to be a lot, A LOT of preparation, or chaos is the only thing they will generate.  After all, we are talking about sticky foods, spatulas, and an enclosed area (forecast is for thunderstorms, so there will likely be no romping in the garden). At any rate, rather than let them do as much damage as the same number of Daleks would, I've assembled the parts ahead of time.

The first stage is to get ice cream cups.

I had wanted to find some chocolate wafer cups (to make all-chocolate Daleks), but, for some reason, nobody in my area had any of them. Dang it, don't people in retail know that chocolate is a necessity, especially in these uncertain times? Well! Instead of leaving in a huff, I bought a box of colored cups, 
 photo 9ee1117d-10e9-4fea-bfe4-2476cc54ffaa_zpse63e9b90.jpg

and l left in a minute and a huff.*


Other than that, almost everything I needed was in stock in my own cupboards. I'm a regular boy scout, I am. 

In case you're not certain what you'll need to have in your kitchen cupboards for a project like this, here is a list of all ingredients:

  • cake batter, either your favorite recipe or a favorite box mix.
  • food coloring
  • simple whipped frosting, either your favorite recipe or from a little tub†
  • little pretzel sticks
  • m&m minis
  • helmets. 


That last one is the hardest to come by. I've considered using chocolate-covered cherries or other straight candy domes, but they all end up looking more square than rounded, so the Dalek doesn't look very… Dalek-y. At last, though, I found, at a Big Lots store, some of these chocolate-dipped marshmallow-topped chocolate cookies
 photo IMAG0534_zps62b1742b.jpg
Which looked a little less dented on the cover of the box,
 photo IMAG0531_zps6d57c1d4.jpg

but I decided I could live with it, and just let the boys pretend our Daleks had just been in a big battle.

Anyway, now to the construction of your invading army. 

The first thing you are going to want to do is to set out your ice cream cups. My box of ice cream cups had eighteen in it, but the recipe I use makes two dozen cupcakes. This is only a problem if you lack ambition. Either put set up some cupcake papers or those silicone cups, or get an eight-inch cake pan or brownie pan, butter it up or line it with parchment, and set it amid your workspace. Then stand your wafer cups up, either on a cookie sheet or each in its own cup of a muffin tin. 

Next, to make the cupcakes, follow your favorite recipe or the instructions on your box mix to make  a basic cake. If you're going with coloring the cakes as I did, stick with a white cake, because you want your colors to come out intense and cheerful. (But feel free to use your favorite chocolate cake. It won't be seen once you build the Dalek.) If adding color to a white cake, once the batter is mixed, divide into as many bowls as you have colors (the standard mix provides about 5 cups of batter, so do your math on that). Add food color until it reaches the desired tint. 

Spoon batter into bottom of wafer cups, until it nearly fills, to just under a centimeter from the top of the cup. When all the cups are filled, pour any remaining batter into the cupcake papers or the small cake pan (it will not be a thick cake).

Bake about 15-18 minutes, or until a toothpick inserted into the center of one comes out clean.  

Allow to cool completely.

Many of these will have domes upon their tops.
 photo IMAG0528_zps6fd415b1.jpg

You do not want this lovely effect, because you are going to invert the cupcakes, so, take a sharp, serrated knife and cut away the extra cake tops so that there is a nice, flat surface. Set the cupcake down on parchment or waxed paper. (The dots you cut away may be saved for a later project or just nibbled the heck out of.)


 photo IMAG0529_zps20de7500.jpg
Once it is on its paper, it is now ready for little hands to mess with it. 

Let them slather frosting around what would have been the base of the cup, but is now its top (this means the sides and the top). Have them stick a helmet on it. Then, it's a matter of setting in rows of those m&m minis (each Dalek will need at least 18 to 24 dots, depending on how tightly the child arranges his rows of dots.


 photo IMAG0535_zps2ab199da.jpg
Then they can dip one end of a pretzel stick into the remaining frosting, attach a weapon arm, break another pretzel in half (or bite a couple of them off so they're the desired length) and dip ends of those pieces into frosting, and attach them so they look, more or less, like this:

 photo IMAG0533_zps06829e28.jpg

Admire, and then INGURGITATE! INGURGITATE! INGURGITATE!


*Thank you, Groucho Marx.

†I made a several batches of white "buttercream" frosting, combining 1/3 cup water (plus a little extra as needed), 1/3 cup solid vegetable shortening (Crisco), and 4 1/2 cups confectioner's sugar, then added most of a packet of unsweetened Kool-Aid plus matching food coloring to make some frosting for the party. It's tart and tangy and probably not for adult taste buds. But I love the stuff. The Demonstration Dalek, though, is, as you can see, made from pre-fab frosting.

Saturday, March 30, 2013

Pop's Birthday Lemon Meringue Pie

Our family likes desserts of all sorts, but there is one sweet which reigns supreme, especially with my father, and that sugary delight, to the shock of some, is not cake. Indeed, with that in mind, for more than four decades, Pop has been treated on his birthday to one particular cake alternative.

He gets lemon meringue pie.

He gets his special lemon meringue pie.

Bat says she got the original from a women's magazine, back about the time I was starting kindergarten, so that puts it at the mid-1960s. Since then, she's made a few alterations, to keep everybody happy with this springtime treat.


 photo IMAG0506_zps73eb0aed.jpg

Pop's Birthday Lemon Meringue Pie

Pastry crust

Ingredients:

1 large egg yolk
2 Tablespoons ice water
1 Tablespoon lemon juice
pinch salt
1 stick (1/2 cup) butter
1 1/2 cups sifted all-purpose flour
2 Tablespoons sugar

Directions:

Beat yolk lightly and add ice water, lemon juice, and salt. Cut or work butter into flour, then add, along with sugar, to the egg mixture. Work ingredients together until they form a soft ball. Wrap in plastic and allow to chill in refrigerator at least 1/2 hour.

Remove from fridge, pat into 9" pie pan, flan ring, or springform pan. Place sheet of foil inside shell and fill with weights (beans or rice will do if you don't have ceramic pellets for the purpose). Bake in moderate oven (350º F) for 25 minutes.


Filling

Ingredients: 

6 egg yolks
1 1/2 cups sugar
grated rind of one lemon (about 1 Tablespoon)
1/2 cup lemon juice
3 Tablespoons butter
4 Tablespoons corn starch
1/4 teaspoon salt
1 1/2 cups boiling water

Directions: 

Beat egg yolks well, add remaining ingredients except boiling water, and beat again thoroughly. Combine with boiling water and pour into top of double boiler. Cook over hot water until the mixture thickens , then allow to cook 5 to 10 minutes longer over simmering water.

Pour into baked shell.

 photo IMAG0491_zps2943d42d.jpg
 

 Top with meringue.


Meringue

Ingredients:

6 egg whites
pinch salt
12 Tablespoons sugar

Directions:

Beat egg whites until they form soft peaks. Add cream of tartar and salt, continue to beat until whites are stiff but not dry. Add sugar, a little at a time, beating in thoroughly. Spread meringue over surface of the pie completely, including the edge of the crust. (If you want to keep the meringue from weeping, and would like a slightly drier meringue, you may wish to add 1/2 teaspoon cream of tartar, or 1 teaspoon vinegar and 2 teaspoons corn starch).

 photo IMAG0494_zpsfc456641.jpg

 Bake in moderate oven (350º F) 15 to 18 minutes, until the peaks are delicate light (golden) brown.


 photo IMAG0495_zpsc262418a.jpg


Serve room temperature or chilled.


 photo IMAG0505_zpsb26f87e5.jpg


 If there are leftovers (it is to laugh!), keep refrigerated.

Update: finally realized I had not listed tha amount of lemon juice required. It would have made an amazingly bland filling, without the stuff...

Saturday, March 31, 2012

Out of this world birthday cake

First, we have a seven-year-old boy.  Next, we have his nine-year-old sister who spends one afternoon per week as my art pupil.  Third, both children are practically my niece and nephew.  That's how important their family has been to me and my immediate family.

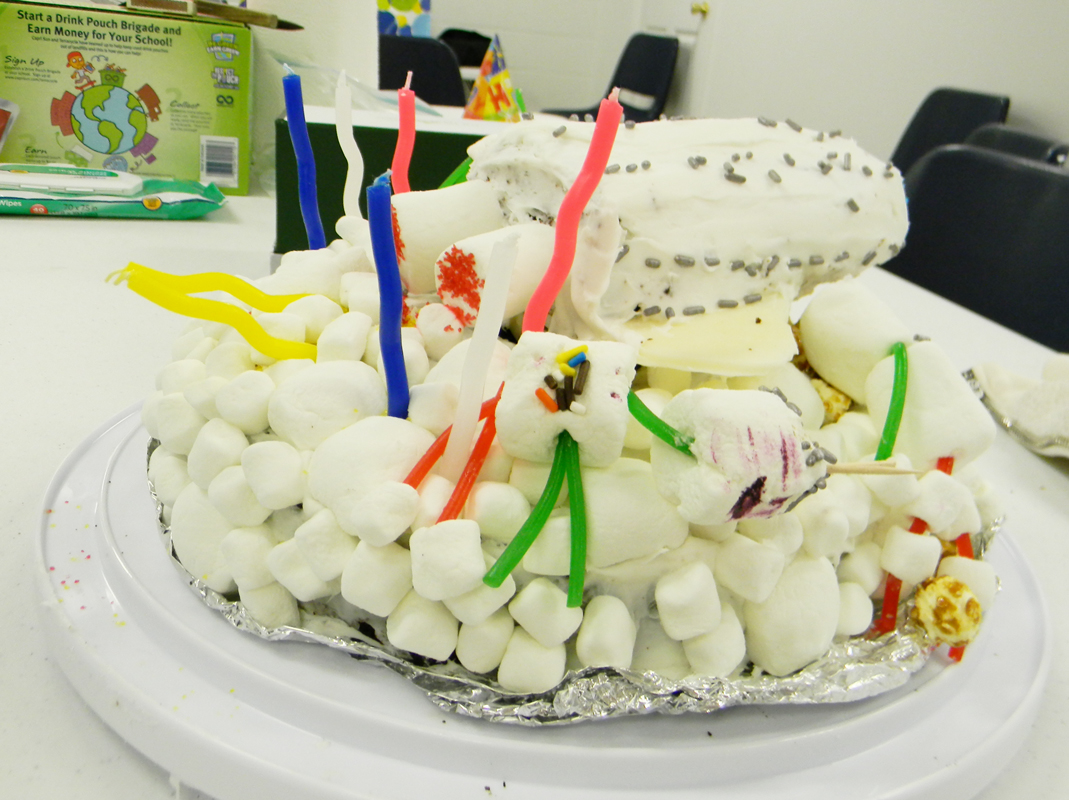
So, naturally, I beg for the opportunity to do the special cakes for their birthdays.  Last year, I built the circus tent cake, followed by the cheeseburger cake.  This year, the first cake was, again, chocolate cake, but with white fluffy whipped frosting and almond bark (aka white chocolate), plus a bazillion other ingredients.

You can see most of the bazillion, here.


The cake is a basic devil's food mix, with a little bit of buttermilk added for moisture and cohesion.  Since the whole thing was going to be fed to a mob of youngsters with undeveloped taste buds, I didn't worry about making a special frosting -- I bought a couple of tubs of whipped white, vanilla-flavored brand-name frosting.  I needed one and a half of them.

The cake was baked in two parts: a half-filled semi-cylinder loaf pan, and a basic tube pan (you could accomplish the same in a bundt pan, but ours needed a little love, so I went straight angel-food-tube pan.  Neither gets filled completely, unless you want to get wild and do a double-batch, in which case, you will have a leftover slab of your loaf cake.  As it was, I had a small section I didn't need for the sculpture, so I set it aside for a later, quiet family moment.
Anyway.  Once the cake was baked, cooled, and removed from the pans, I wrapped it and popped it in the freezer to make it easier to sculpt with.  In the meantime, my star pupil came over to help build the "alien robots" to decorate the cake.  This was done using both regular-sized and mini marshmallows, which were punctured by toothpicks (it helps to wet the toothpick, first), then stitched/pieced together to provide limbs, using Twizzlers® Pull-Aparts in both cherry and green apple (those would be the red and green strings).  Some of the faces were painted on, using a toothpick dipped in food coloring, while others were made sticking colored jimmies into the marshmallow. 

Note:  It's always helpful to have a child's imagination in building alien robots.  The birthday boy's sister has considerable talent, there.
The rocket ship was a little tricky.  Having a section of cake rise from the rest means building a support structure, or your cake will be nothing more than a straight layer.  I melted almond bark in a shallow dish, then dipped the butt end of a tall plastic container into it at an angle, to build a parabola (the container was approximately the same diameter as the loaf pan, so that the cake would rest easily inside it when the bark firmed up). When the belly of the rocket was firm enough to remove from its mold, I attached a pair of slim bamboo skewers to the base (using plenty more almond bark), sticking out from the flat back end.  These would be used to anchor the rocket to the rocky planet's surface.

Ah, yes, the rocky surface.  That would be (a) the coating of whipped frosting, followed by (b) a mass of Cracker Jack® popcorn (see pic below).  That's just the front end of the cake.  The back end is also frosted, but is piled with marshmallows (the larger ones were cut in half and stuck on, cut side into the frosting), to represent the cloud of smoke/steam of the rocket's exhaust from takeoff.


But, back to the rocket.  Once the almond bark was fully hardened for the base, and I was confident the skewers would hold the weight, I added wings: more almond bark, poured into a small square mold (actually, the indentation in the top of a plastic container's lid), then cut diagonally with a hot knife.  I attached them with more melted almond bark, placing the structure in the freezer to set up more quickly and firmly.

The round-bottomed loaf was long enough to make two rockets (just in case I was clumsy), so I cut it in half and trimmed away one to make a point, setting it in the almond bark undercarriage and coating it with frosting to make it appear one solid piece of food.  I finished it by adding silver jimmies along "seams", blue decorator sugar for the windshield, and large marshmallows for the jet engines on the back (each having been moistened at the end and lightly coated with red decorator sugar to indicate the engines were hot.  I inserted the skewers at an oblique angle, through the center of the base, then frosted the rest of the cake, then piled on the rocks, smoke, and aliens.

The candles I arranged as though the ones directly behind the jet engines had been blown over.  The advantage, here, is that they're all on the same side of the rocket, so a little boy doesn't have to dance around the cake in order to blow them all out.

Before anybody cut the cake, I helped pull the rocket off the top, and set it aside as the special piece exclusively for the birthday boy.  One of the aliens managed to stay clinging to it, so it will live to see another day.

I didn't need the second half of the loaf in order to make a rocket, so I used the remaining frosting and some jimmies to make a little side cake, just for the heck of it.
I had, actually, planned to tell him that the dog had eaten the big cake, and this was all I had left for him, but he saw the big cake box before I could hide it all away, so... gosh darn it, the joke was spoiled.  Still, he and his friends seemed to enjoy the out-of-this-world cake, piled high with soft ice cream.  I was glad to see he was not disappointed with his cake, this year.

And, since the party was a few days before his actual birthday, he gets his own birthday cake twice in one week.    We all should be so lucky!

I don't know what I'll do next year, though.