Raiding the larder of ideas.

What one family eats, plans to eat, dreams of eating. Plus, other food and kitchen-related stuff from the home of steak-and-potatoes, pie and fresh green beans from the garden.

Wednesday, December 25, 2013

Bunny Cookies

Every one in a while, I end up making food for somebody non-human, especially at Christmas time. As I've already mentioned, I made dog cookies for Pop's best friend, Clyde, as well as more bikkies for Bat's best friend's best friends…

This year, I also made bunny cookies…that is to say, treats for the bunnies in the house of my young friend Asteroidae and her family. It took a little prying to be sure what was permitted in their diet, but eventually I had a batch of decadence for lagomorphs.

Oddly enough, when it's baking, it smells good enough for people to eat…I may have to try it sometime as a basis for an energy bar, or something like it. 

Nevertheless, for the bunnies…

It began with oat flour. It ended with bliss. 

Bunny Cookies

Ingredients:

1 1/2 cups oat flour (you can make your own by blending the dickens out of a couple of cups of regular – not instant – oatmeal)
1 cup fresh spinach 
1 medium carrot, finely grated
1 small apple, chopped into small pieces
1 medium banana, smooshed*

Directions:

Preheat oven to 300º F.

If you have a food processor†, combine everything but the oat flour and puree it. Add in the flour, mix well. Spread out on an oiled parchment on a cookie sheet, to about 1/4 inch (1/2 cm) thick or slightly thinner. Bake about 45 minutes, or until golden-browned on top and crusty. 

Remove from oven. Cool a few minutes, then cut into centimeter-square pieces or smaller (it will still be sticky in the middle, so you may need to use a wetted knife to cut). Spread the pieces out on the cookie sheet, place back in oven, and bake another 20 minutes, or until they are completely crusty and beginning to darken.

Remove from oven, allow to cool completely. Store in solid container, in refrigerator or cool dark place.


* I realize this is not actually a technical term used in polite cooking society, but, seriously, go ahead and smoosh your banana in its skin & then just cut or tear off the end & squeeze it out like toothpaste from a tube. Or, you can peel the banana first and then smoosh it in the dish.

†Without a food processor, I recommend using a hand-blender to puree the fruits and vegetables. Barring that, you will want to add water to the mix in a regular blender, then strain it back out using a sieve or colander lined with a coffee filter, until most of the water is removed and the mixture is thick and pasty. Once that is done, mix in the flour by hand. Or with a wooden spoon or spatula, if you prefer. It's kind of a sticky dough, so I used a silicone spatula.  

Dairy-free whipped filling: go crazy with a can of coconut milk

I've seen a lot of posts on the internet showing how to make a substitute for whipped cream using coconut cream - that is, the thick gloop which likes to rise to the top of a can of coconut milk. Several have even been so kind as to give recommendations for brands worth buying for it - top of their list for greatest cream-to-water ratio: Trader Joe's. I'd like to add Golden Star to that preferred list. I opened up two still, well-chilled cans to find less than an inch of liquid at the bottom of each can. All the rest was rich, thick, chilled-buttery solids. Of this I approve. Most others are just about half cream, or even less. That's fine for some things like curries and soups, but not when you want to get whippy with it.

And I do like getting whippy with it.

For just regular, immediate serving, you can use the coconut cream plain, with just a little vanilla and a hint of your preferred sweetener (I used some agave syrup, most recently). In essence, all you want to to is give it a lift, so you need no more than about a half-teaspoon to a teaspoon of sweetener and a half-teaspoon of vanilla per cup of coconut cream (unless you're a sugar addict, in which case, dump in as much sweetness as you like. It's all a matter of taste).

But if you let it stand – in or out of the refrigerator – for more than a couple of hours, it begins to liquefy – or, at the very least, go too soft – once more. I needed it to hold its shape overnight, in the middle of a buche de noël, so it took some figuring. My solution: gelatin. Unflavored gelatin. One teaspoon of dry gelatin, added to a quarter cup of the coconut water I separated from the coconut cream… It went like this:

Take one can of good, high-quality coconut milk, allow to stand without shaking for at least a couple of days, then refrigerate overnight.

Open the can carefully (again, don't shake it), and very carefully scoop out the great dense globs of the cream on the top of the can.

Pour 1/4 cup of the remaining liquid into a small dish to set into a pan of cool water, or the top of a small double-boiler under which the heat is off.  Sprinkle 1 teaspoon of unflavored gelatin onto the top of the liquid and allow to stand about 3 to 5 minutes. Turn on the heat and add the coconut cream. Allow to melt and bring to simmer, but be careful not to boil.

Remove from heat, refrigerate until completely chilled (at least 2 hours).

Put in bowl for a stand mixer, whip up until light and fluffy. Add sweetener and any flavorings you like, whip a little more. Overbeating this does not do the same damage that overbeating dairy cream does (unless you don't think of having butter instead of whipped cream as damage). Chill the heck out of it, then serve or add to recipe.

Friday, December 20, 2013

Pumpkin Cookies for Dogs


When the holidays roll around, there's occasionally a little fresh pumpkin left in our house after making pies. While many people have no problem with either throwing the half-cup or so into the trash, or burying it deep in the frozen wasteland that is the deepfreeze, I rather enjoy producing more gifts for Christmas. Even for the pets.

Not long ago, I discovered that said squash was good for dog digestion, and – more to the point – our big fella Clyde likes it almost as much as he likes sweet potato. And he LOVES sweet potatoes. In fact, I've occasionally just  baked a couple of large sweet taters, sliced them up, and dehydrated them to give as substitutes for biscuits. Indeed, one can even use leftover baked sweet taters instead of pumpkin, in this recipe.  Or, if you feel like splurging (or taking a shortcut), you can buy canned pumpkin or  yams. Most dogs won't know the difference.

And, you can use other flour for this, but the brown rice flour is the most easily digested, as well as being least likely to trigger an allergy in your dog – plus, it makes the best crunch. Clyde really likes the crunch. Especially when there's squash involved.

The original source I had for this recipe (long since lost) suggested a teaspoon of dried parsley, but I usually have fresh on hand around holiday meals, and recipes need more of the fresh for the fullest effect. Either way, it's especially nice for the rest of the family if you add some in to the recipe, because it helps sweeten doggy breath…or at least cut the funk when he pants in your general direction.

Any way you look at it, though, if you throw together this recipe, you'll have a happy goggie in short order.


Pumpkin-Laden Dog Biscuits

Ingredients:
2 eggs
1/2 cup pumpkin puree 
2 Tablespoons powdered milk (dry)
1/4 teaspoon sea salt or kosher salt
2 1/2 cups brown rice flour
1/2 cup finely chopped fresh parsley (optional)

Directions:

Preheat oven to 350º F.

In a large bowl, whisk together pumpkin and eggs until completely combined smooth. Stir in powdered milk, salt and parsley (if using). Gradually stir in rice flour to form a stiff, dry dough. Turn out onto a lightly-floured surface (use rice flour, please!) and knead lightly until fully combined. 

Press dough to about 1 centimeter thick (somewhere between 1/4 and 1/2 inch), and cut into biscuits (if you have a shape you want, go ahead and use it, but I prefer the simple approach: grab a big knife and cut a grid of rectangles or diamonds). 

Place on ungreased cookie sheet, and, with the tines of a fork dipped in rice flour, press pattern most of the way through each biscuit. 

Bake 20 minutes, remove from oven carefully turn over, return to oven to bake another 20 minutes. Remove from oven. Cool on rack completely before storing or giving to the dog.


Clyde, want a cookie? Do I even need to ask?

Saturday, December 14, 2013

Oven-crisped Caramel Puffcorn


We live next to an army. Or, maybe it's just a platoon. I'm not good with numbers. All I know is that there's a mess o' young'uns coming and going, and the little hooligans are always sneaking around trying their little stunts. For example, last night, in the midst of the snowstorm, they came over and swept our stairs and shoveled our sidewalk! The NERVE! Sometimes, when they get bored in the summer, they weed the garden for Pop. And they're polite and courteous to everybody. 

It's just so wrong

And, because of this, it's hard to get even with them, especially when you strongly suspect that their orthodontist scowls at half the things I like to offer…like the Bat's homemade Cracker Jack (I'll have to have her post that recipe, some time soon). Not only is it sweet and decadent, it's also popcorn, so the hulls get stuck in inconvenient places and manners, and then you have to hear about the picking and flossing…ick.

So my friend Fleet introduced me to this concept a year ago: you can have caramel corn without getting hulls stuck in your braces (or, for us older folks, between our teeth or – heaven forfend – between denture and gum). All it takes is a bag of those extruded corn puffs, the kind which are essentially Chee-Tos without the cheese, and then your favorite caramel recipe.  This is a mixture of several different recipes, but I've made it repeatedly, and it's always decadent, no matter how many times I toss it together. It's possible to make it with half the butter, but why would anybody want to do that? 

It will be just right for spoiling the heck out of those meddling kids.


Caramel Puffcorn

Ingredients:

1 (8 ounce) bag hull-free corn puffs
1 cup butter (no substitutions)
1 cup dark brown sugar
1/2 cup light corn syrup
1 Tablespoon baking soda
Optional: 1/2 cup peanuts, pecans, or cashews

Directions:

Preheat oven to 250ºF.

Pour the contents of the corn puffs bag into a well-buttered large roasting pan (or a gi-normous steel bowl like the Bat has).

In a 2 quart saucepan on high heat, mix butter, sugar and syrup, melt and bring to a boil. Allow to boil 2 minutes. Remove from heat, add baking soda. Mixture may puff up a bit, and will become frothy and foamy.


When thoroughly mixed, pour over corn puffs and stir gently with a heat-resistant silicone spatula until caramel is evenly distributed over all puffs.

Place in 250º F oven. Bake 45 minutes, remembering to STIR EVERY 15 MINUTES until done.

Spread out on two large buttered jelly roll pans (cookie sheets with sides) and allow to cool enough to handle. As they cool, begin to separate the chunks back into individual puffs. If you don't do this while it's still a little warm, you will have big candy bricks, instead of bite-sized morsels of buttery sweetness.

When it is cooled, put into sandwich-sized bags and hand it out, to vanish instantly into the maws of young ruffians.

Or, if you're feeling contrary, hide it away and nibble on it yourself. It can last a week or two if stored in airtight containers. Out of sight. Away from temptation.

Clyde's Cookies, or Barkin' Bars


Some years back, we inherited a dog – a slightly-oversized Labrador Retriever named Clyde. He's a hundred-pound doofus pudding, who views the Bat and me as joint-alphas, and dotes on my Pop. The trouble is, Pop dotes on him, and keeps giving the dog all manner of scraps…needless to say, Clyde has put on a few pounds, over the years, and those few pounds are not the sorts he can afford to have, as he has a genetic defect making his foreleg vulnerable to dysplasia and arthritis. We try to keep the pressure off that joint, to the best of our abilities, and when we can't, we make sure he's as comfy as an old dog can get without being too doped up.

Anyway, at Christmas, we like to spoil both the fellers in our house, so the Bat and I do a little baking…(actually, these days, the Bat spends more time working on her cross-stitch projects, while I mess up her kitchen, but we eventually end up with a fair trade, somehow). Last weekend, I made cookies for Pop, this weekend, I made goggie cookies for…well, a certain spoiled baby.

Not only are they munchies to please the beast, but this recipe also does a little tiny bit of breath-freshening, so it makes us all a little happier.


Clyde's cookies, or Barkin' Bars

Ingredients:
3/4 cup boiling water
2 cubes chicken or beef bouillon or 2 1/2 teaspoons bouillon powder
3 cups whole wheat flour
3/4 cup powdered milk (dry)
1 cup finely chopped fresh parsley
2 Tablespoons brown sugar
1 egg, lightly beaten

Directions:
Dissolve bouillon in boiling water. Allow to cool.

Preheat oven to 300º F.


Mix all ingredients in a medium or large bowl, then knead the dough together on a lightly-floured surface.

Pat or roll dough out to approximately 1/4 inch thick. Use a long knife or dough-cutter to slice into 3/4 x 2 inch strips, or cut with your favorite bone-shaped or cat-shaped cookie cutter. Place on lightly greased cookie sheet.

With a fork dusted with flour at the tips of the tines, pierce the center of each cookie all the way through (this will help them to be crunchier at the center, too).

Bake at 300º F for 30 minutes, until lightly browned.

Allow to cool, store away until somebody has been very good (with Clyde, it won't be long…with Pop, a little longer). 

Serve dry and crunchy. Clyde especially likes them when they're a little stale.


Monday, December 09, 2013

Pecan Shortbread Cookies (Pecan Sandies), or, How To Reward a Physicist for Retrieving a Wallet from Another Dimension

Yummmm!

I lost my wallet the other day. 

Well, I misplaced it. 

I spent the better part of an hour retracing my few steps, and had no success. It didn't help that I'd just finished a lovely frat-house quality cocktail of vodka and the equivalent of Kool-Aid on an empty stomach moments before I realized my wallet was not in the pocket where it belongs. 

In other words, I was distressed and befuddled, and had no luck finding my plastic, my losing lottery tickets, and my aged ticket to my alma mater's stage production of The Trojans. I wasn't all that worried about those contents, but, dang it, I'd just bought the wallet a few months ago, after spending a year looking for the right one at the right price to suit my needs, and I was going to miss it. 

Besides, it had pics of my sister's kids, at their most adorable, in it.

So I had resigned myself to living with my losses, climbed morosely into my room, gotten into my pajamas, and turned on the tv to watch whatever show had the biggest pyrotechnic display, when Pop came to the door and asked if there might be a reward for the person who finds the wallet. 

It had been out in plain sight, in the room of rest. It was a clear case of hiding in plain sight. On the other side of a dimensional rift.

It took a nuclear physicist to find it. 

This is his payment:
Pop got 30 of these. Mom got two. Seems fair. In Pop's world.

Pecan Shortbread Cookies

Ingredients:

1 cup (1/2 pound)  butter, at room temperature
1 cup light brown sugar, tightly packed
3 teaspoons pure vanilla extract
1/2 teaspoon salt
2 cups plus 3 Tablespoons all-purpose flour, divided
2 cups pecans, coarsely chopped, plus 1/2 cup finely chopped

Directions:

Preheat oven to 350º F.

In large mixer bowl, at relatively high speed, cream butter and brown sugar until light and fluffy.  Beat in vanilla and salt. At low speed, gradually scoop in 2 cups flour until just mixed. Stir in coarsely chopped pecans.

Onto a parchment-covered cookie sheet, set  two inches (about 5 centimeters ) apart, shape dough into  1 1/2 inch (4 cm) balls and top with a sprinkling of finely-chopped pecans. Lightly butter the bottom of a flat-bottomed cup, then dip into bowl holding remaining 3 Tablespoons flour, use floured cup to lightly press cookie dough balls flat-ish.

Bake at 350º F for 15 minutes, or until golden-brown. Cool on rack.

Makes 32.

Let your father have as many as he wants.


Never Eat a Heath Bar Again

English Toffee

Every Christmas season, the Bat and I feel compelled to make at least one large batch of candies for gifts, because...well, just because. The batch usually involves dark chocolate truffles, fudge, and these toffees. We'd make them at other times of the year, but people would wonder what was wrong, why were we giving out candies, then we'd end up eating them all out of paranoid guilt. And certainly my girth needs no such enhancement. Therefore, this becomes pretty much strictly a holiday treat for us (more is the pity). In fact, 90% of this particular batch in the photos went to a friend's place of business – where one of his customers sampled a piece and said afterward, "I'll never eat a Heath Bar again!"

Hence the title of the blog entry.

The Toffee recipe is originally from the Bat's well-worn copy of The Freezer Cookbook, by Charlotte Erickson, with no real adaptations other than that you can swap out sea salt or fleurs de sal for the pecans...or even in addition to it, if your little heart desires.

Still, if you want to make the stuff any time, all you need is a few basic ingredients, a 2 - quart (or slightly larger) saucepan, a well-BUTTERED jelly roll pan (a cookie sheet with sides), and a reliable candy thermometer. And a stove. Those really do come in handy when you want to cook.

All right, then. I've had my moment of silliness, now it's time for the rich and sweet:


English Toffee (double batch)

Ingredients:
2 cups granulated sugar
2 cups (1 pound) butter
6 Tablespoons water
2 cups semi-sweet chocolate morsels
1 1/2 cups finely chopped pecans

Directions:
In medium or large saucepan, combine butter, sugar, and water. Cook over moderately high heat to the hard - crack stage (300° F. on your candy thermometer).

Bring to boil

Watch closely, stirring occasionally, with greater frequency toward the end of cooking time, to prevent burning.
Caramel stage


When the liquid reaches 300°F.,  immediately remove from heat and pour into generously - buttered jelly roll pan. Immediately sprinkle chocolate morsels over the top of the hot mixture and spread as soon as the chocolate has melted.
In pan with chocolate


 Sprinkle with nuts.


Chocolate, pecans,  and SCOOOORE!

With a buttered blade, you should score the candy into 1-  or 1 1/2 - inch pieces. Let cool completely. Break apart and share. Or don't share, if you're not afraid of a little gluttony.

Thursday, November 28, 2013

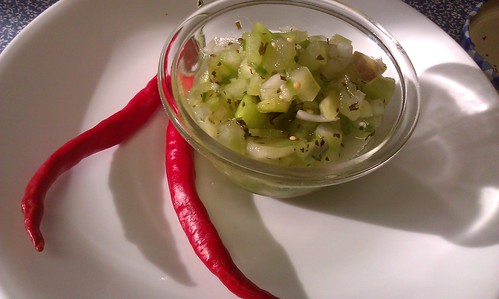
Fresh Tomatillo Relish (pseudo-salsa-verde)

IMAG1567 by leucanthemum b
Tangy! Zippy! (It even works if you use dried cilantro, as I did here!)
Some days, I get these cravings…

Usually, the pangs are for ordinary foods which have suddenly been added to my proscribed list, like yeasty honey-wheat bread fresh from the oven and slathered with butter. I can have the butter (in small amounts). I miss the wheat breads. Especially around the holidays, since fresh bread was one of those things that Grandma Helen excelled at, for the festive tables, and we spent many of those holidays, in my yoot, at her table.

But I digress. This does not cry out for yeast breads.

Some foods, she would never have served, simply because she was a nice German-American wife of a Midwestern farmer, and a product of her time. She never heard of salsa, never heard of tomatillos, or cilantro, or jalapeño peppers, or… quite a bit of the stuff we take for granted when we walk into the produce section of a supermarket today. In fact, I've found quite a few people in my neighborhood who still know nothing about these things. But that's probably because I live out here in the sticks, and people here tend to pay little attention to the latest trends from the coasts.

So, I get to treat the people who sit at the Bat's table with the products of my playtime in the kitchen, the result of my spending entirely too much time surfing food porn on the internet.

This particular dish, my relish, occurred because my pop kindly potted a couple of tomatillo plants for me, this year, and I was looking to use the fruits in something besides my favorite chili and your basic salsa verde recipes… I suppose one might eat this on tortilla chips, or on a chicken taco, or some such. But it's just fine as a light side dish, as a sort of salad.

Heck, it's a relish. Do with it what you please.

Fresh Tomatillo Relish

Ingredients:

about 3 lbs fresh tomatillos, husks removed and thoroughly washed
1 medium sweet onion, finely chopped
1/3 cup fresh cilantro, minced
zest of 1 small lime
juice of 2 small limes
1/4 cup rice vinegar
dash salt
2 small jalapenos, finely minced

Directions:

Rinse the tomatillos in cold water, peel, and keep rinsing them until they are no longer sticky. Cut away the bit where the stem was attached (pretty much the same way you'd rid most tomatoes of their stem cores). Coarsely chop them (into cubes of less than 1 centimeter) and put them in a medium-sized bowl. Add all the other ingredients, and mix well.

Refrigerate at least 1 day before serving, to allow the flavors to blend.

Can be kept in fridge for up to two weeks.

Wednesday, November 27, 2013

Cranberry Rum Pecan Pie

Fresh from the oven. A few of those cranberries pushed some of those pecan halves around – the big bullies!

When it comes to desserts, I am my father's daughter. I love pie. I love pie so much that, if somebody were to tell me I had a choice between a long life married to Dolph Lundgren but never to have pie again, and a big slice of pie right before a swift death, I'd be hemming and hawing, and still probably choose the pie. And I'd give my eyeteeth even for a simple lunch date with Dolph. I think he's that cool.

But enough of guilty pleasures and schoolgirl crushes.

The problem with pie is, I can't eat wheat any more. And most people make their pie crusts from basic all-purpose wheat flour. I'm also allergic to almonds, and most people who build gluten-free recipes love to make pie crusts with almond flour. This, of course, means I can't eat just any pie. Therefore, I search high and low for crusts and compatibilities.

And, of course, I seek the best way to safely misbehave.

This means, while I get a healthy overdose of sugars, I can at least brag that there's extra nutrition in whatever I prepare. In this case, it's a bit of additional protein. Yes, it's a pecan pie, but it's a pecan-pecan pie. The crust is purely pecans and butter.

Seriously. Pecans. Butter. Crust.

As for the pie filling…well, let's get down to business.


Cranberry Rum Pecan Pie

Crust ingredients:* 

2 cups chopped pecans
4 Tablespoons melted butter


Filling ingredients:

3 large eggs
1 cup dark Karo syrup
2/3 cup granulated sugar
1/4 cup melted butter
1/2 teaspoon pure vanilla extract
2 Tablespoons dark rum
2 cups fresh cranberries
1 1/4 cup chopped pecans, plus some complete halves for decoration (optional)

Directions:


For the crust:

Coarsely chop pecans. Spread out on jelly roll pan (cookie sheet with sides), and roast in oven at 350º until slightly darkened (about 8 minutes). Allow to cool.

Put into blender or food processor and chop until only slightly coarser than cornmeal. Place pecans in freezer at least a half hour, to deeply chill.

Preheat oven to 450º Fahrenheit. 

Remove from freezer, add 4 Tbs. melted butter. Mix well. Press evenly into 9-inch pie pan† (you may want to lay a sheet of plastic wrap over the mixture while you work, to keep things tidy. Personally, I like the opportunity to lick the buttered pecan crumbs off my fingers when I'm done). Refrigerate until filling is ready.

For the filling:

In a medium or large bowl, stir the 3 eggs, 1 cup syrup, 2/3 cup sugar, 1/4 cup melted butter, 1/2 teaspoon vanilla extract, and 2 Tablespoons dark rum. When the ingredients are fully mixed, add the chopped pecans and the fresh cranberries. Pour into crust.  If you wish to get fancy, you may choose to arrange a few pecan halves on the top of the filling, for decoration (and added nutrition, if you want a really good excuse to do this).

Place on middle rack of oven. Bake at 450º F for 10 minutes (if you're working with a convection oven, 425º). Reduce oven temperature to 350º, continue to bake at least 35-40 minutes, or, until the middle begins to set up. Remove from oven, cool on rack.

When fully cooled, cover and refrigerate at least 3 hours before serving.

Serve with ice cream or whipped cream (I like a rum whipped cream, myself!)


*If you think this doesn't have enough sugar in it, you can always add a little sweetener to the crust, as well. My original source recommended 2 Tablespoons non-sugar syrup, and I've used brown sugar plus cinnamon before. But with this, I don't think it needs any more sweetness, or people's teeth will start to hurt.

†I prefer to use a glass pie pan for this, because I can hold the dish up to the light after I've spread the crust and pressed it in. That way, I can see if I've missed any spots or made an area too thin. Also, the pecan crust seems to crisp a little better in either a glass pan. I think it may be that it continues to cook a little after it comes out of the oven, and the butter finishes it nicely. But don't quote me on that. I'm not a scientist. And I am a little bit nuts.

Saturday, November 02, 2013

Oven-fried Chicken and Potatoes O'Becky

Friday nights we have a sort of a family get-together. That is to say, Bat's BFF and her husband come over to decompress, and thereby give the old fogeys in our house a chance to catch up on the latest gossip from my alma mater. This gives me a chance to play a little bit in the kitchen, since, as long as it's only for three of us, sometimes the recipes mean FAR too many leftovers. Having a couple of extra people pitching in on the eating process means less goes into the freezer. That's not always a good thing, but then, the deep-freeze is often over-filled with goodies harvested from Pop's garden, so there is  a built-in problem when it comes to extra servings.

I really didn't have to worry about extra, though, this week. Pop, who watches his food intake, and who doesn't care for chicken since the days of the Great Depression (when chicken and Spam were the meats on the table almost all the time), ate two servings of the bird, plus went back for seconds on the 'taters. 

In other words, the whole dinner was a success, and I didn't have to worry about freezer space.

And the truth is, it was fairly simple. Much of the preparation can be done hours ahead of time (even the night before), and the cooking is low-fuss. The real trick is to brine the chicken at least three hours before you start to cook. And to use buttermilk (no cheats or substitutions). That's what (a) makes it tender and (b) gives it a little "tang". I also made mine gluten-free, by using garbanzo flour to coat the pieces, which gave it an added distinction in its flavor and texture, but you can go ahead and use an all-purpose flour, if you like.

There is something else to consider: keep the portions in a manageable size. I bought a six-pound package of chicken breasts on sale at the local supermarket, and it contained five pieces of bird. I don't know about you, but a single piece of meat that large is more than I can handle at one sitting, these days. Also, when they're that big, it takes forever to cook them. So, for this recipe, I stripped the meat from skin and bone, and then cut the pieces into sections approximately 1/3 pound in weight (slightly larger than the palm of my hand, not counting the fingers), leaving the tenders whole. If you buy leg portions, you'll want to separate the thigh from the drumstick. Of course, you can buy the pieces already boneless and skinless, if you feel like saving time, but I like the part where I got all six pounds for six dollars, when the prepared stuff was $3.49 per lb.

Also, if you want to fix these two dishes in one meal, it's easy enough to peel & chop your potatoes and chop your onion & pepper while the chicken is marinating, and let them stand in their own separate dishes, submerged in cold water, until it's time to cook them (about the time you put the chicken in the oven). If you do this, drain well before cooking.

At any rate, dinner is served. 


We like a little color…

Oven-fried Chicken

Ingredients:

3 lbs skinless, boneless chicken pieces
1 cup buttermilk
2 Tablespoons honey
1 teaspoon Kosher salt

2 eggs 
3 cups garbanzo flour (divided)*
1 Tablespoon coarse-ground pepper
1 Tablespoon Old Bay seasoning
1 teaspoon salt
1/2 cup cooking oil (I prefer canola, because it has no flavor of its own)
1/4 cup (1/2 stick) butter, cut into 1/2 tablespoon slices

Directions:

In a gallon zipper bag, mix buttermilk, honey, Kosher salt and chicken. Shake well, allow to sit in refrigerator at least 3 hours.

Preheat oven to 400º F. 

Fill a gallon zipper bag with 2 cups garbanzo flour, pepper, Old Bay seasoning, and salt. 

In a shallow bowl or smaller bag, put remaining 1 cup of garbanzo flour

In another wide, shallow bowl, lightly beat eggs. 

Remove marinating chicken from refrigerator and pour away the buttermilk mixture. Pat dry the pieces of chicken. 

Dredge each piece through the plain flour, then through the egg, finally dropping it into the bag of seasoned flour. Shake thoroughly as each piece is put into the bag, so as to cover the chicken completely.

In a 9x14x2" roasting pan, pour oil, place in oven to heat up. When oil starts to shimmer, remove from oven, add butter. 

Carefully place the pieces of floured chicken in the pan, fitting so they do not overlap. 

Place in oven, bake about 10-15 minutes, remove from oven, turn pieces over, return them to the oven for another 5-10 minutes, until they are lightly-browned. 

Allow to stand and cool about 5 minutes before serving (they are also tasty served chilled).


*you can substitute your favorite flour, or whatever you have on hand.


Potatoes O'Becky

Ingredients:

3-4 medium potatoes, peeled and cut into 1/2" cubes (about 4 cups)
2 cups sweet corn, fresh or thawed from frozen
1 medium sweet red pepper, diced
1 medium sweet onion, diced (Vidalia or Texas Sweets are best)
1 Tablespoon coarse-ground black pepper
Salt to taste
1 tablespoon butter
1/3 cup Extra Virgin Olive Oil (approximately)

Directions:

In a large frying pan or wok, heat olive oil with onions at medium-high temp until the onions turn transparent. Using a slotted spoon or a strainer, remove the onions from the oil, replace them with the potato chunks, salt and pepper. Cook until they begin to turn brown and slightly crisp, flipping with spatula occasionally.

Meanwhile, in another frying pan at medium heat, melt butter, sauté the corn until some kernels begin to turn golden-brown. Add peppers and stir until just mixed. Stir this and the onions into the potatoes. Let cook on medium heat for a few minutes, for the flavors to blend. Serve hot.†


†Leftovers of this can be reheated in a frying pan & mixed into eggs, for a tasty breakfast. It's even more awesome when you add freshly-cooked, crumbled bacon to the eggs…